Troubleshooting Windows Server 2012 R2 Crashes. Analysis of Dump Files & Options. Forcing System Server Crash (Physical/Virtual)
 There are umpteen reasons why your Windows Server 2012 R2 decides to present you with a Blue Screen of Death (BSOD) or the stop screen. As virtual machines become more prominent in enterprise environments, the same problems that plagued physical servers earlier are now increasingly being observed for crashes of virtual machines as well.
Microsoft designs and configures Windows systems to capture information about the state of the operating systems if a total system failure occurs, unlike a failure of an individual application. You can see and analyze the captured information in the dump files, the settings of which you can configure using the System Tool in the Control Panel. By default, BSOD provides minimal information about the possible cause of the system crash and this may suffice in most circumstances to help in identifying the cause of the crash.
However, some crashes may require a deeper level of information than what the stop screen provides – for example, when your server simply hangs and becomes unresponsive. In that case, you may still be able to see the desktop, but moving the mouse or pressing keys on the keyboard produces no response. To resolve the issue, you need a memory dump. This is basically a binary file that contains a portion of the server's memory just before it crashed. Windows Server 2012 R2 provides five options for configuring memory dumps.
SafeGuard your Hyper-V & VMware servers from unrecoverable crashes with a reliable FREE Backup – Altaro’s VM Backup. Download Now!
Different Types Of Memory Dump Files
1. Automatic Memory Dump
Automatic memory dump is the default memory dump that Windows Server 2012 R2 starts off with. This is really not a new memory dump type, but is a Kernel memory dump that allows the SMSS process to reduce the page file to be smaller than the size of existing RAM. Therefore, this System Managed page file now reduces the size of page file on disk.
2. Complete Memory Dump
A complete memory dump is a record of the complete contents of the physical memory or RAM in the computer at the time of crash. Therefore, this needs a page file that is at least as large as the size of the RAM present plus 1MB. The complete memory dump will usually contain data from the processes that were running when the dump was collected. A subsequent crash will overwrite the previous contents of the dump.
3. Kernel Memory Dump
The kernel memory dump records only the read/write pages associated with the kernel-mode in physical memory at the time of crash. The non-paged memory saved in the kernel memory dump contains a list of running processes, state of the current thread and the list of loaded drivers. The amount of kernel-mode memory allocated by Windows and the drivers present on the system define the size of the kernel memory dump.
4. Small Memory Dump
A small memory dump or a MiniDump is a record of the stop code, parameters, list of loaded device drivers, information about the current process and thread, and includes the kernel stack for the thread that caused the crash.
5. No Memory Dump
Sometimes you may not want a memory dump when the server crashes.
Configuring Dump File Settings
Windows Server 2012 R2 allows you to configure an Automatic memory dump. To start the configuration, you have to log in as a local administrator and click on Control Panel in the Start menu:
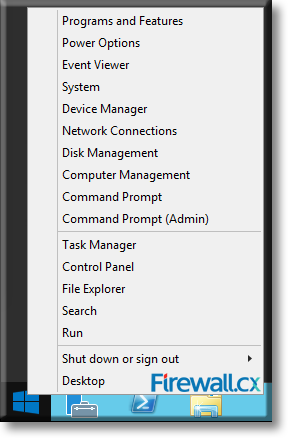
Figure 1. Invoking the Windows Server Control Panel
From the Control Panel, click on System and Security icon. Next, click on System:
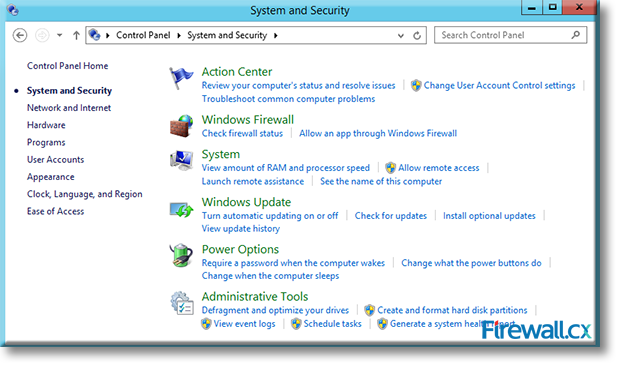
Figure 2. System and Security
In the System Properties that opens up, click on the Advanced tab as shown below:
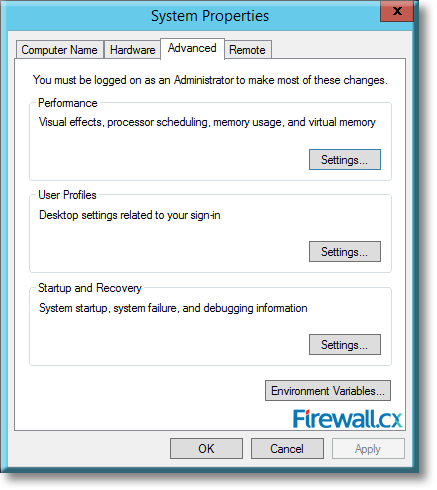
Figure 3. System Properties – Advanced Tab
In the Advanced System Properties, look for and click on Settings under Startup and Recovery section:
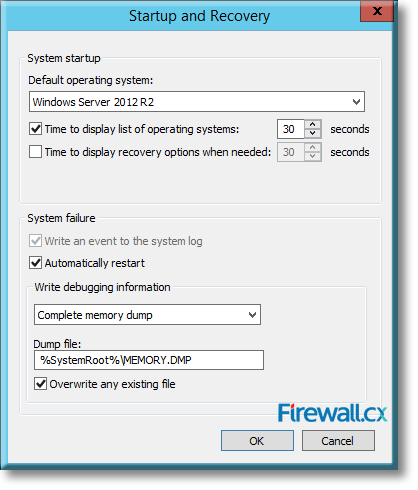
Figure 4. Startup and Recover dialog
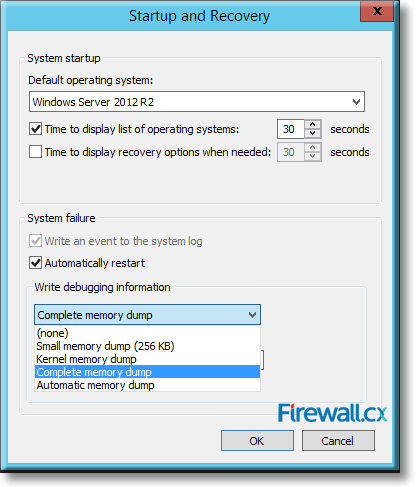
Figure 5. The five types of debugging information (memory dumps) available
Here, you have the choice to let your server Automatically restart on System failure. Under Write Debugging information, you can select between one of the five types of memory dumps to be saved in the event of a server crash.
You can also define the name of the dump file the server should create and specify its location. The default location is in the System Root and the default name of the file is MEMORY.DMP. If you do not want the previous file to be overwritten by the new dump file, remove the tick mark from Overwrite any existing file (visible in figure 4).
When done, you will need to restart the server for the changes to take place.
Manually Generating A Dump File
Although the server will create the dump files when it crashes, you do not have to wait indefinitely for the crash to occur. As described in Microsoft’s support pages Generating a System Dump via Keyboard and Forcing a System Crash via Keyboard, you can induce the server to crash with a select combination of keys. Of the several methods described by Microsoft, we will discuss the method via USB keyboards.
Forcing a System Crash From the Keyboard
Begin with a command prompt with administrative privileges. For this, begin with the Start menu and click on Command Prompt (Admin):
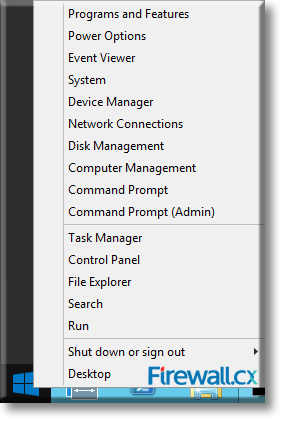
Figure 6. Invoking the Command Prompt with Elevated Privileges
In the command prompt window that opens, type in “regedit” to and hit Enter:
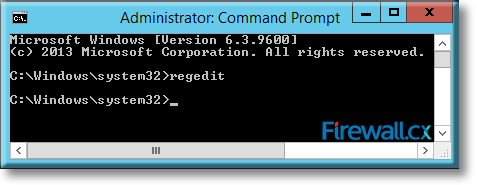
Figure 7. Opening and Editing the Windows Registry
This opens the Registry Editor screen. Now expand all the way to the following section:
HKEY_LOCAL_MACHINE\SYSTEM\CurrrentControlSet\Control\CrashControl
Right-click on CrashControl and create a new DWORD with the name CrashDumpEnabled which will appear in the right hand pane. Next, modify its value by right-clicking on CrashDumpEnabled in the right hand pane and selecting Modify:
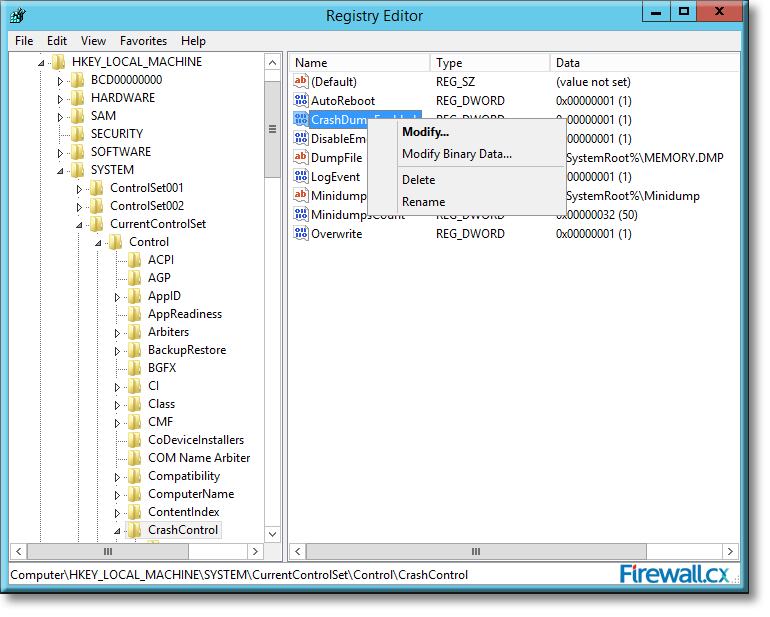
Figure 8. Editing the Registry. Modifying the new registry DWORD CrashDumpEnabled
In the Edit DWORD Value dialog that opens enter Value data as 1 and click on OK:
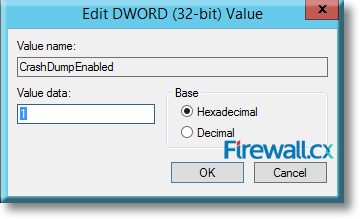
Figure 9. Editing the Value Data of CrashDumpEnabled
HKEY_LOCAL_MACHINE\SYSTEM\CurrrentControlSet\Services\kbdhid\Parameters
Right-click on Parameters and create a new DWORD with the name CrashOnCtrlScroll, which will appear in the right pane:
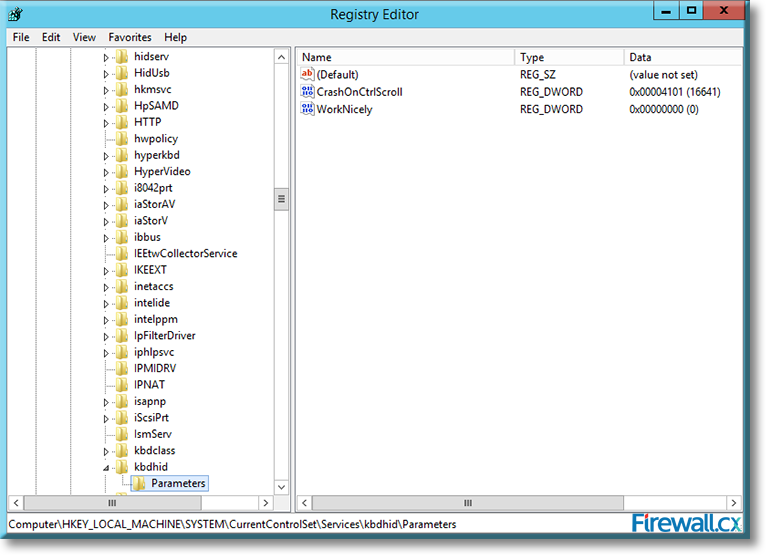
Figure 10. Editing the Registry. Creating the new Registry DWORD CrashOnCtrlScroll
Now, modify the CrashOnCtrlScroll value by right-clicking on CrashOnCtrlScroll in the right pane and selecting Modify:
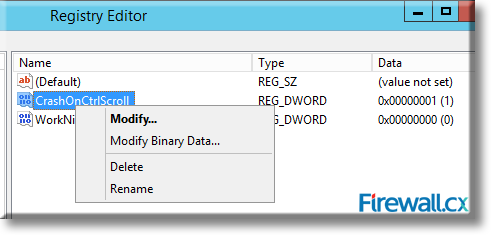
Figure 11. Modifying the Registry DWORD entry CrashOnCtrlScroll
In the Edit DWORD Value dialog that opens, enter Value data as 1 and click on OK:
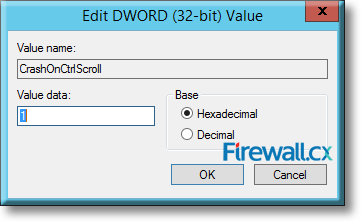
Figure 12. Editing the Value data of CrashOnCtrlScroll
Restart the server for the new values to take effect.
Next, to crash the server, press the combination of keys:
CTRL + SCROLL LOCK + SCROLL LOCK
Note: Press SCROLL LOCK key twice while holding down the CTRL key.
The server will crash and restart and should have created a new dump file.
Note: However, as described in the Microsoft support pages referred above, this method does not always work and for other methods, you can refer to additional Microsoft support pages here.
This article explained why Windows Server dump files are considered important and how we can configure Windows Server 2012 R2 to save crash dump files. We saw the different memory Dumps (Automatic Memory Dump, Complete Memory Dump, Kernel Memory Dump, Small Memory Dump, No Memory Dump) and how to configure the dump’s settings. More articles on Windows Server 2012 can be found in our Windows Server 2012 Section.
Wi-Fi Key Generator
Follow Firewall.cx
Cisco Password Crack
Decrypt Cisco Type-7 Passwords on the fly!


