How to Manually Deploy – Install GFI LanGuard Agent When Access is Denied By Remote Host (Server – Workstation)
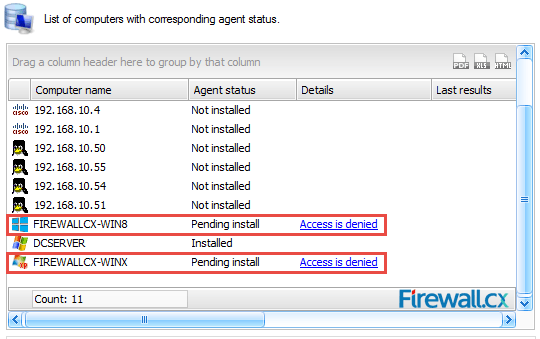
When IT Administrators and Managers are faced with the continuous failure of GFI LanGuard Agent deployment e.g (Access is denied), it is best to switch to manual installation in order to save valuable time and resources. The reason of failure can be due to incorrect credentials, disabled account, firewall settings, disabled remote access on the target computer and many more. Deploying GFI LanGuard Agents is the best way to scan your network for unpatched machines or machines with critical vulnerabilities.

Figure 1. GFI LanGuard Agent deployment failing with Access is denied
Users interested can also check our article Benefits of Deploying GFI LanGuard Agents on Workstations & Servers. Automate Network-wide Agent Scanning and Deployment.
Step 1 – Locate Agent Package On GFI LanGuard Server
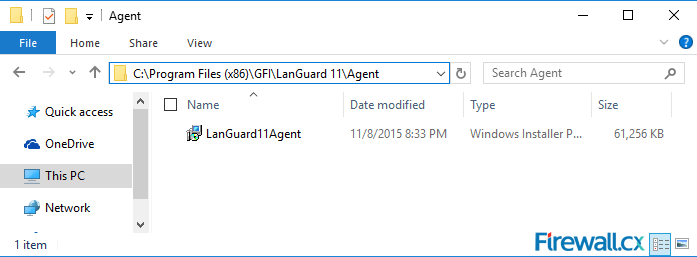
The GFI LanGuard Agent installation file is located in one of the following directories, depending on your operating system:
- For 32bit operating systems: c:\Program Files\GFI\LanGuard 11\Agent\
- For 64bit operating systems: c:\Program Files (x86)\GFI\LanGuard 11\Agent\

Figure 2. The location of GFI LanGuard Agent on our 64bit O/S.
Step 2 – Copy The File To The Target Machine & Install
Once the file is copied to the target machine, execute it using the following single line command prompt:
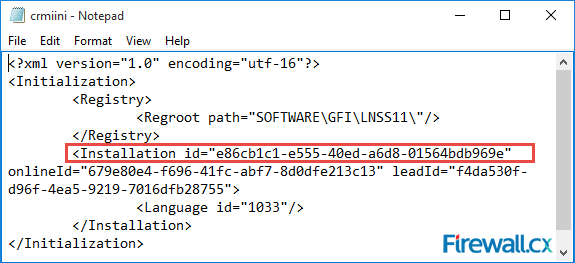
Note: InstallationID is an ID that can be found in the crmiini.xml file located on the GFI LanGuard server directory for 32bit O/S: c:\Program Files\GFI\LanGuard 11 Agent or c:\Program Files (x86)\GFI\LanGuard 11 Agent for 64bit O/S.
Following is a screenshot of the contents of our crmiini.xml file where the installation ID is clearly shown:

Figure 3. Installation ID in crmiini.xml file on our GFI LanGuard Server
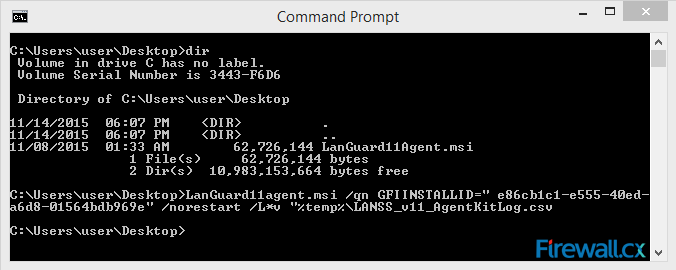
With this information, the final command line (DOS) for the installation of the Agent will be as follows:
LanGuard11agent.msi /qn GFIINSTALLID=" e86cb1c1-e555-40ed-a6d8-01564bdb969e" /norestart /L*v "%temp%\LANSS_v11_AgentKitLog.csv
Note: Make sure the command prompt is run with Administrator Privileges (Run as Administrator), to ensure you do not have any problems with the installation.
Here is a screenshot of the whole command executed:

Figure 4. Successfully Installing GFI LanGuard Agent On Workstations & Servers
Notice that the installation is a ‘silent install’ and will not present any message or prompt the user for a reboot. This makes it ideal for quick deployments where no reboot and minimum user interruption is required.
A restart will be necessary to complete the Agent initialization.
Important Notes
After completing the manual installation of the GFI LanGuard Agent, it is necessary to remote deploy the Agent from the GFI LanGuard console as well, otherwise the GFI LanGuard server will not be aware of the Agent manually installed on the remote host.
Also, it is necessary to deploy at least one Agent remotely via GFI LanGuard server console, before attempting the manual deployment, in order to initially populate the Crmiini.xml file with the installation id parameters.
This article covered the manual deployment of GFI’s LanGuard Agent on Windows-based machines. We took a look at common reasons why remote deployment of the Agent might fail, and covered step-by-step the manual installation process and prerequisites to ensure the Agent is able to connect to the GFI LanGuard server.
Wi-Fi Key Generator
Follow Firewall.cx
Cisco Password Crack
Decrypt Cisco Type-7 Passwords on the fly!


