


DHCP (Dynamic Host Configuration Protocol) is a protocol that allows clients on a network to request network configuration settings from a server running the DHCP server service which, in our case, will be Windows Server 2003. Additionally the protocol allows the clients to self-configure those network configuration settings without the intervention of an administrator. Some of the settings that a DHCP server can provide to its clients include the IP addresses for the DNS servers, the IP addresses for the WINS servers, the IP address for the default gateway (usually a router) and, of course, an IP address for the client itself.
This article will discuss and walk you through the steps of installing and configuring DHCP on a Windows Server 2003 member server, specifically focusing on setting up a scope and its accompanying settings. The same configuration can be applied to a standalone server even though the step-by-step details differ slightly. The upcoming 'Advanced DHCP Server Configuration on Windows 2003' article will discuss other DHCP options and features such as superscopes, multicast scopes, dynamic DNS, DHCP Backup and more.
While our articles make use of specific IP addresses and network settings, you can change these settings as needed to make them compatible with your LAN – This won't require you to make changes to your LAN, but you'll need to have a slightly stronger understanding of DHCP and TCP/IP.
Assigning the Server a Static IP Address
Before we install the DHCP server service on Windows Server 2003, we need to assign the Windows server a static IP address. To do this:
1. Go to Start > Control Panel > Network Connections , right-click Local Area Connection and choose Properties .
2. When the Local Area Connection Properties window comes up, select Internet Protocol (TCP/IP) and click the Properties button.
3. When the Internet Protocol (TCP/IP) window comes up, enter an IP address , subnet mask and default gateway IP address that is compatible with your LAN.
We've configured our settings according to our network, as shown below:
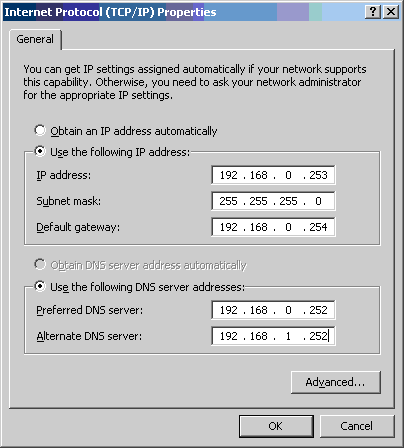
4. Enter 192.168.0.252 for the Preferred DNS server and 192.168.1.252 for the Alternate DNS server. The Preferred and Alternate DNS server IP addresses are optional for the functionality of the DHCP server, but we will populate them since you typically would in a real-world network. Usually these fields are populated with the IP addresses of your Active Directory domain controllers.
5. After filling out those fields, click OK and OK to save and close all windows.
Install DHCP Server Service on Windows Server 2003
Our server now has a static IP address and we are now ready to install the DHCP server service. To do this:
1. Go to Start > Control Panel > Add or Remove Programs .
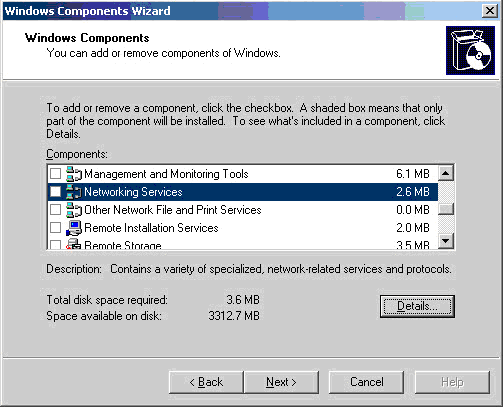
2. When the Add or Remove Programs window launches, click Add/Remove Windows Components in the left pane.
3. When the Windows Components Wizard comes up, scroll down and highlight Networking Services and then click the Details button.
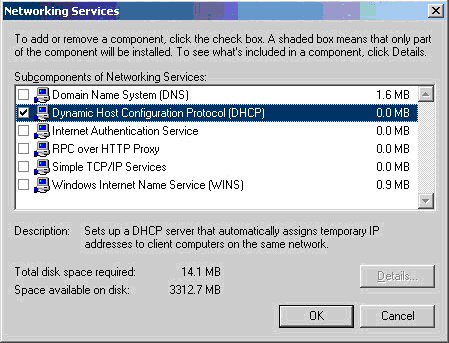
4. When the Networking Services window comes up, place a check mark next to Dynamic Host Configuration Protocol (DHCP) and click OK and OK again.
Note that, during the install, Windows may generate an error claiming that it could not find a file needed for DHCP installation. If this happens, insert your Windows Server 2003 CD into the server's CD-ROM drive and browse to the i386 directory. The wizard should automatically find the file and allow you to select it. After that, the wizard should resume the installation process.
Configure DHCP on Windows Server 2003
DHCP has now been successfully installed and we are ready to configure it. We will create a new scope and configure some of the scope's options. To begin:
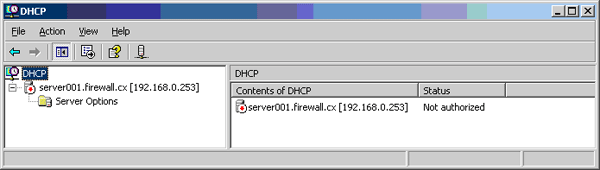
1. Launch the DHCP MMC by going to Start > Administrative Tools > DHCP .
Currently, the DHCP MMC looks empty and the server node in the left pane has a red arrow pointing down. Keep that in mind because it will be significant later on.
2. Right-click the server node in the left pane and choose New Scope . This will launch the New Scope Wizard.
3. On the New Scope Wizard, click Next .
4. Specify a scope name and scope description. For the scope Name , enter “ Building A, Floor 1 .” For the scope Description , enter “ This scope is for Floor 1 of Building A .” Afterwards, click Next .
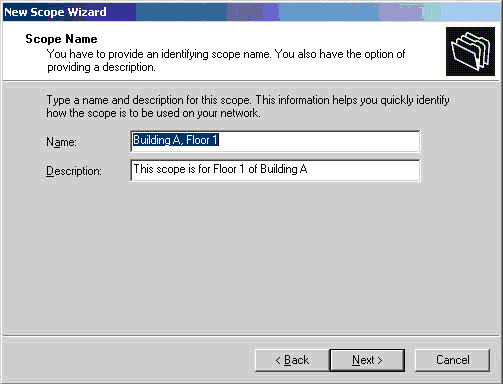
The scope name can be anything, but we certainly want to name it something that describes the scope's purpose. The scope Description is not required. It is there in case we needed to provide a broader description of the scope.
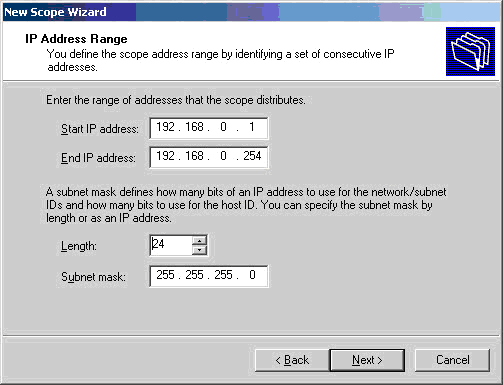
5. Specify an IP address range and subnet mask. For the Start IP address enter 192.168.0.1, for the End IP address enter 192.168.0.254 . Finally, specify a subnet mask of 255.255.255.0 and click Next.
Specifying the IP address range of a scope requires some knowledge of subnetting. Each scope in a DHCP server holds a pool of IP addresses to give out to clients, and the range of IP addresses must be within the allowed range of the subnet (that you specify on the subnet mask field).
For simplicity we entered a classful, class C IP address range from 192.168.0.1 to 192.168.0.254. Notice that the range encompasses the IP address of our server, the DNS servers and the default gateway, meaning that the DHCP server could potentially assign a client an IP address that is already in use! Do not worry -- we will take care of that later.
6. Specify IP addresses to exclude from assignment. For the Start IP address , enter 192.168.0.240 and for the End IP address enter 192.168.0.254 , click Add , and then click Next.
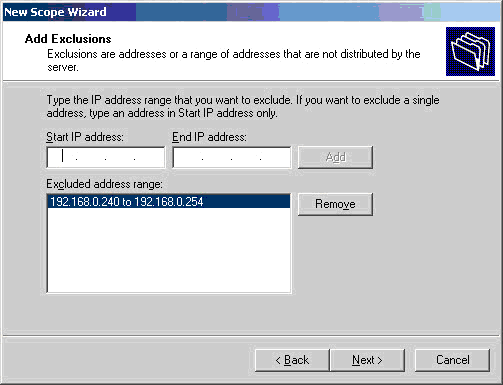
Certain network devices, such as servers, will need statically configured IP addresses. The IP addresses may sometimes be within the range of IP addresses defined for a scope. In those cases, you have to exclude the IP addresses from being assigned out by DHCP.
We have the opportunity here to define those IP addresses that are to be excluded. We specified IP addresses 192.168.0.240 to 192.168.0.254 to ensure we've included our servers plus a few spare IP addresses for future use.
7. Specify the lease duration for the scope. Verify that Days is 8 and click Next.
The lease duration is how long clients should keep their IP addresses before having to renew them.
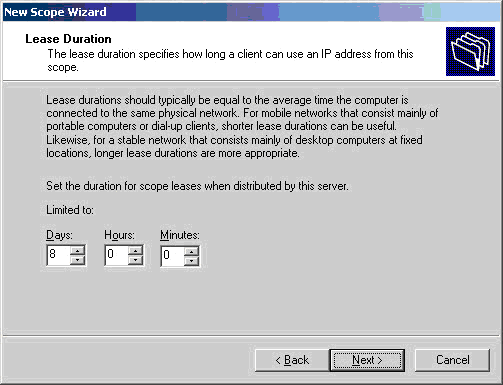
There are a few considerations at this point. If a short lease duration is configured, clients will be renewing their IP addresses more frequently. The result will be additional network traffic and additional strain on the DHCP server. On the other hand if a long lease duration is configured, IP addresses previously obtained by decommissioned clients would remain leased and unavailable to future clients until the leases either expire or are manually deleted.
Additionally if network changes occur, such as the implementation of a new DNS server, those clients would not receive those updates until their leases expire or the computers are restarted.
As Microsoft states, “lease durations should typically be equal to the average time the computer is connected to the same physical network.” You would typically leave the default lease duration in an environment where computers are rarely moved or replaced, such as a wired network. In an environment where computers are often moved and replaced, such as a wireless network, you would want to specify a short duration since a new wireless client could roam within range at any time.
8. Configure DHCP Options. Make sure “ Yes, I want to configure these settings now ” is selected and click Next to begin configuring DHCP options.
DHCP options are additional settings that the DHCP server can provide to clients when it issues them with IP addresses. These are the other settings that help clients communicate on the network. In the New Scope Wizard we can only configure a few options but from the DHCP MMC we have several more options.
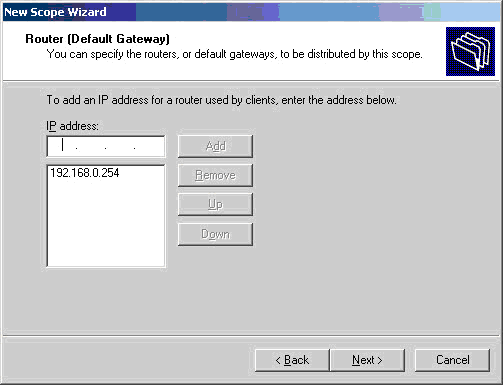
9. Specify the router IP address. Enter 192.168.0.254 as the IP address of the subnet's router, click Add , and then click Next .
The first option we can configure is the IP address for the subnet's router for which this scope is providing IP addresses. Keep in mind that this IP address must be in the same network as the IP addresses in the range that we created earlier.
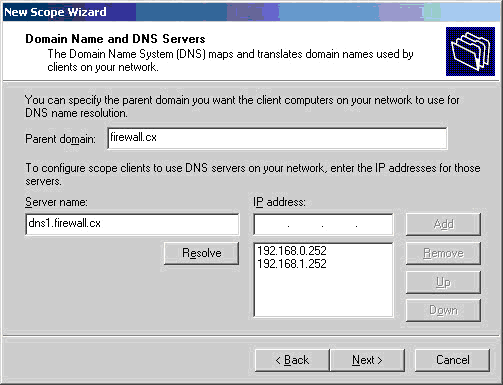
10. Configure domain name and DNS servers. On the next page, enter “firewall.cx" for the domain name. Then enter 192.168.0.252 for the IP address of a DNS server, click Add , enter 192.168.1.252 as the IP address for another DNS server, and click Add again. When finished, click Next.
If you had a DNS infrastructure in place, you could have simply typed in the fully qualified domain name of the DNS server and clicked Resolve .
The DNS servers will be used by clients primarily for name resolution, but also for other purposes that are beyond the scope of this article. The DNS domain name will be used by clients when registering their hostnames to the DNS zones on the DNS servers (covered in the 'Advanced DHCP Server Configuration on Windows 2003' article).
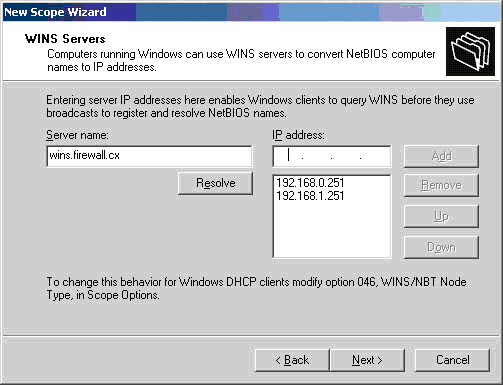
11. Configure WINS servers. On the next screen, enter 192.168.0.251 as the IP address for the first WINS server, click Add , enter 192.168.1.251 as the IP address for the second WINS server, click Add again, and then click Finish .
12. Finally, the wizard asks whether you want to activate the scope. For now, choose “ No, I will activate this scope later ” and click Next and then Finish to conclude the New Scope Wizard and return to the DHCP MMC.
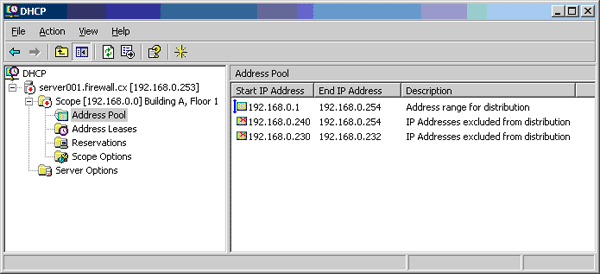
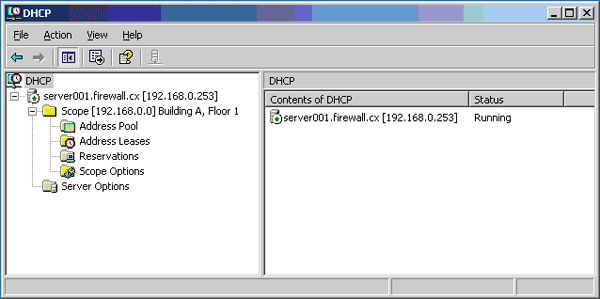
At this point we almost have a functional DHCP server. Let us go ahead and expand the scope node in the left pane of the DHCP MMC to see the new available nodes:
Address Pool – Shows the IP address range the scope offers along with any IP address exclusions.
Address Leases – Shows all the leased IP addresses.
Reservations – Shows the IP addresses that are reserved. Reservations are made by specifying the MAC address that the server would “listen to” when IP address requests are received by the server. Certain network devices, such as networked printers, are best configured with reserved IP addresses rather than static IP addresses.
Scope Options – Shows configured scope options. Some of the visible options now are router, DNS, domain name and WINS options.
Server Options – Shows configured server options. This is similar to scope options except that these options are either inherited by all the scopes or overridden by them (covered in 'Advanced DHCP Server Configuration on Windows 2003' article).
Earlier, we only defined exclusions for our servers, router plus a few more spare IP addresses. In case you need to exclude more IP addresses, you can do it at this point by following these instructions:
13. Select and right-click Address Pool and choose New Exclusion Range.
14. When the Add Exclusion window comes up, enter the required range and then click Add. In our example, we've excluded the addition range 192.168.0.230 - 192.168.0.232.
Notice that the server node and scope node still has a red arrow pointing down. These red arrows pointing down mean that the server and scope are not “turned on”.
The concept of “turning on” the scope is called “activating” and the concept of “turning on” the server for DHCP service is called “authorizing”. Security has some influence in the concept of authorizing a DHCP server and, to authorize a DHCP server, you must be a member of the Enterprise Admins Active Directory group.
15. Right-click the server (server001.firewall.cx) and choose Authorize , then right-click the scope (Building A, Floor 1) and choose Activate . If the red arrows remain, refresh the MMC by going to Action > Refresh .
Congratulations! At this point, you should have a working DHCP server capable of providing IP addresses!
Free eBook - Endpoint Security

Enterprise-Class Cloud & Network Monitoring

Bandwidth Monitor

Wi-Fi Key Generator
Network and Server Monitoring

Follow Firewall.cx
Recommended Downloads
Cisco Password Crack
Decrypt Cisco Type-7 Passwords on the fly!
Automated Patching Solution

Firewall Analyzer
