


The Cisco ATA 186 and 188 analog phone adaptor is very common amongst Cisco CallManager (CUCM) & Cisco CallManager Express (CUCME) installations.
The ATA 186/188 provides two analog phone ports, allowing support for up to two analog phones and supports a number of features allowing an engineer to configure it according to the requirements and environment.
One neat feature is the ability to disable one of the two analog phone ports, something administrators might want to do if the second phone port is not used, providing an additional security measure.
On the other hand, a couple of second-hand ATA’s might fall into your hands and, upon testing, you may find out that only the phone port works – this doesn’t necessarily mean the second phone port is faulty!
When an ATA 186/188 registers on either CallManager or CallManager Express (CME), two MAC addresses appear in the device section.
Let’s take CME for example:
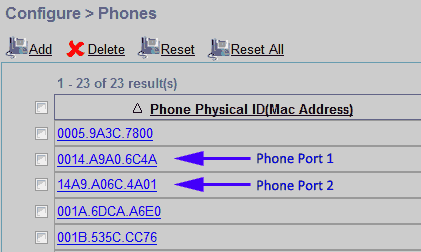
When an ATA 186/188 is registered with CUCM or CUCME, the system will show two new MAC addresses. The first is the actual MAC address of the ATA device. This represents Phone Port No.1.
The second MAC address is similar to the first but with a ‘01’ appended at the end. The whole MAC address is then shifted to the left by two positions, as shown in the above screenshot. This second MAC address represents Phone Port No.2.
When a phone port is disabled, for example port Phone 2, the second MAC address ending in ‘01’ will not register anymore. If removed from the CUCM/CME system, it will not appear again until it is enabled.
How to Enable – Disable Cisco ATA Phone Port No.1 or No.2
The first step is to try resetting the ATA to its factory default setting. This is fully covered in our ATA 186/188 Upgrade and Factory Reset article.
In many cases a factory reset might not prove to be that useful, in which case manual configuration of the ATA parameter SID is required. To do this, open a web browser and connect to the ATA using its address e.g http://192.168.135.5. From the web interface, select SCCP Parameters under the Change Configuration menu option.
At the presented page, Phone 1 and Phone 2 ports at the back of the ATA are represented by the SID0 and SID1 field respectively.
To enable a port, simply enter a dot “.” as a parameter, or “0” to disable it. Simple as that!
The screenshot below helps make this practice clearer:

Of course, it is always highly recommended to upgrade to the latest ATA firmware version to ensure stability and enhanced functionality of the Cisco ATA 186/188 device. The latest Cisco ATA 186/188 firmware is freely available in our Cisco Download section.
Free eBook - Endpoint Security

Enterprise-Class Cloud & Network Monitoring

Bandwidth Monitor

Wi-Fi Key Generator
Network and Server Monitoring

Follow Firewall.cx
Recommended Downloads
Cisco Password Crack
Decrypt Cisco Type-7 Passwords on the fly!
Automated Patching Solution

Firewall Analyzer
