


Cisco, as most IT engineers know, covers a wide range of products and services. These range from routers to switches, firewalls, intrusion prevention systems (ips), intrusion detection systems (ids), servers, wireless lan controllers (wlc), wireless access points and much more.
What a lot people aren't aware of is that most of these products come with a 90 day warranty - something that's really odd when compared with other vendors who usually offer at least one year warranty. On the other hand, only a number of hand-picked Cisco devices offer lifetime-limited warranty - for example, the Cisco Catalyst switches (lower to mid range models). Effectively, these lifetime-limited covered devices means that if they fail, it takes 20-25 days for Cisco to replace them.
For the above, and many more reasons, you should always choose to purchase the additional warranty extension service for each device. This is know as a 'SmartNet service'.
The Cisco SmartNet service comes in many variations, however in its most basic form, it extends up to one year the warranty for the device it is purchased, with a next business day replacement (NBD). The SmartNet service also entities you to download minor upgrade for the device's IOS or firmware.
The big problem with SmartNet service is that when dealing with a lot of equipment e.g 8 routers, 15 switches, 2 firewalls, it can get quite tricky and you need to ensure the renewal of every SmartNet happens within a specific period, otherwise you'll need to pay a lot more money to renew it.
Sounds fussy and a laborious task? Want more from Cisco than a simple warranty coverage?
Enter the Cisco SmartCare service.....
The Cisco Smart Care service is the most advanced support services Cisco has offered until now. Due to the extensive features and services offered within the Smart Care service, we've broken the article down into smaller sections to make it easier to follow.
Cisco Smart Care Service
The Cisco Smart Care service is a new and much sophisticated approach in covering expensive Cisco equipment. The Smart Care service aims to help simplyfy the whole process while providing a lot more for your money.
The Smart Care service of course covers completely everything the SmartNet service does, but also adds the following benefits:
- Simplified Contract. Everything you have with a Cisco logo is covered under one contract.
- Access to advanced Cisco Technical Assistance Center (TAC) for help around the clock.
- Free Cisco Smart Care appliance (Hold on, we'll analyse this soon).
- 24/7 Monitoring of your Cisco equipment.
- Delivers dashboard visibility into network performance
- Proactive network scanning for software vulnerabilities and security risks
- Security assesments of your device configurations according to Cisco's security guidelines
- VoIP assessment of your network (for networks with VoIP Smart Care services)
- Cheaper coverage. As it turns out, the more Cisco equipment you cover, the cheaper it gets when compared to the traditional SmartNet service.
When your Cisco Smart Care service is purchased and enabled, you'll receive the Cisco Smart Care appliance within a couple of days.
Through this appliance, all Cisco network equipment covered under the Smart Care contract, are monitored 24/7. This information is encrypted and sent directly to the Cisco Smart Care center for processing and is almost immediately made available to your Cisco Partner via the Smart Care portal.
Your Cisco partner can, and should, provide you with access to the Smart Care portal so you can see all information provided by Cisco, that is associated with your network. Reports and warnings generated by the Smart Care appliance are sent to your Cisco partner and can also be configured so you (the network administrator) receive them as well.
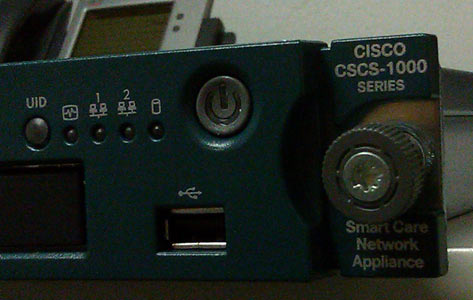
The Cisco Smart Care Appliance
The Cisco Smart Care appliance can only be deployed only by your authorised Cisco Smart Care partner. Keep in mind that the Cisco 'Smart Care certifed' certification is a separate certification in addition to the ones your partner might already have aquired. This means that no matter what certification level your Cisco partner has (SMB, Premier, Silver or Gold), they need to also be Smart Care certified.
The Cisco Smart Care appliance is basically a HP Proliant DL server with the Cisco brand on it, much like the Cisco Call Manager servers. At the time, the model we received was powered by an Intel Celeron Processor running at 3.2 Ghz with a 533Mhz bus and is bundled with 1GB RAM and a single Western Digital 74.6 GB SATA hdd.
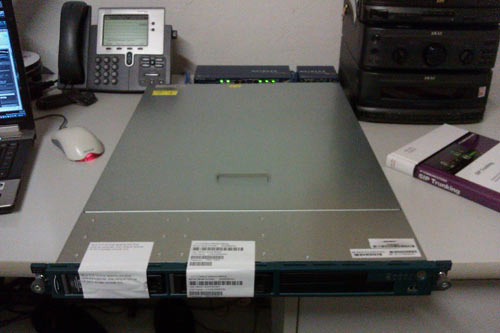
We must agree that the specifications for this server are extremely low, however because its running on a customised Linux kernel, we can justify the server's specifications. By the way, don't expect to find a floppy or DVD drive - they've been removed and replaced by plastic covers.
Speaking of covers, we thought it would be nice if we opened our Smart Care appliance and see what's inside it, and we did just that:
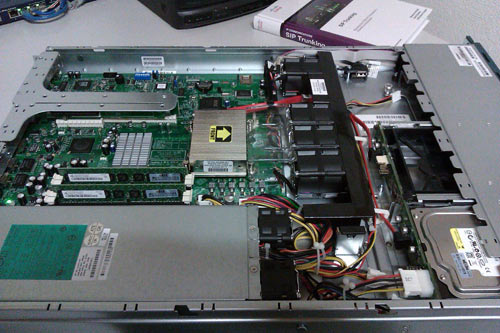
At a first glance, the server's fanless CPU, Ram and SATA hdd grabs your attention. In front of the CPU you'll notice an array of fans designed to constantly blow cool air through the CPU's heatsink keeping its temperature low, but also cooling at the same time the motherboard and other circuits. This is a classical design for these type of servers. On the lower left part of the picture you can see the server's power supply, bundled with two additional fans in front forcing cool air to enter the area from the front, skimming the hdd and cooling it as well.
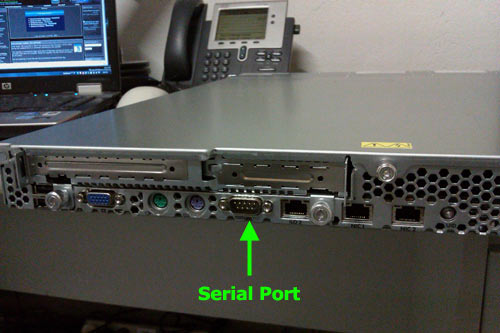
Turning the appliance backwards, you'll find all necessary interfaces, including a serial port which is all you really need to setup the server.
Provided with the server is a DB9 serial cable (shown below on the right side) which is basically a null-modem serial cable with the TX & RX pins in cross-over mode:

Since almost all laptops today do not feature a serial port, you'll need to use a USB-to-Serial adaptor like the one shown left in the above picture. Alternatively, you can simply connect a VGA monitor and a keyboard to proceed with the setup. We've decided to go ahead using the serial cable, rather than a monitor.
When you first power on the Smart Care, you'll get the well-know bios post test and a brief summary of the system's configuration as shown below:
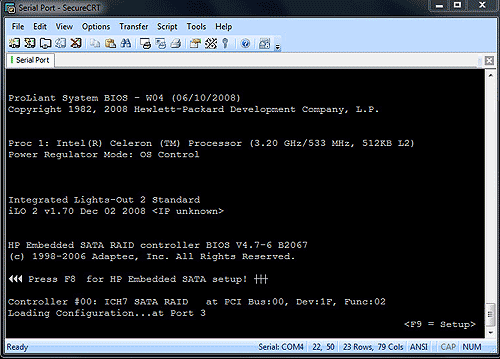
Following the post test is the system bootup which doesn't really show anything else other than a message telling you that its booting the kernel. Once the system has loaded, it will prompt for a login name and password. The factory defaults for this are 'cisco' and 'cisco'.
The first step required once your Smart Care appliance boots up, is to configure it with the appropriate network settings in order to obtain Internet access and update the appliance software.
Configuring the Appliance Network Settings
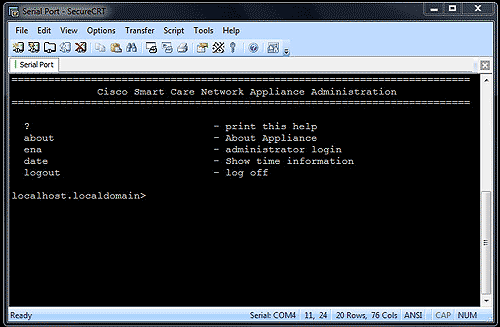
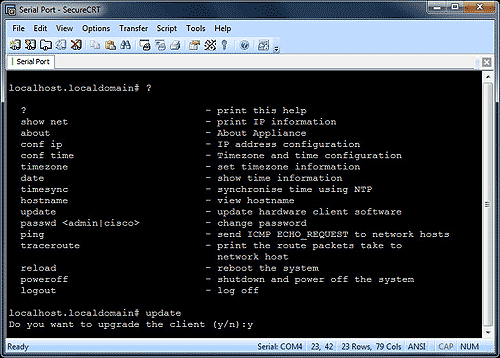
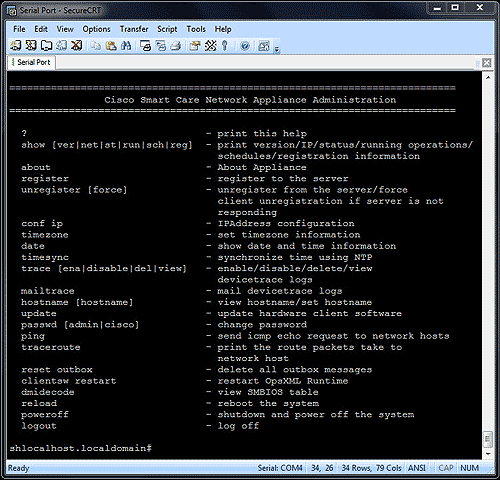
To configure the network settings, you need to enter Priveliged Mode just as you would with a Cisco router or switch. Type 'enable' and enter 'admin' as a password when prompted.
You'll see the hash # character at the prompt, indicating you've now entered priveliged mode. Typing ? will present all available options as shown below:
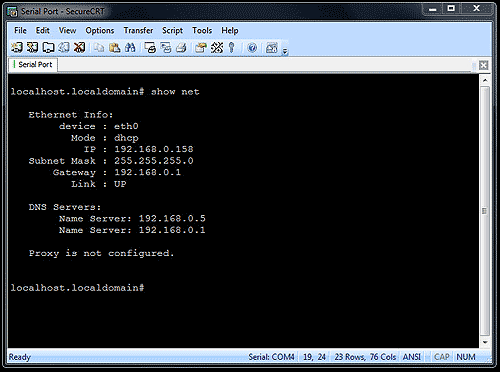
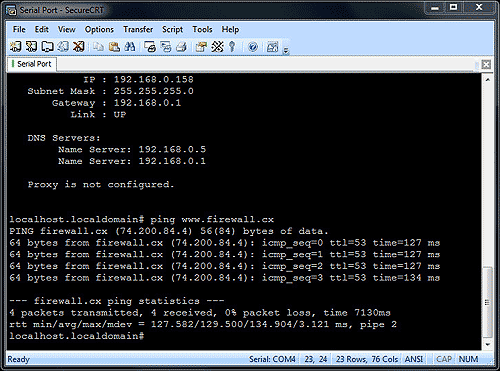
The conf ip command will launch a series of prompts asking for the system's IP Address, Subnet mask, Gateway, DNS servers and proxy server, however we highly advise you enable a DHCP server on your network that will provide all this information automatically.
Our approach was to use a DHCP server and by issuing the 'show net' command we were able to verify the correct settings of our Smart Care appliance:
As with all Cisco products, you can enter a simple 'ping' command toward a domain to ensure the DNS resolution process is working correctly and there is in fact connectivity with the Internet.
Updating the Cisco Smart Care Appliance
Updating the Cisco Smart Care appliance is a necessity because if you don't upgrade it, it simply won't work.
The first time we performed the update, we had a problem downloading the new image and were required to open a Cisco TAC case as the appliance is not able to automatically find the necessary update and download it. Hopefully this will be fixed in the newer versions of the appliance so updating it would simply mean to execute a command and nothing more.
Envoking the update process is easy: At the prompt #, simply type the command update and hit enter. The Cisco Smart Care appliance will ask you to confirm the upgrade of the client:
After answering y for yes, the system will move to the 'client update' page to continue the process.
The client update page is very simple and requests the following two peices of information:
1) URL from which the Cisco Smart Care appliance is able to download the necessary image
2) Cisco Connection Online (known as 'CCO') account name & password
Keep in mind that when entering your CCO password, the system will not show it on the screen, but instead the field is kept blank:
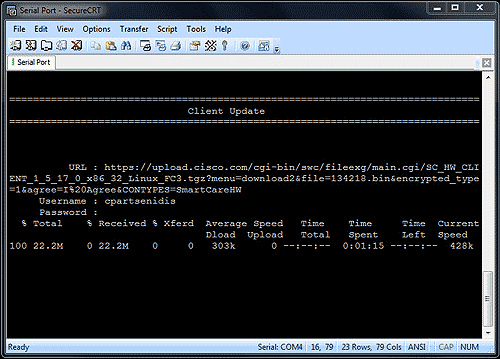
The url seems a bit wierd at a first glance because of its length, the system wraps it at the end of the screen, giving it an aweful look. Assuming all the information provided is correct, the Cisco Smart Care appliance will automatically start downloading the new update providing you with constant feedback on the download speed. The image download is about 55Mb, so if your on a fast ASDL connection, its a matter of minutes.
This update can only be performed online. You cannot download the image and install it from your computer as you would with an IOS image!
As soon as the image download is complete, you are prompted with a few details about the installation that will proceed, plus a final confirmation that you wish to perform the update:
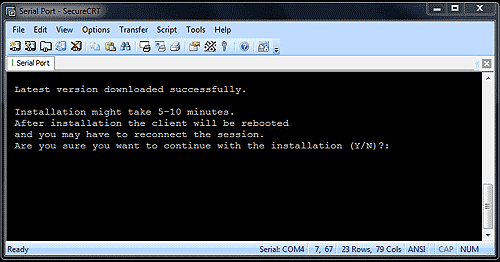
After you press 'y' and 'enter', confirming to proceed with the update, the system will start to upwrap the image it downloaded and begins the installation as shown below:
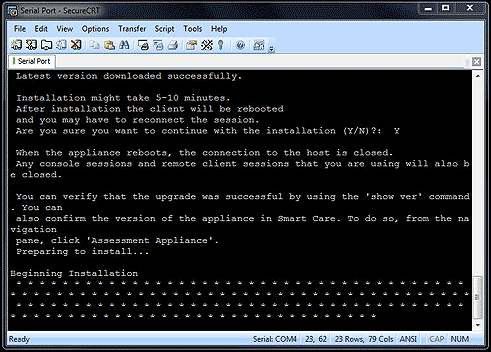
The installation process is monitored easily through the stars * on the screen. We don't know what eactly one unique star represents, but that doesn't really matter :) As soon as the update is complete, the system notifies the installer with a 'Installation Complete' message and immediately begins the restart process to load the newly updated software.
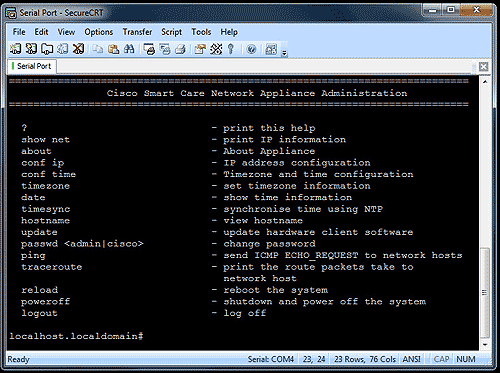
When the Cisco Smart Care appliance completes its reboot, you'll need to perform the whole login process again, until you reach the '#' prompt. At that point, we can issue the '?' command and see the available menu options. If you compare the options with the ones before the update, (shown at the begining of this page - first screenshot), we'll see there is a noticeable difference.
Now that we have updated the Cisco Smart Care appliance, we need to register it with Cisco. This registration is necessary so we can finally tie the appliance to the end customer.
To kick-start the registration, simply enter the 'register' command and the registration screen will make its appearance:
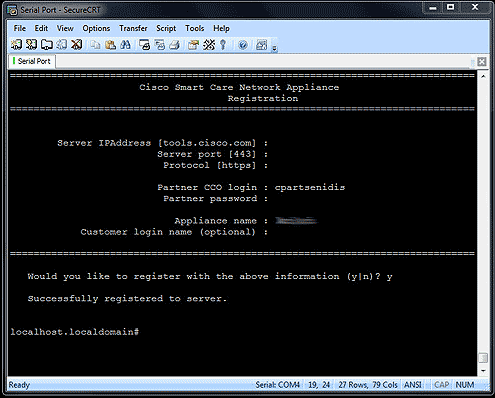
Taking the settings from top to bottom, we leave the first three options 'as is' and move to the fourth where enter again the partner CCO account and password. Next, we can provide a name for the appliance to help us indicate which customer is it for. The name above has been smudged out to ensure privacy.
We confirm at the end that all above information is correct and the appliance proceeds to contact Cisco and register itself. A confirmation message is shown, indicating tha the registration was successful.
Assigning & Enabling the Cisco Smart Care Appliance
Once the Cisco Smart Care appliance has registered with Cisco, we need to assign it to the end customer. This process binds the appliance to the specific customer and the contract invoked.
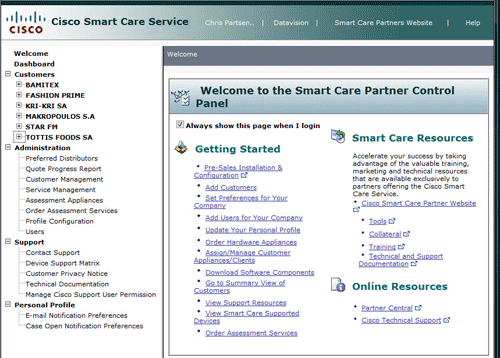
For this process, the partner must log into the Cisco Smart Care portal.
The main page at the Cisco Smart Care portal provides all the necessary configuration and monitoring options for all appliances installed.
From the menu on the left, we select the Administration menu and then Assessment Appliances to assign the registered appliance to the appropriate customer.
When selected, the Assessment Appliances screen will show all registered appliances no matter what state they are in. As shown in the screenshot below, our hardware client is registered, but remains unassigned to the customer.
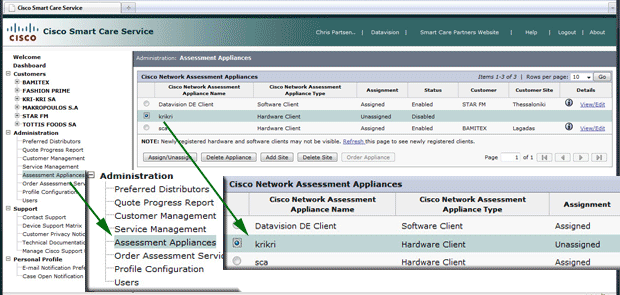
To assign the appliance, we select the appliance and then click on the Assign/Unassign button located on the lower left corner of the Cisco Network Assessment Appliances table.
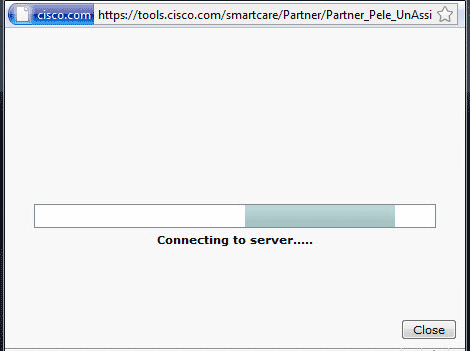
Once the Assign/Unassign button is pressed, a final confirmation is required before the assignment process begins. After confirming by pressing OK, the process begins:

The Cisco Smart Care portal will contact the appliance and after a brief secure exchange of data, the appliance will be assigned to the customer.
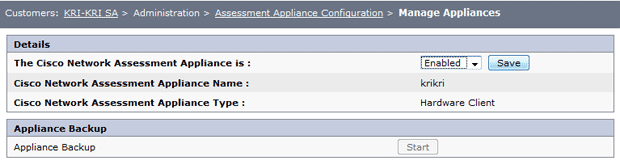
Once this phase of the process is complete, we need to enable the Smart Care appliance installed as the customer's site. To do this, under the customer's menu, we select Administration and then Assessment Appliance Configuration.
Once the page loads we click on view and wait for the next window to open

The next page provides us with the option to finally enable the network appliance installed at our customer's site. Click on the drop-down box, select Enabled and then click on the Save button.
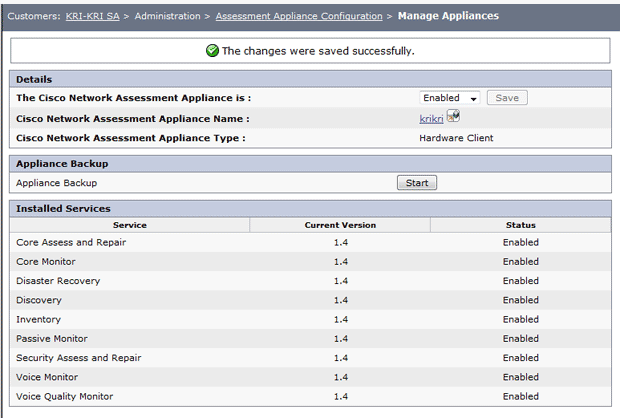
Once the Save button is pressed, the Smart Care portal will queue the necessary commands and send them to the Smart Care appliance to enable it, providing the Cisco engineer with a number of additional tasks within the Smart Care portal.
Discovering Cisco Devices
As soon as the appliance is enabled, the Smart Care portal will refresh and show its status alongside with the services activated and their respective version. This particular customer has a Level 3 service which includes routing, switching and voice services (Cisco Unified CallManager Express).
Level 3 services indicate a higher complexity network and therefore offer additional services such as Voice Monitor, Voice Quality Monitor and other related services as shown in the screenshot above.
At this point, we need to discover our Cisco network devices and add them to the portal. This process is usually handled during the contract setup by your Cisco Partner, and therefore all covered equipment are already listed with their product codes and serial numbers, however the system does not contain any IP Addresses, SNMP passwords (required for the SmartCare appliance to connect to the devices) e.t.c.
We now head over to the Discovered Devices menu on the left and click the Perform New Discovery button which brings up the Service Control screen where we can run a number of services by either scheduling them or running them at that moment.
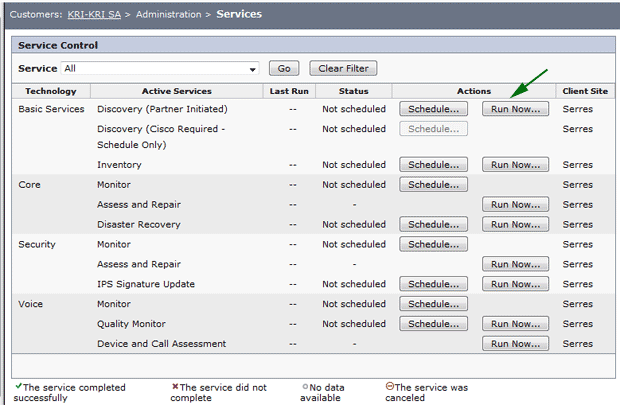
The first step here is to select the Run Now... button which will trigger the 3-step discovery process so that the Smart Care appliance can discover all Cisco devices that will be included in the Smart Care contract. These devices will be permanently monitored by the appliance once added.
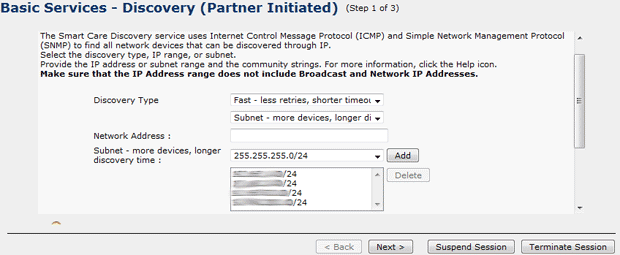
The first step involves the Cisco engineer inserting the network subnets that need to be scanned by the appliance to discover the Cisco devices. Scrolling further below (not shown) the system requires the SNMP string which will be used to connect to each discovered device and obtain all necessary information. As it is evident, SNMP must be enabled on all Cisco devices we want to be discovered, using a read-only string.
This technique is favourable because it allows you to control which equipment are added to the Smart Care contract. If the Smart Care appliance can't 'see' them - they aren't added to the contract!
As soon as all the information is entered, hitting the Next button starts the scanning process as shown below:
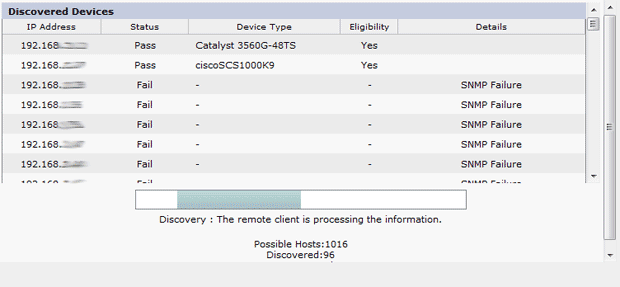
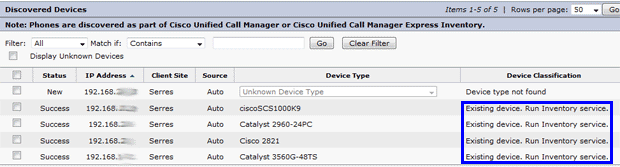
The screen will show the discovered hosts in real-time and won't take longer than a couple of minutes to complete, depending on the amount of hosts the network has.
As each device is successfully discovered, the system shows its Status, Device Type, Eligibility and Details. This will help ensure the correct devices are discovered.
In our first discovery process, the ASA 5510 appliances were not discovered due to the strict firewall policies in place. This was a reminder that when performing the discovery, you must ensure firewall access lists are not blocking SNMP queries to the devices.
Thankfully, we are able to re-run the discovery process and add the missing devices later on.
As soon as the process is complete, we are presented with the final table of discovered devices. Here we get the chance to make any last changes and select the proper device, in case the Smart Care appliance made a mistake - something we have never encountered so far.
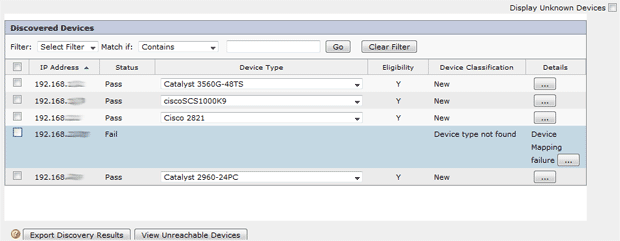
Clicking on the Details button doesn't do much other than display the IP Address and SNMP MIB Tree information of the discovered device - slightly useless information we believe.
Now all that is needed is to hit the Save and Continue button so the system can add these devices to the Cisco Smart Care service so they become available to the customer's inventory.
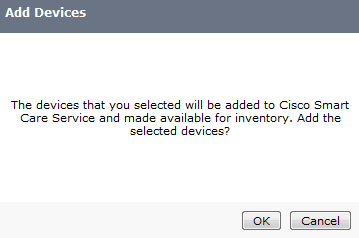
The Cisco Smart Care service allows the Cisco Partner to run the discover process and add devices to the service at any time, however, these additional devices (assuming they are not already covered) can force the Smart Care service device weight jump to the next level. When this happens, an invoice is automatically generated and sent to the partner!
Therefore, to help avoid covering equipment accidently, the system always provides a number of warnings before allowing you to accept the changes:
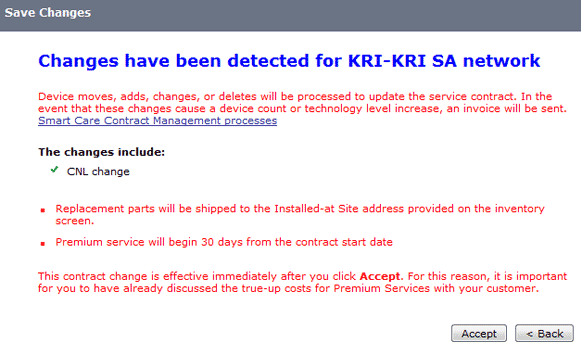
For this installation, all devices had been pre-inserted into the Smart Care portal in order to generate the initial quotation. As these devices are now discovered, we will see duplicate entries in the inventory. As a last step, we simply need to delete the older entries, effectively replacing them with the newly discovered devices.
Inventorying The Discovered Cisco Devices
After running the discovery service, if we visit the Discovered Devices section from the menu, the system will confirm the devices found already exist in the system and report that we need to run the inventory service:
Following the instructions, we select Services under the customer's Administration menu:
This will load the Service Control panel where we can execute on the spot a number of services or schedule them to automatically run at specific times and dates. The panel will also show when exactly the available services were executed.
To continue our setup, we select the Run Now... button to initiate the Inventory service.

Like most partner-initiated services, this is a 4-step process where we selected the discovered devices to the inventoried:
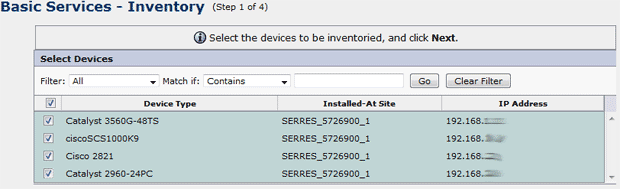
After selecting the devices to be inventoried and clicking the Next button, we are asked to enter the necessary credentials for each Cisco device, so that the Smart Care appliance can log into each device.
This might come as a surprise to some engineers, however it is necessary because the Cisco Smart Care appliance actually logs into each device and obtains a full list of all components installed, including part numbers, serial numbers, PVDMs (Cisco DSPs), slots in which cards are installed (for routers) and even Cisco Unity Express modules (if installed)!
The amount of information later on provided will surprise you as it is extremely comprehensive.
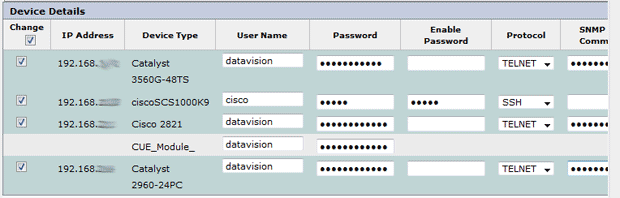
In case an incorrect username or password is entered, the system will reported a failure to log into the affected device and we will be able to later on re-run the inventory service and enter the correct credentials. For any given device who's credentials are correct, the SmartCare appliance will save this information for all future monitoring services to be run.
As we complete entering all information and select the protocol used to access each device, we can click on the Next button to start the inventory process:
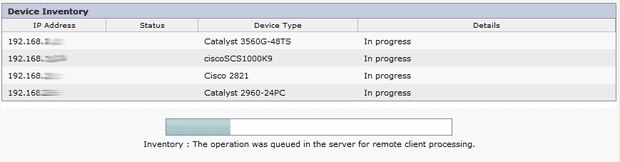
At this point, the Smart Care portal queues the operation at the customer's Smart Care appliance and will begin to execute in a minute or two.
The time required to complete the inventory process will depend on the amount of devices and their complexity. For our setup, the process did not take more than 5 minutes to complete.
As soon as the process completes, we are presented with a brief summary of the process and are able to Terminate (close) the window. This will take us back to the Service Control panel where the Inventory will show as sucessfully executed along with a date and time.
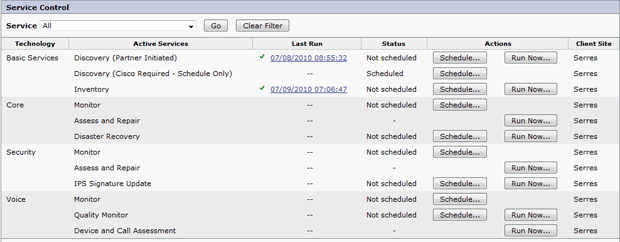
With the inventory process complete, the last step is to schedule or run the Core, Security and Voice technology processes in order to examine and monitor the equipment discovered.
The Core, Security and Voice process is out of this article's scope and will be covered in future articles.
Summary
This article introduced the Cisco Smart Care service and explained the secret details of this service, which is executed by Cisco Smart Care authorized partners only. We saw the setup process of the Smart Care appliance, the portal setup including discovery and inventorying process of Cisco devices.
Your IP address:
216.73.216.114
All-in-one protection for Microsoft 365

FREE Hyper-V & VMware Backup

Wi-Fi Key Generator
Network and Server Monitoring

Follow Firewall.cx
Recommended Downloads
Enterprise Class Cloud & Network Monitoring

Cisco Password Crack
Decrypt Cisco Type-7 Passwords on the fly!
Bandwidth Monitor

Free PatchManager

Security Podcast

Firewall Analyzer
