Windows 2003 DHCP Server Advanced Configuration - Part 2
Part 1 of our Windows 2003 DHCP Server Advanced Configuration article explained the creation and configuration of DHCP Scope options and how to configure various DHCP server settings. This article focuses on backing up and restoring the DHCP server database, troubleshooting DHCP using a packet analyser and more.
Backing up the DHCP database
Our DHCP server is fully functional but it may not always remain that way. We definitely want to back it up so we can quickly restore the functionality in the event of a disaster.
The DHCP scopes, settings and configuration are actually kept in a database file, and the database is automatically backed up every 60 minutes. But to manually back it up:
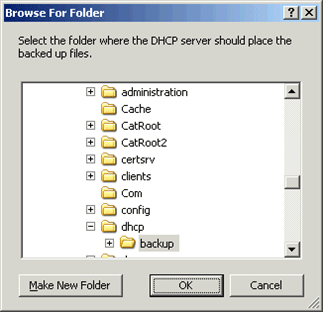
- On the DHCP MMC, right-click the server node and choose Backup
- When the Browse for Folder window comes up, verify that it points to C :\windows\system32\dhcp\backup and click OK:

Restoring the DHCP Database
Let us imagine that a disaster with the DHCP server did occur and that we now have to restore the DHCP functionality. Restoring the DHCP database is just as simple as backing it up:
- 1. On the DHCP MMC, right-click the server node and choose Restore
- 2. When the Browse for Folder window comes up, click OK
- 3. You will receive a prompt informing you that the DHCP service will need to be stopped and restarted for the restore to take place. Click OK
The DHCP database will then be restored.
Troubleshooting DHCP
Let us imagine that, after restoring the database, the DHCP server developed some issues and started malfunctioning. Luckily, DHCP comes equipped with several tools to help us troubleshoot.
Event Viewer
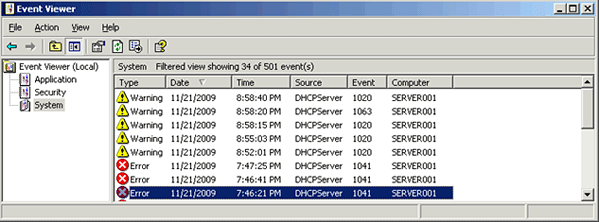
The Event Viewer displays events that the server has reported and whether those events represent actual issues or normal operation. Most of the issue events related to DHCP will be reported in the System log of the Event Viewer with a Source of DHCPServer.
To view the Event Viewer:
- Go to Start > Administrative Tools > Event Viewer
- When the Event Viewer window comes up, click the System log on the left pane and its events will be displayed on the right pane.
Depending on how active the server is, the System log may be cluttered with Information, Warning and Error events that are unrelated to DHCP. To see only DHCP issues, filtering non-important events is necessary. To do this:
- Go to the View > Filter
- When the System Properties window comes up, click on the Event Source drop-down menu and select DHCPServer . This tells the log to display only DHCP server events.
- Next, uncheck the box next to Information . This tells the log to display only events regarding issues.
- (Optional) On the From and To drop-down menus on the bottom, adjust the time and date frame to when an issue was suspected to have occurred.
- When finished, click OK
The System log is now displaying only DHCP Warning and Error events. This should cause any DHCP-related issues to stick out:

Every event has an Event ID. In case a particular event's description is too vague to understand, you may have to research the Event ID for further clarification.
DHCP Audit Logs
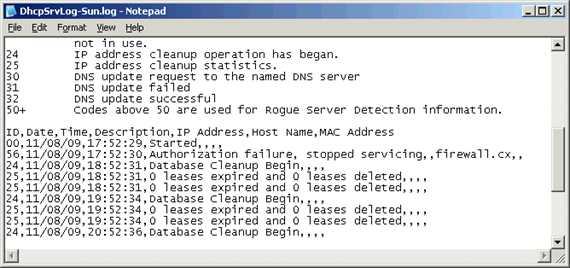
Another DHCP troubleshooting tool is the DHCP audit logs. These logs display detailed information about what the DHCP server has been doing. If a client leases an IP address, renews its IP address, or releases its IP address, the DHCP server will audit this activity.
More concerning events are also audited: if the DHCP server service stops, encounters a rogue DHCP server in the network, or fails to start, the server will audit this issue as well. These logs provide closer visibility into what the DHCP server is doing.
To access the DHCP audit logs:
- Go to Start > Run
- When the Run box comes up, type c:\windows\system32 and click OK
- When the System32 folder comes up, navigate to and double-click the dhcp folder.
In the dhcp folder, the log files will be titled DhcpSrvLog -%WeekDay%. log, where %WeekDay% is a week day. There should be one for the past six days.

The log may appear overwhelming, but it is very simple to read. Each line contains several pieces of information but the most important is the code at the beginning of the line, since that describes what is being audited. That code is defined on the top portion of the log file. As each line is comma-separated you can actually save the log file in .csv format and open it in Excel for easier and more convenient reading and analysis.
Protocol Analyzer
Although a Network protocol analyzer is not an official DHCP troubleshooting tool, it is nonetheless an excellent tool for troubleshooting issues where the server is not servicing clients. In such situations you would use the protocol analyzer on the server to determine whether DHCP Discover/Request packets from clients are arriving at the server at all or if they are arriving but being ignored by the server.
If you find that the packets are not arriving at the server at all, you would have isolated the problem to most likely being a routing issue or an issue with any relay agents/configured IP helpers in the network.
However, if you find that the packets are arriving but being ignored by the server, then you would have isolated the problem to either residing on the server or the configuration of DHCP.
The screen shot below, of Wireshark, shows that the server received a DHCP Discover packet from a client and properly responded to it.

DHCP Migration
Continuing from our previous storyline, let us pretend that we found the issue that was affecting our DHCP server but to fix it we would have to take the DHCP server offline for a considerable amount of time, so for the time being we will just setup a different server as our DHCP server.
To accomplish this, we will have to transfer the DHCP database to our new server. Migrating the DHCP database is not only done in situations such as this. When a DHCP server is decommissioned, for example, you would need to transfer the DHCP database to the new server.
Although the transfer can technically be done in more than one way, presented below is one method. Regardless of the approach chosen, you should aim to minimize the amount of time that both DHCP servers are simultaneously active and able to service clients as this would increase the chances of one server leasing an IP address that is already in use.
- On the old server, go to Start > Run , type cmd , and click OK .
- When the Command Prompt window comes up, type netsh dhcp server export c:\dhcp_backup.txt all and hit Enter. This command exports all the scopes in the DHCP database to a file titled dhcp_backup.txt .
- Copy the export file ( dhcp_backup.txt ) to the new server.
- On the new server, install the DHCP server role. Do not authorize the DHCP server yet.
- On the new server, go to Start > Run , type cmd , and click OK .
- When the Command Prompt window comes up, type netsh dhcp server import c:\dhcp_backup.txt all and hit Enter. This command imports all the scopes in the DHCP database from the file titled dhcp_backup.txt .
- On the new server, enable conflict detection so IP addresses that have been leased out by the old server since the start of the migration are not reissued.
a. On the DHCP MMC, right-click the server node and choose Properties
b. When the Properties window comes up, click the Advanced tab.
c. On Conflict Detection Attempts , increase the number to 2 just to be safe. This tells the server to ping an IP address before it assigns it. If there is a response, then the DHCP server will not lease out the IP address since that address would already be assigned.
d. Click OK
8. On the new server, authorize the DHCP server.
9. On the old server, unauthorized the DHCP server.
Although we could perform a migration by simply backing up the DHCP database on the old server using the backup procedure and restoring it on the new server using the restore procedure, this approach also restores the old DHCP server's configuration settings, such as audit settings, conflict detection settings, DDNS settings, etc. It may not always be desirable to transfer those settings in a migration. The procedure described above only transfers the scopes and their settings.
Conclusion
Without careful observation, the full capabilities of DHCP can be overlooked. The protocol, in combination with the DHCP MMC, provides numerous methods to control client configuration settings and server administrative functions.
Wi-Fi Key Generator
Follow Firewall.cx
Cisco Password Crack
Decrypt Cisco Type-7 Passwords on the fly!


