If you've read our previous article The VLAN Concept - Introduction to VLANs then you should feel comfortable with terms such as 'VLAN', 'Static & Dynamic VLANs', however this is just the beginning in this complex world. This article will start to slowly expand on these terms to help understand how VLANs are implemented inside an enterprise network.
To begin with, we will take a closer look at the port interfaces on these smart switches and then start moving towards the interfaces connecting to the network backbone where things become slightly more complicated, though do not be alarmed since our detailed and easy to read diagrams are here to ensure the learning process is as enjoyable as possible.
VLAN Links - Interfaces
When inside the world of VLANs there are two types of interfaces, or if you like, links. These links allow us to connect multiple switches together or just simple network devices e.g PC, that will access the VLAN network. Depending on their configuration, they are called Access Links, or Trunk Links.
VLAN Configuration, InterVLAN routing,Trunk Link configuration for Cisco Layer 3 switches (3550, 3560 series, 3750 series, 4500 series and 6500 series switches) is covered extensively at the following article: Basic & Advanced Catalyst Layer 3 Switch Configuration: Creating VLANs, InterVLAN Routing (SVI), VLAN Security – VLAN Hopping, VTP Configuration, Trunk Links, NTP. IOS License Requirements for SVI Routing.
Access Links
Access Links are the most common type of links on any VLAN switch. All network hosts connect to the switch's Access Links in order to gain access to the local network. These links are your ordinary ports found on every switch, but configured in a special way, so you are able to plug a computer into them and access your network.
Here's a picture of a Cisco Catalyst 3550 series switch, with it's Access Links (ports) marked in the Green circle:
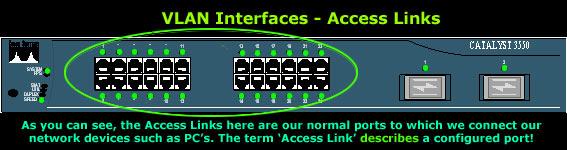
We must note that the 'Access Link' term describes a configured port - this means that the ports above can be configured as the second type of VLAN links - Trunk Links. What we are showing here is what's usually configured as an Access Link port in 95% of all switches. Depending on your needs, you might require to configure the first port (top left corner) as a Trunk Link, in which case, it is obviously not called a Access Link port anymore, but a Trunk Link!
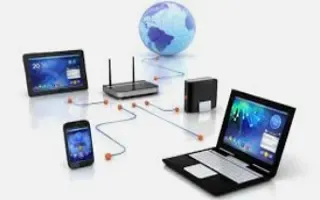
When configuring ports on a switch to act as Access Links, we usually configure only one VLAN per port, that is, the VLAN our device will be allowed to access. If you recall the diagram below which was also present during the introduction of the VLAN concept, you'll see that each PC is assigned to a specific port:
In this case, each of the 6 ports used have been configured for a specific VLAN. Ports 1, 2 and 3 have been assigned to VLAN 1 while ports 4, 5 and 6 to VLAN 2.
In the above diagram, this translates to allowing only VLAN 1 traffic in and out of ports 1, 2 and 3, while ports 4, 5 and 6 will carry VLAN 2 traffic. As you would remember, these two VLANs do not exchange any traffic between each other, unless we are using a layer 3 switch (or router) and we have explicitly configured the switch to route traffic between the two VLANs.
It is equally important to note at this point that any device connected to an Access Link (port) is totally unaware of the VLAN assigned to the port. The device simply assumes it is part of a single broadcast domain, just as it happens with any normal switch. During data transfers, any VLAN information or data from other VLANs is removed so the recipient has no information about them.
The following diagram illustrates this to help you get the picture:
As shown, all packets arriving, entering or exiting the port are standard Ethernet II type packets which are understood by the network device connected to the port. There is nothing special about these packets, other than the fact that they belong only to the VLAN the port is configured for.
If, for example, we configured the port shown above for VLAN 1, then any packets entering/exiting this port would be for that VLAN only. In addition, if we decided to use a logical network such as 192.168.0.0 with a default subnet mask of 255.255.255.0 (/24), then all network devices connecting to ports assigned to VLAN 1 must be configured with the appropriate network address so they may communicate with all other hosts in the same VLAN.
Trunk Links
What we've seen so far is a switch port configured to carry only one VLAN, that is, an Access Link port. There is, however, one more type of port configuration which we mentioned in the introductory section on this page - the Trunk Link.
A Trunk Link, or 'Trunk' is a port configured to carry packets for any VLAN. These type of ports are usually found in connections between switches. These links require the ability to carry packets from all available VLANs because VLANs span over multiple switches.
The diagram below shows multiple switches connected throughout a network and the Trunk Links are marked in purple colour to help you identify them:
As you can see in our diagram, our switches connect to the network backbone via the Trunk Links. This allows all VLANs created in our network to propagate throughout the whole network. Now in the unlikely event of Trunk Link failure on one of our switches, the devices connected to that switch's ports would be isolated from the rest of the network, allowing only ports on that switch, belonging to the same VLAN, to communicate with each other.
So now that we have an idea of what Trunk Links are and their purpose, let's take a look at an actual switch to identify a possible Trunk Link:
As we noted with the explanation of Access Link ports, the term 'Trunk Link' describes a configured port. In this case, the Gigabit ports are usually configured as Trunk Links, connecting the switch to the network backbone at the speed of 1 Gigabit, while the Access Link ports connect at 100Mbits.
In addition, we should note that for a port or link to operate as a Trunk Link, it is imperative that it runs at speeds of 100Mbit or greater. A port running at speeds of 10Mbit's cannot operate as a Trunk Link and this is logical because a Trunk Link is always used to connect to the network backbone, which must operate at speeds greater than most Access Links!
Summary
This page introduced the Access and Trunk links. We will be seeing a lot of both links from now on, so it's best you get comfortable with them! Configuration of these links is covered later on, because there is still quite a bit of theory to cover!
Enterprise-Class Cloud & Network Monitoring

Bandwidth Monitor

Wi-Fi Key Generator
Network and Server Monitoring

Follow Firewall.cx
Recommended Downloads
Cisco Password Crack
Decrypt Cisco Type-7 Passwords on the fly!
Free PatchManager

Firewall Analyzer