


In our previous article, Network Address Translation (NAT) Overload - Part 1, we explained what NAT Overload is and how it works. This page deals with the analysis of the packets that traverse a NAT Overload enabled device. We'll examine which fields of the packets are modified and how the NAT device, a router in our example, keeps track of them in its NAT Table.
In order to keep things simple, we're going to use a few simple examples and then deal with a few more complicated ones, this should help make the complex stuff much easier to understand and digest.
Time to grab something to drink or munch on, and prepare to download this information into your head!
Readers interested in learning how to configure NAT on a Cisco router can visit our Cisco Routers section
How NAT Translation Works
When covering Dynamic and Static NAT, we saw that it was either the Source or Destination IP Address that had to be modified by the NAT device. No matter which mode was used, the Source and Destination ports were never altered in any way.
NAT Overload on the other hand will use a single public IP Address for the routing process and change, in most cases, the Source or Destination port depending on whether it's an incoming or outgoing packet.
In the next diagram we have two computers that have each sent a packet out to the Internet and are expecting a reply. We take a look at how the router deals with these packets individually and where the information required to identify the expected replies is stored:

You've got to agree that that's a very simple setup. To make life easy, I haven't included any additional information about the generated packets because we'll deal with them individually.

So it's time to take a look at how the router deals with this first packet which belongs to Workstation 1:

The packet generated by Workstation 1 arrives at the router's private interface which has IP Address 192.168.0.1. The router accepts the packet and processes it. Once inside the router, the packet's Source IP Address, Destination IP Address, Source Port and Destination Port are examined and the router decides that this is a valid packet so it should be forwarded to the Internet.
NAT is now about to take place (check NAT Table in the above diagram). The router will replace the Source IP Address (192.168.0.5) with its Public IP Address (200.0.0.1) and keep the rest of the information intact.
Note that in most cases, the Source Port is not changed unless it has already been used by a previous packet from the private network but, since this is the first outgoing packet, this cannot be the case.
Here's how the packet looked once it exited the router's public interface:

Time to check our second packet that will traverse the router, which is generated by Workstation 2 (the router has not yet received the reply to Workstation 1's packet).
We're going to assume that Workstation 2 uses the same Source Port (2400) as Workstation 1's packet, so you can see how the router will react:
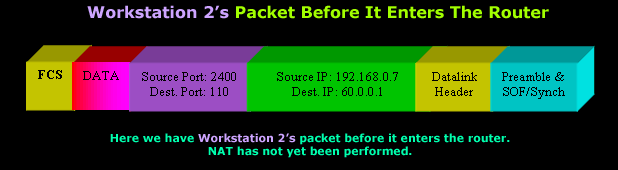
This packet is a very good example to show you how great NAT Overload is because the router will need to 'do' something to make sure it's able to successfully receive the reply.
Let's look at what happens within the router as the packet arrives at its private interface:

As you can see, our second packet arrives at the router's private interface. It enters the router and since the packet is valid (it's not corrupt and contains a valid Destination IP Address in its IP Header) it's routed to the public interface and NAT is performed while a new entry is added into the router's NAT Table.
Looking at the NAT entries, you will notice that both first and second packets have the same Source Port, which is 2400. Since the router already used port 2400 as a Source Port for the first packet's NAT Translation and hasn't yet received a reply, it cannot use it again for the second packet. If it did use it, when a reply for any of the two packets came back the router wouldn't be able to distinguish whose it was.
For this reason, the router assigns a new Source Port for the second packet (14500), ensuring that the reply will get to the internal host for which it is intended:
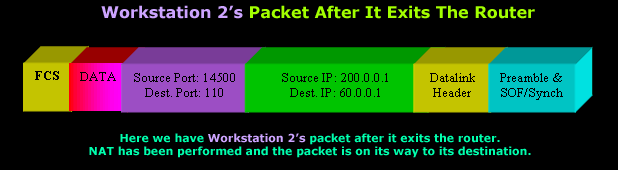
Usually most NAT Overload enabled devices will assign Source Ports in the range of 1025 to 65500.
Keep in mind that when one host sends a packet to another, the Source Port it used in the packet will be substituted for the Destination Port in the reply packet.
For example, Host A sends a packet to Host B and this packet has a Source Port of 200, then when Host B replies to Host A its packet will have a Destination Port of 200. This way, Host A knows this is a reply to the initial packet it sent.
This is why it's important for the router to keep close track of Source Ports on outgoing packets and Destination Ports in all incoming packets.
Summary
NAT Overload will work perfectly no matter which type of IP Address assignment you have. Whether it's Dynamic IP or Static, via dial up or a permanent connection, it makes no difference to the NAT device. You can now see how this particular NAT mode has helped preserve real (public) IP Addresses, because no matter how many internal hosts any private network has, it only requires one real IP Address in order to allow all internal hosts to access the Internet.
Enterprise-Class Cloud & Network Monitoring

Bandwidth Monitor

Wi-Fi Key Generator
Network and Server Monitoring

Follow Firewall.cx
Recommended Downloads
Cisco Password Crack
Decrypt Cisco Type-7 Passwords on the fly!
Free PatchManager

Firewall Analyzer
