


The previous page (Static NAT - Part 1) helped us understand what exactly happens with Static NAT and how it works, and we saw a few examples of how to use it in various network configurations.
This page will deal with the transformations the packets undertake as they pass through the Static NAT device, which is normally a router or firewall appliance.
How NAT Translations Take Place
So what exactly happens to the packet that enters or exits the Static NAT-enabled device ? Well it's not that complicated once you get the hang of it. The concept is simple and we're going to see it and analyse it using an example, which is really the best possible approach.
The process of the Static NAT translation is the same for every device that supports it (assuming the manufacturer has followed the RFCs). This means that whether we use a router or a firewall appliance to perform Static NAT they'll both follow the same guidelines.
Consider our example network:
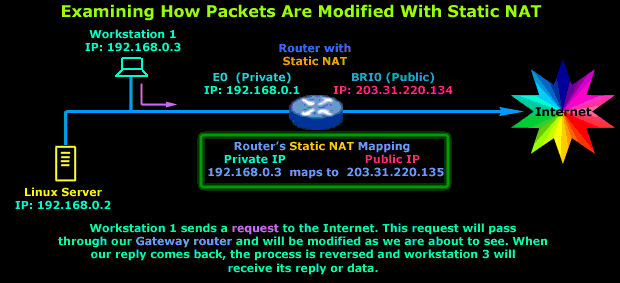
As the diagram describes we have Workstation No.1, which sends a request to the Internet. Its gateway is the router that connects the LAN to the Internet and also performs Static NAT.
The diagram below shows us how the Workstation's packet is altered as it transits the router before it's sent to the Internet (outgoing packet):
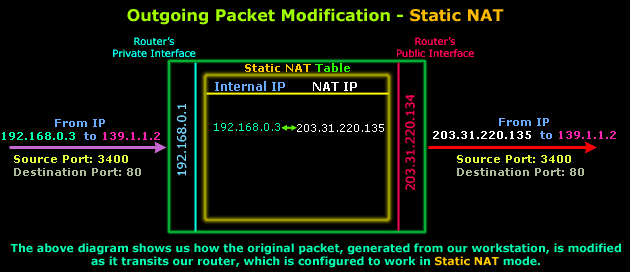
As you can see, the only thing that changes is the Source IP, which was 192.168.0.3 and was given the value of 203.31.220.135, which is a real IP Address on the Internet. The Destination IP Address, Source Port and Destination Port are not modified.
Assuming the packet arrives at its destination, we would most likely expect to see a reply. It would be logical to assume that the reply, or incoming packet, will require some sort of modification in order to successfully arrive at the originating host located on our private network (that's Workstation 1).
Here is how the incoming packet is altered as it transits the router:
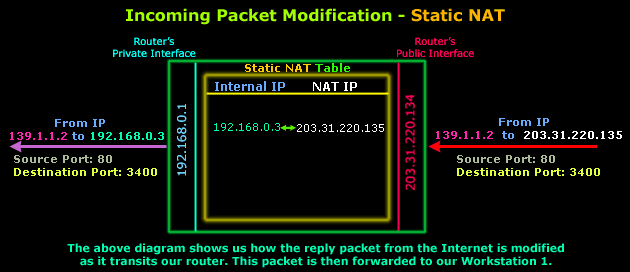
The diagram above shows the part of the incoming packet that is altered by the router. Only the destination IP Address is changed, from 203.31.220.135 to 192.168.0.3 so the packet can then be routed to the internal workstation. Source IP Address, Source Port and Destination Port remain the same.
And in case you're wondering why the ports have changed in comparison to the original outgoing packet, this is not because of NAT but the way IP communications work and happens to be way out of the scope of this topic.
Now, because I understand that even a simple diagram can be very confusing, here's one more that summarises all the above. The diagram below shows you what the outgoing and incoming packets looked like before and after transiting the router:

So there you have it, Static NAT should now make sense to you :)
As you've seen, the concept is very simple and it varies slightly depending on the NAT mode you're working with. So NAT is not that difficult to understand after all ! If there are still a few things that are unclear to you, please try reading the page again and keep in mind the forum to which you can post your questions and doubts !
Next up is Dynamic NAT - Part 1, so sit tight and let's continue our journey!
Enterprise-Class Cloud & Network Monitoring

Bandwidth Monitor

Wi-Fi Key Generator
Network and Server Monitoring

Follow Firewall.cx
Recommended Downloads
Cisco Password Crack
Decrypt Cisco Type-7 Passwords on the fly!
Free PatchManager

Firewall Analyzer
