Configuring Linux to Act as a Firewall - Linux IPTables Basics
What exactly is a firewall? As in the non-computer world, a firewall acts as a physical barrier to prevent fires from spreading. In the computer world too, the firewall acts in a similar manner, only the fires that they prevent from spreading are the attacks, which crackers generate when the computer is on the Internet. Therefore, a firewall can also be called a packet filter, which sits between the computer and the Internet, controlling and regulating the information flow.
Most of the firewalls in use today are the filtering firewalls. They sit between the computer and the Internet and limit access to only specific computers on the network. It can also be programmed to limit the type of communication, and selectively permit or deny several Internet services.
Organizations receive their routable IP addresses from their ISPs. However, the number of IP addresses given is limited. Therefore, alternate ways of sharing the Internet services have to be found without every node on the LAN getting a public IP address. This is done commonly by using private IP addresses, so that all nodes are able to access properly both external and internal network services.
Firewalls are used for receiving incoming transmissions from the Internet and routing the packets to the intended nodes on the LAN. Similarly, firewalls are also used for routing outgoing requests from a node on the LAN to the remote Internet service.
This method of forwarding the network traffic may prove to be dangerous, when modern cracking tools can spoof the internal IP addresses and allow the remote attacker to act as a node on the LAN. In order to prevent this, the iptables provide routing and forwarding policies, which can be implemented for preventing abnormal usage of networking resources. For example, the FORWARD chain lets the administrator control where the packets are routed within a LAN.
LAN nodes can communicate with each other, and they can accept the forwarded packets from the firewall, with their internal IP addresses. However, this does not give them the facility to communicate to the external world and to the Internet.
For allowing the LAN nodes that have private IP addresses to communicate with the outside world, the firewall has to be configured for IP masquerading. The requests that LAN nodes make, are then masked with the IP addresses of the firewall’s external device, such as eth0.
How IPtables Can Be Used To Configure Your Firewall
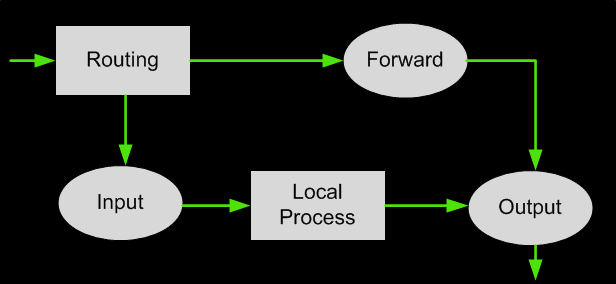
Whenever a packet arrives at the firewall, it will be either processed or disregarded. The disregarded packets would normally be those, which are malformed in some way or are invalid in some technical way. Based on the packet activity of those that are processed, the packets are enqueued in one of the three builtin ‘tables.’ The first table is the mangle table. This alters the service bits in the TCP header. The second table is the filter queue, which takes care of the actual filtering of the packets. This consists of three chains, and you can place your firewall policy rules in these chains (shown in the diagram below):
- Forward chain: It filters the packets to be forwarded to networks protected by the firewall.
- Input chain: It filters the packets arriving at the firewall.
- Output chain: It filters the packets leaving the firewall.
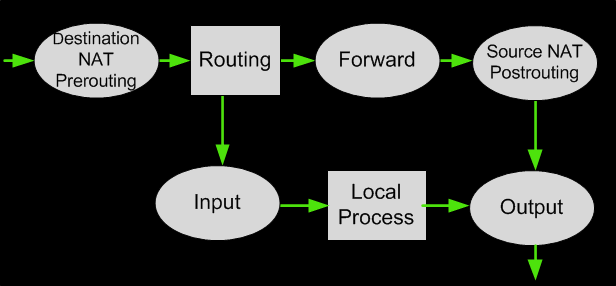
The third table is the NAT table. This is where the Network Address Translation or NAT is performed. There are two built-in chains in this:
- Pre-routing chain: It NATs the packets whose destination address needs to be changed.
- Post-routing chain: It NATs the packets whose source address needs to be changed.
Whenever a rule is set, the table it belongs has to be specified. The ‘Filter’ table is the only exception. This is because most of the 'iptables’ rules are the filter rules. Therefore, the filter table is the default table.
The diagram below shows the flow of packets within the filter table. Packets entering the Linux system follow a specific logical path and decisions are made backed on their characteristics. The path shown below is independent of the network interface they are entering or exiting:
The Filter Queue Table

Each of the chains filters data packets based on:
- Source and Destination IP Address
- Source and Destination Port number
- Network interface (eth0, eth1 etc)
- State of the packet
Target for the rule: ACCEPT, DROP, REJECT, QUEUE, RETURN and LOG
As mentioned previously, the table of NAT rules consists mainly of two chains: each rule is examined in order until one matches. The two chains are called PREROUTING (for Destination NAT, as packets first come in), and POSTROUTING (for Source NAT, as packets leave).
The NAT Table

At each of the points above, when a packet passes we look up what connection it is associated with. If it's a new connection, we look up the corresponding chain in the NAT table to see what to do with it. The answer it gives will apply to all future packets on that connection.
The most important option here is the table selection option, `-t'. For all NAT operations, you will want to use `-t nat' for the NAT table. The second most important option to use is `-A' to append a new rule at the end of the chain (e.g. `-A POSTROUTING'), or `-I' to insert one at the beginning (e.g. `-I PREROUTING').
The following command enables NAT for all outgoing packets. Eth0 is our WAN interface:
If you rather implement static NAT, mapping an internal host to a public IP, here's what the command would look like:
With the above command, all outgoing packets sent from internal IP 192.168.0.3 are mapped to external IP 203.18.45.12.
Taking it the other way around, the command below is used to enable port forwarding from the WAN interface, to an internal host. Any incoming packets on our external interface (eth0) with a destination port (dport) of 80, are forwarded to an internal host (192.168.0.5), port 80:
How The FORWARD Chain Allows Packet Forwarding
Packet forwarding within a LAN is controlled by the FORWARD chain in the iptables firewall. If the firewall is assigned an internal IP address eth2 and an external IP address on eth0, the rules to be used to allow the forwarding to be done for the entire LAN would be:
# iptables -A FORWARD -o eth0 -j ACCEPT
This way, Firewall gets access to the nodes of the LAN that have internal IP address. The packets enter through the eth2 device of the gateway. They are then routed from one LAN node to their intended destination nodes.
Dynamic Firewall
By default, the IPv4 policy in Fedora kernels disables support for IP forwarding. This prevents machines that run Fedora from functioning as a dedicated firewall. Furthermore, starting with Fedora 16, the default firewall solution is now provided by “firewalld”. Although it is claimed to be the default, Fedora 16 still ships with the traditional firewall iptables. To enable the dynamic firewall in Fedora, you will need to disable the traditional firewall and install the new dynamic firewalld. The main difference between the two is firewalld is smarter in the sense it does not have to be stopped and restarted each time a policy decision is changed, unlike the traditional firewall.
To disable the traditional firewall, there are two methods, graphical and command line. For the graphical method, the GUI for the System-Config- Firewall can be opened from the Applications menu > Other > Firewall. The firewall can now be disabled.
For the command line, following commands will be needed:
# systemctl stop ip6tables.service
To remove iptables entirely from system:
rm '/etc/systemd/system/basic.target.wants/iptables.service'
# systemctl disable ip6tables.service
rm '/etc/systemd/system/basic.target.wants/ip6tables.service'
For installing Firewalld, you can use Yum:
To enable and then start Firewalld you will need the following commands:
# systemctl start firewalld.service
The firewall-applet can be started from Applications menu > Other > Firewall Applet
When you hover the mouse over the firewall applet on the top panel, you can see the ports, services, etc. that are enabled. By clicking on the applet, the different services can be started or stopped. However, if you change the status and the applet crashes in order to regain control, you will have to kill the applet by using the following commands:
Which will tell you the PID of the running applet, and you can kill it with the following command:
A restart of the applet can be done from the Applications menu, and now the service you had enabled will be visible.
To get around this, the command line option can be used:
|
Use firewall-cmd to enable, for example ssh: |
# firewall-cmd --enable --service=ssh |
|
Enable samba for 10 seconds: Enable samba for 10 seconds: |
# firewall-cmd --enable --service=samba --timeout=10 |
|
Enable ipp-client: |
# firewall-cmd --enable --service=ipp-client |
|
Disable ipp-client: |
# firewall-cmd --disable --service=ipp-client |
|
To restore the static firewall with lokkit again simply use (after stopping and disabling Firewalld): |
# lokkit --enabled |
Wi-Fi Key Generator
Follow Firewall.cx
Cisco Password Crack
Decrypt Cisco Type-7 Passwords on the fly!


