


For many engineers and administrators, maintaining a Linux system can be a daunting task, especially if there’s limited time or experience. Working in shell mode, editing files, restarting services, performing installations, configuring scheduled jobs (Cron Jobs) and much more, requires time, knowledge and patience.
One of the biggest challenges for people who are new to Linux, is to work with the operating system in an easy and manageable way, without requiring to know all the commands and file paths in order to get the job done.
All this has now changed, and you can now do all the above, plus a lot more, with a few simple clicks through an easy-to-follow web interface. Sounds too good to be true? Believe it or not, it is true! It's time to get introduced to ‘Webmin’.
Webmin is a freeware program that provides web-based interface for system administration and is a system configuration tool for administrators. One of Webmin's strongest points is that it is modular, which means there are hundreds of extra modules/addons that can be installed, to provide the ability to control additional programs or services someone might want to install on their Linux system.
Here are just a few of the features supported by Webmin, out of the box:
- Setup and administer user accounts
- Setup and administer groups
- Setup and configure DNS services
- Configure file sharing & related services (Samba)
- Setup your Internet connection (including ADSL router, modem etc)
- Configure your Apache webserver
- Configure a FTP Server
- Setup and configure an email server
- Configure Cron Jobs
- Mount, dismount and administer volumes, hdd's and partitions
- Setup system quotas for your users
- Built-in file manager
- Manage an OpenLDAP server
- Setup and configure VPN clients
- Setup and configure a DHCP Server
- Configure a SSH Server
- Setup and configure a Linux Proxy server (squid) with all supported options
- Setup and configure a Linux Firewall
- and much much more!!!
The great part is that webmin is supported on all Linux platforms and is extremely easy to install. While our example is based on Webmin's installation on a Fedora 16 server using the RPM package, these steps will also work on other versions such as Red Hat, CentOS and other Linux distributions.
Before we dive into Webmin, let's take a quick look at what we've got covered:
- Webmin Installation
- Adding Users, Groups and Assigning Privileges
- Listing and Working with File Systems on the System
- Creating and Editing Disk Quotas for Unix Users
- Editing the System Boot up, Adding and Removing Services
- Managing and Examining System Log Files
- Setting up and Changing System Timezone and Date
- Managing DNS Server & Domain
- Configuring DHCP Server and Options
- Configuring FTP Server and Users/Groups
- How to Schedule a Backup
- Configuring CRON Jobs with Webmin
- Configuring SSH Server with Webmin
- Configuring Squid Proxy Server
- Configuring Apache HTTP Server
Installing Webmin On Linux Fedora / Redhat / CentOS
Download the required RPM file from http://download.webmin.com/download/yum/ using the command (note the root status):
# wget http://download.webmin.com/download/yum/webmin-1.580-1.noarch.rpm
Install the RPM file of Webmin with the following command:
Start Webmin service using the command:
You can now login to https://Fedora-16:10000/ as root with your root password. To ensure you are able to login into your webmin administration interface, simply use the following URL: https://your-linux-ip:10000 , where "your-linux-ip" is your Linux server's or workstation's IP address.
Running Webmin
Open Firefox or any other browser, and type the URL https://Fedora-16:10000/ :

You will be greeted with a welcome screen. Login as root with your root password. Once you are logged in, you should see the system information:

Adding Users, Groups And Assigning Them Privileges
Expand the "System" Tab in the left column index, and select the last entry “Users and Groups”. You will be shown the list of the "Local Users" on the system:

You can add users or delete them from this window. If you want to change the parameters of any user, you can do so. By clicking on any user, you can see the groups and privileges assigned to them. These can be changed as you like. For example, if you select the user "root", you can see all the details of the user as shown below :

By selecting the adjacent tab in the "Users and Groups" window, you can see the "Local Groups" as well:

Here, you can see the members in each group by selecting that group. You can delete a group or add a new one. You can select who will be the member of the group, and who can be removed from a group. For example, you can see all the members in the group "mem", if you select and open it:

Here, you will be allowed to create a new group or delete selected groups. You can also add users to the groups or delete them as required. If required, you can also change group ID on files and modify a group other modules as well.
Listing And Working With File Systems On The System
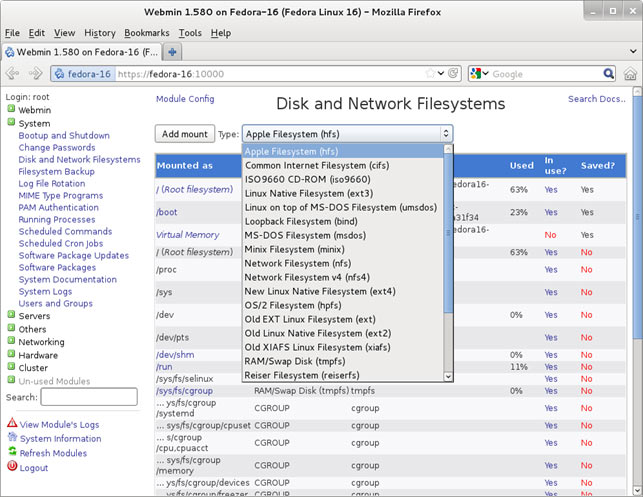
By selecting "Disk and Network Filesystems" under the "System" tab on the left index, you can see the different file systems currently mounted.

You can select other type of file system you would like to mount. Select it from the drop down menus as shown:
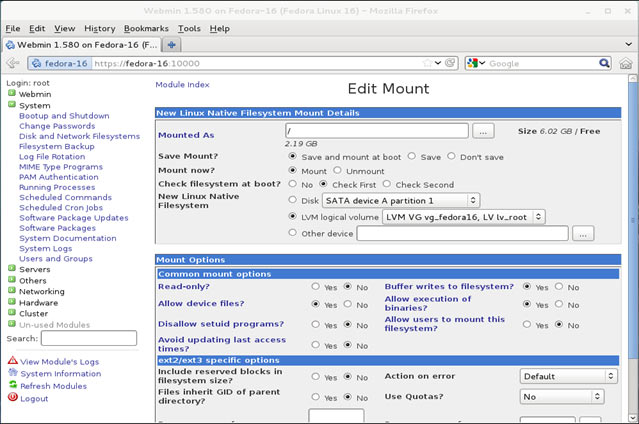
By selecting a mounted file system, you can edit its details such as whether it should be mounted at boot time, left as mounted or unmount it now, check the file system at boot time. Mount options like read-only, executable, permissions can be set here.
Creating And Editing Disk Quotas For Unix Users
Prior to Linux Installation, a major & key point in Linux Partition is the /home directory.
VHost is widely setup on almost all control panel mechanism on /home location, since Users & Groups, FTP server, User shell, Apache and several other directives are constructed on this /home partition. Therefore, home should be created as a Logical Volume on a Linux native File system (ext3). Here it is assumed there is already a /home partition on the system.
You can set the quotas by selecting “Disk & Network Filesystems” under “System”:

This allows you to create and edit disk quota for the users in your /home partition or directory. Each user is given a certain amount of disk space he can use. Going close to filling up the quota will generally send a warning.
You can also edit other mounts such as the root directory "/" and also set a number of presented mount options:
Editing The System Boot Up, Adding And Removing Services
All Systemd services are neatly listed in the "Bootup and Shutdown" section within "System":

All service related functions such as start, stop, restart, start on boot, disable on boot, start now and on boot, and disable now and on boot are available at the bottom of the screen. This makes system bootup process modification a breeze, even for the less experienced:
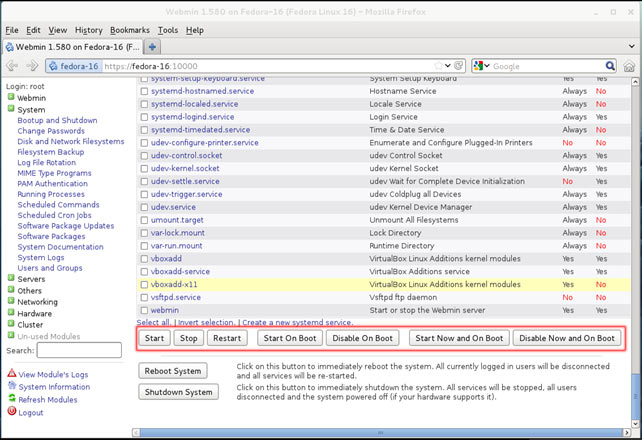
The "Reboot System" and "Shutdown System" function buttons are also located at the bottom, allowing the immediately reboot or shutdown the system.
Managing And Examining System Log Files
Who would have thought managing system log files in Linux would be so easy? Webmin provides a dedicated section allowing the admnistrator to make a number of changes to the preferences of each system's log file. The friendly interface will show you all available system log files and their location. By clicking on the one of interest, you can see its properties and make the changes you require.
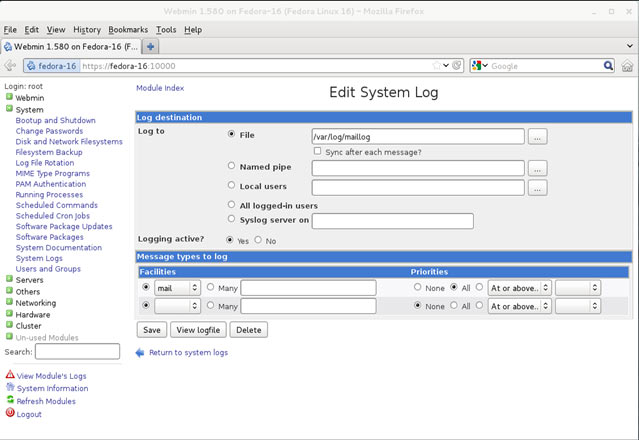
The following screenshot shows the "System Logs" listed in the index under "System" menu option:

All the logs are available for viewing and to editing. The screenshot below shows an example of editing the maillog. Through the interface, you can enable, disable logs and make a number of other changes on the fly:
Another entry under "System" is the important function of "Log File Rotation". This allows you to edit which log file you would like to rotate and how (daily, weekly or monthly). You can define what command will be executed after the log rotation is done. You can also delete the selected log rotations:
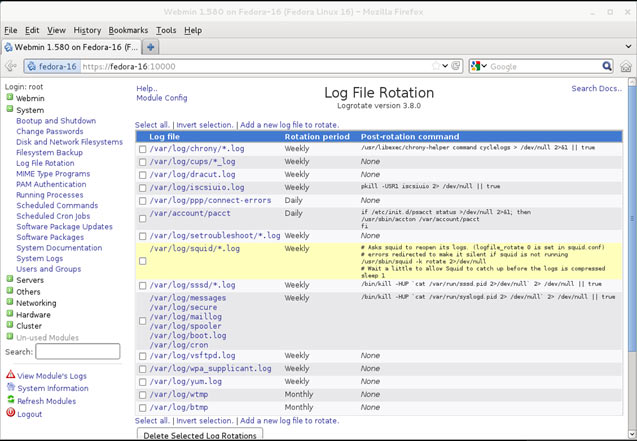
Log rotation is very important, especially on a busy system as it will ensure the log files are kept to a reasonable and manageable size.
Setting Up And Changing System Timezone/Date
Webmin also supports setting up system time and date. To do so, you will have to go to "System Time" under "Hardware" in the main menu index.

System time and hardware time can be separately set and saved. These can be made to match if required.
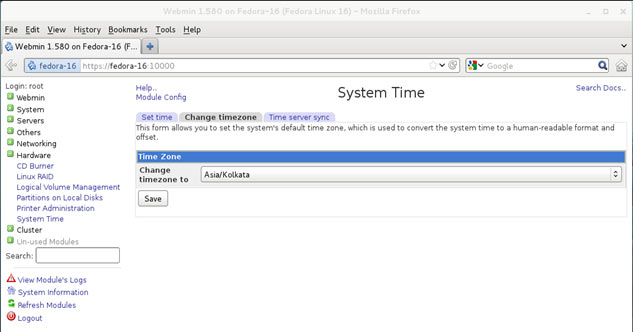
On the next tab you will be able to change the Timezone:
The next tab is the 'Time Server Sync', used for synchronizing to a time-server. This will ensure your system is always in sync with the selected time-server:
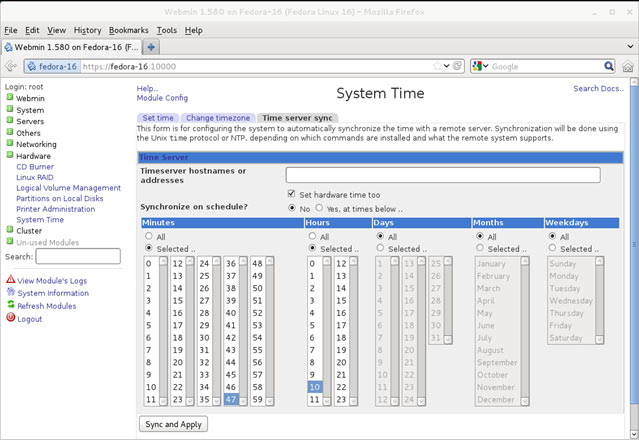
Here, you will be able to select a specific timeserver with a hostname or address and set the schedule when the periodic synchronizing will be done.
Managing DNS Server & Domain
DNS Server configuration is possible from the "Hostname and DNS Client", which is located under "Networking Configuration" within "Networking" in the index:

Here you can set the Hostname of the machine, the IP Address of the DNS Servers and their search domains and save them.
Configuring DHCP Server And Options
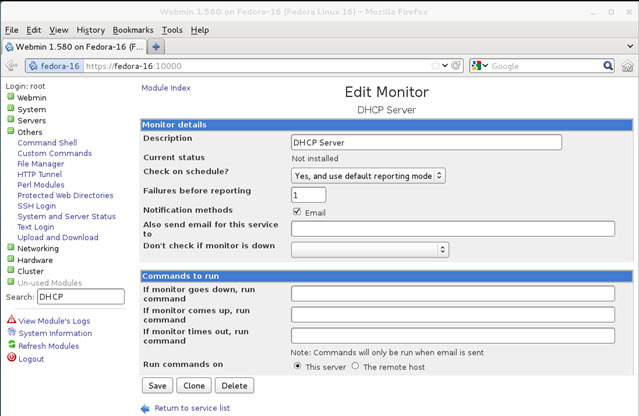
For configuration of your system's DHCP server, go to “DHCP Server” within “System and Server Status” under “Others”:

All parameters related to DHCP server can be set here:
Configuring FTP Server And Users/Groups
For ProFTPD Server, select “ ProFTPD Server” under “Servers”. You will see the main menu for ProFTPD server:

You can see and edit the Denied FTP Users if you select the "Denied FTP Users":

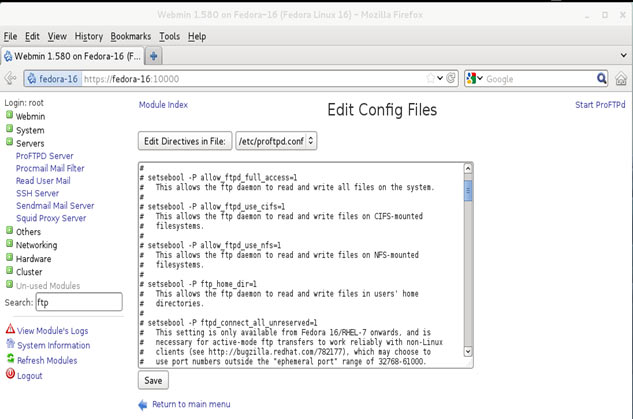
Configuration file at /etc/proftpd.conf can be directly edited if you select the "Edit Config Files" in the main menu:
How To Schedule A Backup
Whatever the configuration files you would like to backup, schedule and restore, can be done from “Backup Configuration Files” under “Webmin”.
In the “Backup Now” window, you can set the modules, the backup destination, and what you want included in the backup. The backup can be a local file on the system, a file on an FTP server, or a file on an SSH server. For both the servers, you will have to provide the username and password. Anything else that you would like to include during the backup such as webmin module configuration files, server configuration files, or other listed files can also be mentioned here:

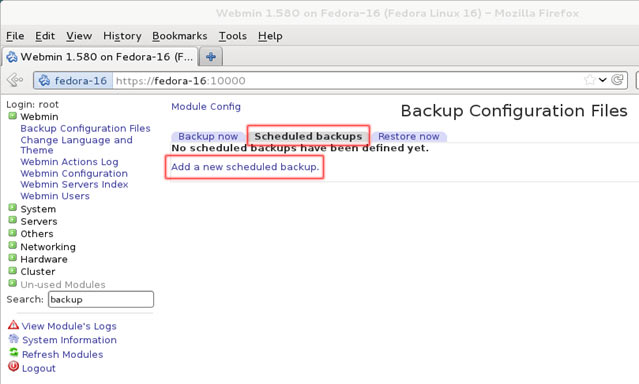
If you want to schedule your Backups go to the next tab “Scheduled Backups” and select the “Add a new scheduled backup”, since, as shown, no scheduled backup has been defined yet:

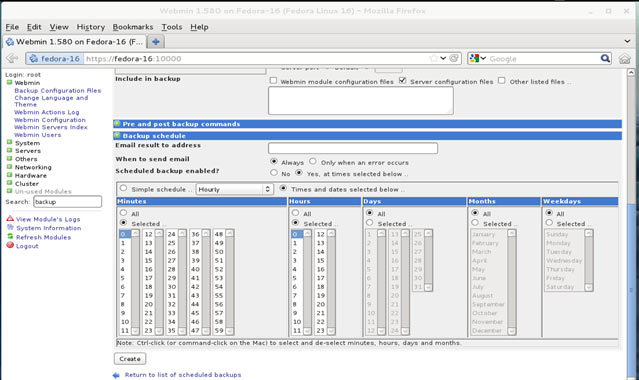
And set the exact backup schedule options. The information is nearly same as that for the Backup Now. However, now you have the choice for setting the options for the schedule, such as Months, Weekdays, Days, Hours, Minutes and Seconds.
Restoration of modules can be selected from the “Restore Now” tab:
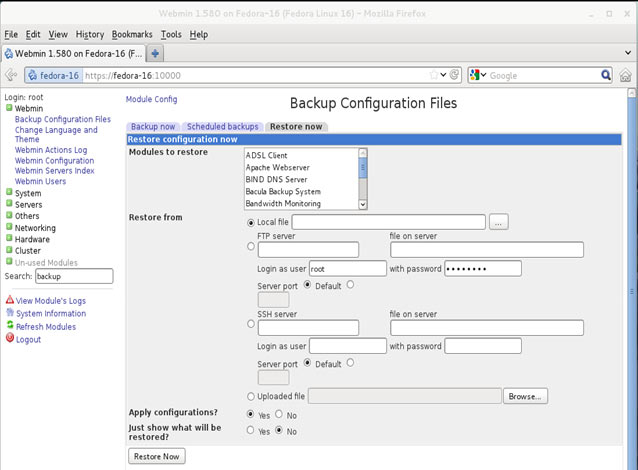
The options for restore now follow the same pattern as for the backup. You have the options for restoring from a local file, an FTP server, an SSH server, and an uploaded file. Apart from providing the username and passwords for the servers, you have the option of only viewing what is going to be restored, without applying the changes.
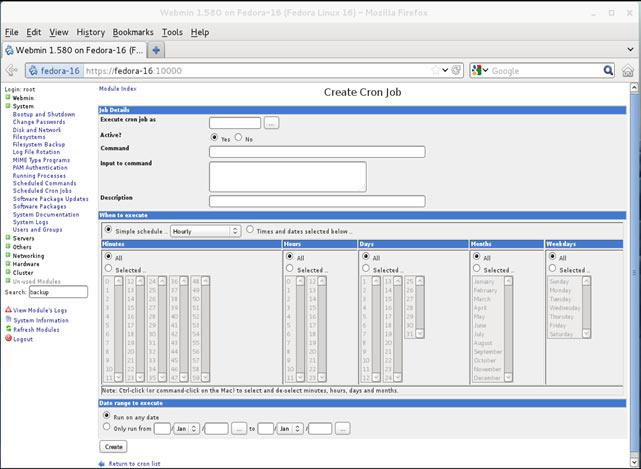
Configuring CRON Jobs With Webmin
Selecting the “Scheduled Cron Jobs” under “System” will allow creation, deletion, disabling and enabling of Cron jobs, as well as controlling user access to cron jobs. The interface also shows the users who are active and their current cron-jobs. The jobs can be selectively deleted, disabled or enabled (if disabled earlier).

For creating a new cron job and scheduling it, select the tab “Create a new scheduled cron job”. You have the options of setting the Months, Weekdays, Days, Hours, Minutes. You have the option of running the job on any date, or running it only between two fixed dates:
For controlling access to Cron jobs, select the next tab “Control User Access to Cron Jobs” in the main menu:

Configuring SSH Server With Webmin
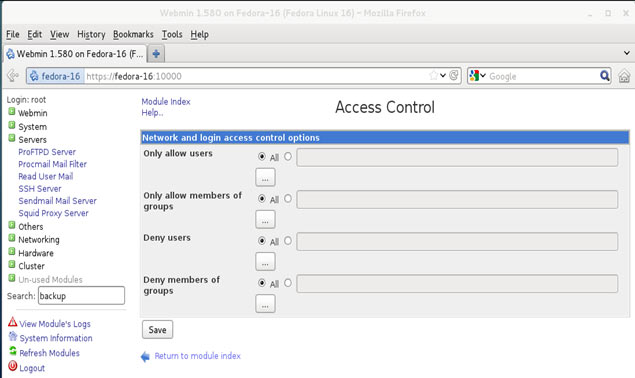
Selecting “SSH Server” under “Servers” will allow all configuration of the SSH Server:

Access Control is provided by selecting the option "Access Control" from the main menu :
Miscellaneous options are available when the "Miscellaneous Options" is selected from the main menu:
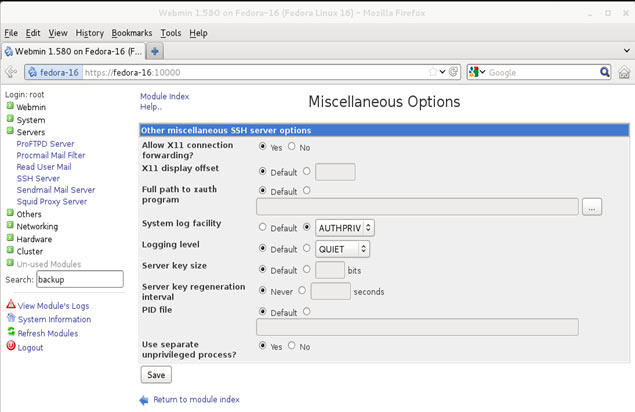
The SSH config files can be accessed directly and edited by selecting “Edit Config Files” from the main menu.

Configuring Squid Proxy Server
Select “Squid Proxy Server” under “Servers”. The main menu shows what all can be controlled there:

The Access Control allows ACL, Proxy restrictions, ICP restrictions, External ACL programs, and Reply proxy restrictions, when you select “Access Control”:


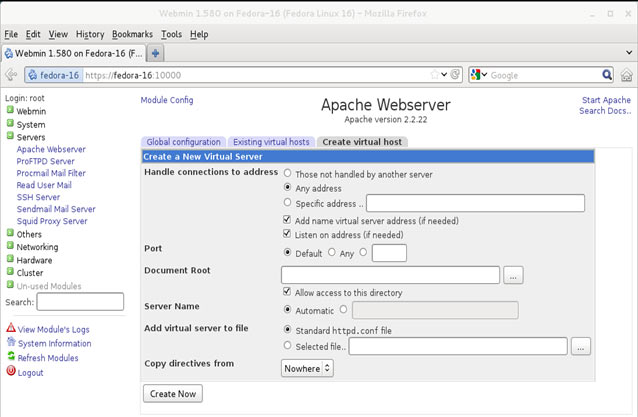
Configuring Apache HTTP Server
You can configure “Apache Webserver” under “Servers”. The main menu shows what you can configure there.
All Global configuration can be done from the first tab:

You can also configure the existing virtual hosts or create a virtual host, if you select the other tabs:
Users and Groups who are allowed to run Apache are mentioned here (select from the main menu):

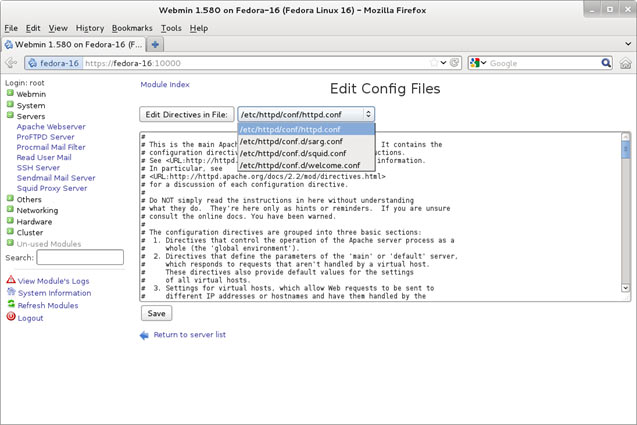
Apache configuration files can be directly edited from the main menu.
All the configuration files, httpd.conf, sarg.conf, squid.conf, and welcome.conf can be directly edited from this interface:
Any other service or application, which you are not able to locate directly from the index on the left, can be searched by entering in the search box on the left. If the item searched is not installed, Webmin will offer to download the RPM and install it. A corresponding entry will appear in the index on the left and you can proceed to configure the service or application. After installing an application or service, modules can be refreshed as well. From the Webmin interface, you can also view the module's logs.
Enterprise-Class Cloud & Network Monitoring

Bandwidth Monitor

Wi-Fi Key Generator
Network and Server Monitoring

Follow Firewall.cx
Recommended Downloads
Cisco Password Crack
Decrypt Cisco Type-7 Passwords on the fly!
Free PatchManager

Firewall Analyzer
