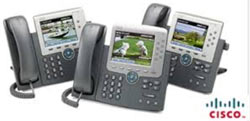
IP Phone 7945, 7965, 7975 Factory Reset Procedure, SCCP Firmware Upgrade & CME DHCP Server Setup
 This article explains how to reset your Cisco 7945, 7965 and 7975 IP phone to factory defaults, and how to upgrade the firmware to the latest available version. We also provide necessary information on how to setup a DHCP server on a CME router or Cisco Catalyst switch, to support Cisco IP Phones and provide them with DHCP Option 150 so they know where to find and register with the CallManager or CallManager Express server.
According to Cisco, when initiating a factory reset procedure certain information from the IP phone is erased while other information is reset to the factory default value, as shown in the list below:
Information Erased:
- CTL File (Certificate Trust List)
- LSC File (Locally Significant Certificate)
- IP Phone Call History (Calls Received, Placed, Missed etc)
- Phone application
Information Reset to Default:
-
User configuration settings (ring tone, screen brightness, sound levels etc)
-
Network configuration settings
It is highly advisable to follow the firmware upgrade procedure in a non-working environment to ensure other phones are not affected (in case of an accidental reboot), and to avoid the freshly factory reset ip phones obtaining the working environment’s settings.
Cisco IP phone SCCP firmware files version 9.2.1 for 7945, 7965 & 7975 IP phones (latest version at the time of writing this article) are available at our Cisco IP Phone & ATA Firmware Download section. For our example, we used version 9.1.1.
Firewall.cx readers can visit our free Cisco IP Phone & ATA Firmware Download section to freely download the latest available firmware for their Cisco IP phones.
Things To Consider Before Factory Resetting Your Cisco IP Phone
When performing the factory reset procedure we are about to describe it is important to keep in mind that the IP phone will lose all configuration files and phone application. This means that it is necessary to have CallManager or CallManager Express setup so that the IP phone will be able to receive the new information (phone application and configuration) after the reset procedure is complete, because it is likely the IP phone will not be usable until this information is loaded.
This preparation also happens to be the procedure for upgrading a Cisco IP phone firmware.
Configuring CallManager Express (CME) For IP Phone Firmware Upgrade
Upgrading your Cisco IP phone firmware is a very simple process. Special consideration must be taken into account when upgrading to the latest firmware.
If the Cisco Unified IP phone is currently running firmware earlier than 6.0(2) on and you want to upgrade to 8.x(x), you must first install an intervening 7.0(x) load to prevent upgrade failure.
Cisco recommends using the most recent 7.0(3) load as the intervening load to avoid lengthy upgrade times.
If the Cisco Unified IP phone is currently running firmware 6.0(2) to 7.0(2) and you want to upgrade to 8.x(x), you can do so directly. However, expect the upgrade to take twice as long.
Step 1 – Download the Appropriate Firmware
To download Cisco IP Phone firmware a valid Cisco CCO account is required. In most cases, the firmware file name is something similar to the following: cmterm-7945_7965-sccp.9-1-1.tar. From the file name, we can understand that this is firmware version 9.1.1, for Cisco 7945 and 7965 SCCP IP phones.
Step 2 – Upload Firmware to CallManager Express
Next, the firmware must be uploaded and unpacked on our CME router. For this, we’ll need a TFTP server running on a workstation, plus access to the CME router. From the CME prompt we instruct the router to download the firmware and unpack it onto our CME flash:
When complete, the system’s flash will contain all 8 files extracted above.
Step 3 – Configure The CallManager Express TFTP server to serve these files & Setup DHCP Server (option 150)
Now we must configure CME’s tftp server to ‘serve’ these files so that the IP phones can request them. This is done by adding the following commands to the router’s configuration:
We also need to ensure there is a valid DHCP server running with option 150 set to CME’s IP address. In our example, this is IP address 10.0.0.10. When the IP phone boots up, it will look for a DHCP server that will provide it with an IP address, but also expect to find DHCP option 150 which designates the CME the phone should try to register with:
The above configuration excludes IP address ranges 10.0.0.1 to 10.0.0.15 from being handed out by the DHCP server. It also creates a DHCP scope named Firewall.cx and configures various self-explanatory parameters including the critical DHCP option 150, which represents the CME the IP phone should try to register to.
Step 4 – Configure CallManager Express to use new Firmware on Next IP Phone Bootup
The final step involves configuring CME to use the new firmware and instruct IP phones to download it. This is done by issuing the following commands under the telephony-service section of CME:
The load command is followed by the phone type and associated firmware (.load) file. Notice we do not add the .loadof the filename at the end of the command.
The create cnf command instructs CME to recreate the XML files that will be used by the IP phone to download all necessary network parameters and force it to check its firmware and begin downloading the new one.
When our IP phone next reboots, it will download the latest firmware installed on the CME router and begin the upgrade process.
Performing the Factory Reset on Cisco 7945, 7965, 7975 IP Phone
Follow the steps below to successfully Factory reset your Cisco IP phone:
- Unplug the power cable from the ip phone and then plug it back in.
- While the phone is powering up, and before the Speaker button flashes on and off, press and hold the hash # key.
- Continue to hold # until each line button (right of the LCD screen) flashes on and off in sequence in orange colour.
- Now release the hash # key and type the following sequence 123456789*0#
After the sequence has been entered the line buttons on the phone flash orange, then green and the phone goes through the factory reset process. This process can take several minutes and the firmware of the IP Phone will be erased.
When complete, the IP phone will reboot and the bootloader will try to obtain an IP address via DHCP. The IP phone also expects the IP address (option 150) or the name (option 66) of the TFTP server to be delivered by the DHCP server. This is why these DHCP options are critical at this phase.
The phone then tries to obtain the appropriate termXX.default.loads file depending in its model:
- term75.default.loads - Cisco 7975
- term65.default.loads - Cisco 7965
- term45.default.loads - Cisco 7945
This "loads" file indicates all the files the IP phone has to download from the TFTP server to make up the device firmware. The IP phone should first obtain the “loads” file and then proceed with the individual files. Once complete, the IP phone will install the files and finally reboot
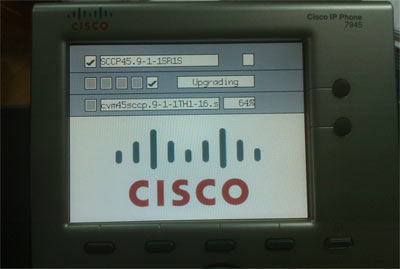
Below is a screenshot of our 7945 IP phone during the firmware upgrade process:

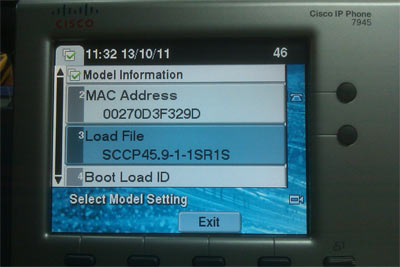
The IP phone should now be ready for use with the new IP phone firmware installed. The firmware can be verified by going to the phone Settings / Model Information menu option, where the load file installed is shown:

This article explained how to perform a factory reset for Cisco IP phones 7975, 7965 & 7945 models. We saw what information is lost during the reset, how to configure Cisco CallManager Express TFTP Server so that the updated SCCP firmware is automatically loaded on the IP phones and how to verify the IP phone firmware after the upgrade is complete.
Your IP address:
216.73.216.214
Wi-Fi Key Generator
Follow Firewall.cx
Cisco Password Crack
Decrypt Cisco Type-7 Passwords on the fly!


