


Mentioned in Part-1 of our Cisco Unity Express installation article, the Cisco Unity Express setup procedure is identical for ISM-SRE-300-K9 and SM-SRE-700-K9 modules. We will be using the smaller ISM-SRE-300-K9 for this article. The only notable difference in the CallManager Express configuration will be the module’s interface that connects to CallManager Express.
Users interested can also visit our Cisco VoIP/CCME - CallManager Section where they'll find more articles covering Cisco VoIP, CallManager, CallManager Express and Unity Express.
For the SRE-300, the module’s interface name is interface ISM0/0, whereas for the SM-SRE-700 it is service-module sm2/0. Both interfaces are GigabitEthernet, connected via each router’s internal bus.
The ISM-SRE-300-K9 module is configured with its own IP address and acts as a separate machine inside the router. Before we can begin configuring Unity Express, preinstalled by Cisco, we must configure IP connectivity with the router so we can then access the ISM-SRE-300-K9 module and initialize the Unity Express setup.
When physically installing an SRE module, CCME will automatically make two additional interfaces available in its configuration. For the ISM-SRE-300-K9, they are interface ISM0/0 and interface ISM0/1, whereas for the SM-SRE-700 they are interface SM2/0 and interface SM2/1.
First step is to configure IP connectivity between the router (CCME) and Unity Express. This is achieved by configuring interface ISM0/0 with an IP address (ISM-SRE-300-K9) or interface SM2/0 for the SM-SRE-700.
Our CCME router has two IP addresses, 192.168.9.5/24 (Data VLAN) and 192.168.10.5/24 (Voice VLAN). When configuring an IP address on Unity Express, there is the choice of assigning one part of the existing network(s) (192.168.9.0 or 192.168.10.0) or one that is on a completely different network.
It is a common practice to configure Unity Express with an IP address that is part of the Voice VLAN, that is, 192.168.10.0/24 in our example:
In the above configuration commands, we’ve configured our Unity Express module with IP address 192.168.10.10 and a default-gateway of 192.168.10.5 (CCME’s Voice VLAN IP address), this is because the Unity Express module is physically connected to our router’s internal interfaces (ISM) and therefore must use one of the router’s IP interfaces as a default-gateway.
The ip unnumbered <interface> command allows the Cisco Unity Express module to use a network subnet IP address associated with a specific router egress port such as GigabitEthernet0/0.2. This configuration method requires a static route to the service-engine interface. The router interface associated with the Cisco Unity Express interface (GigabitEthernet 0/0.2) must be in an "up" state at all times for communication between the router and module.
At this point we should note that GigabitEthernet0/0 is configured as a trunk link with our switch. This configuration method is known as ‘Router on a Stick’ and allows all configured VLANs to pass through a single interface. For more information on this configuration method, please refer to our Router-on-a-Stick article.
Following is the configuration of our GigabitEthernet 0/0 interface:
Next step is to create a static route to Unity Express’s IP address via the internal service module (ISM0/0):
At this point, we should be able to ping Unity Express’s IP address:
CallManager Express - Telephony-Service Configuration
Next step is to configure our CallManager Express web-based administrator user (if not already configured), voicemail extension on CallManager Express, voicemail dial-peer and Message Waiting Indicator (MWI) extensions used to enable/disable the red light (message waiting indicator) on the IP phone when there is a message waiting in the user’s voice mailbox:
Now we must enable the IP http & http secure server and ensure the http access-lists (if any) allow the login of Unity Express’s IP address:
2911-CCME(config)# access-list 50 remark -=[Control CUCME Web Access]=-
2911-CCME(config)# access-list 50 permit 192.168.9.0 0.0.0.255
2911-CCME(config)# access-list 50 permit host 192.168.10.10
2911-CCME(config)# access-list 50 remark
Failing to configure the above commands will result in the failure of Unity Express to log into the CallManager Express system and not able to complete the Unity Express initialization process. In our setup, network 192.168.9.0 is the Data VLAN, whereas host 192.168.10.10 is our Unity Express IP address.
Unity Express Module Administrator User Configuration
Final step involves login into the Unity Express CLI and creating the admin user to be used for the web-based initialization process that follows:
2911-UnityExpress# exit
Session closed
[Connection to 192.168.10.5 closed by foreign host]
We are now ready to connect to Unity Express and begin the module’s initialization.
Unity Express Web Interface Initialization & Configuration
Open a web browser and enter the IP address of the Cisco Unity Express module, in our case this is 192.168.10.10. The Unity Express is yet to be initialized and therefore will only allow administrator login.
Using the username and password entered above, we log in to the Unity Express administration panel:

Upon logon, we need to select the appropriate Call Agent Integration from the drop-down menu, in our case Cisco Unified Communication Manager Express:

After the selection, the system will warn that it will delete Jtapi related configuration and reboot. Do not be alarmed and click on OK to continue:

If you’re connected to the unity express CLI, you’ll also be able to view the whole reboot process. Here is the session we captured during this reboot:
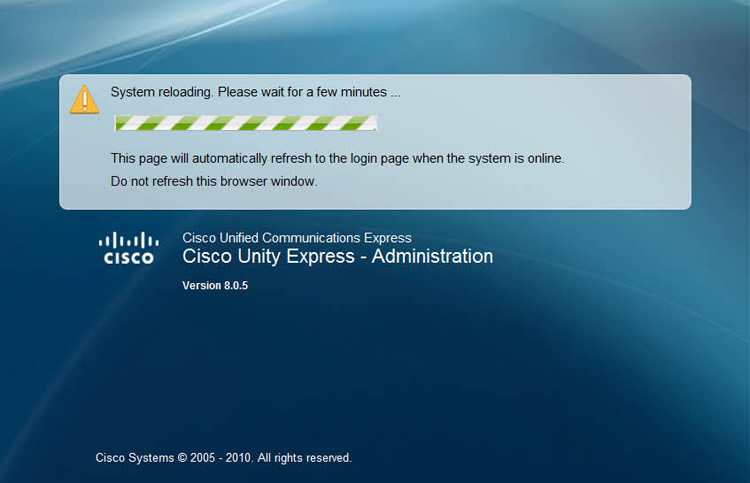
While Unity Express reboots, the GUI interface shows a messaging explaining that the system is reloading and will automatically try to reconnect once the reboot cycle is complete:
When the system is back online it is necessary to log back in using the Unity Express administrator account previously created (admin).
After the logon process is complete, we are presented with the CUCME Logon screen. This screen is to provide the credentials so that Unity Express can log on to the CCME and obtain user account configuration. This account is the same account created under the Telephony-Service section of CCME (shown previously). We can also provide the hostname or IP address of CCME. We selected the IP address of the Voice VLAN, 192.168.10.5:
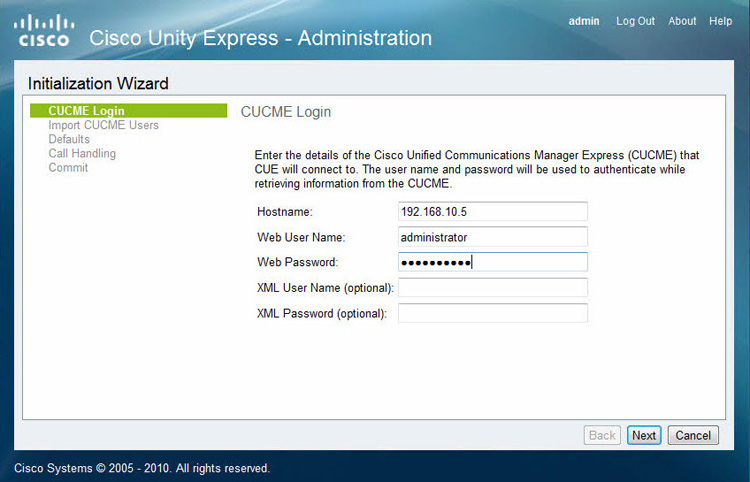
In case of logon failure, Unity Express will present a pop-up window explaining that it failed to log on. In such a case, check the CCME web user under telephony-services and ensure the rest of the required commands are present.
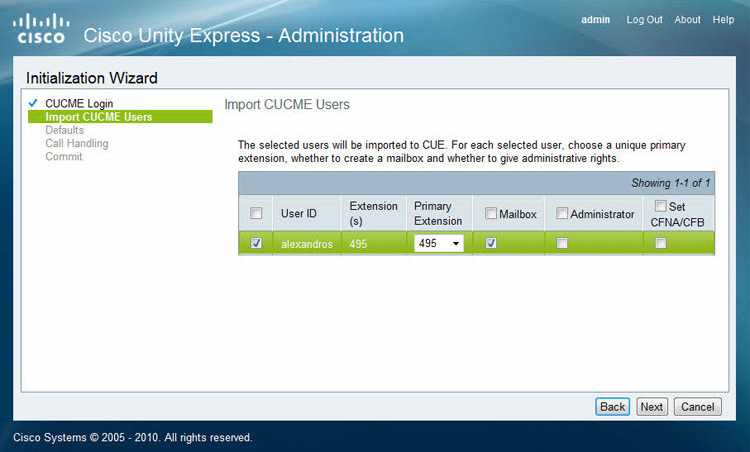
As soon as Unity Express’s login to CCME is complete, it will present all users it finds and allow the administrator to associate the Primary Extension for each one. Here, you can also enable Mailbox creation, set a specific user as an Administrator or set CFNA/CFB (Call Forward No Answer / Call Forward Busy) so that incoming calls to the user are directed to his/her voicemail when not answered or busy:
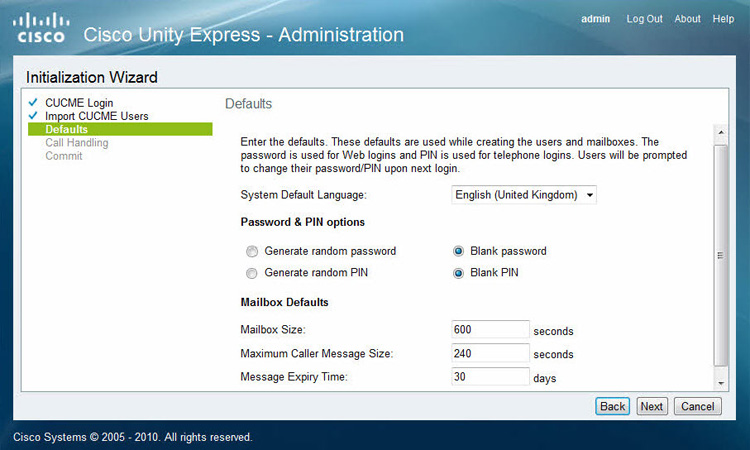
Clicking on Next takes us to the Defaults page where default settings are configured for all new users and mailboxes created from now on. Ensure the System Default Language is set to English (in most cases) and take note of the Password & PIN Options. The rest can be changed as required:
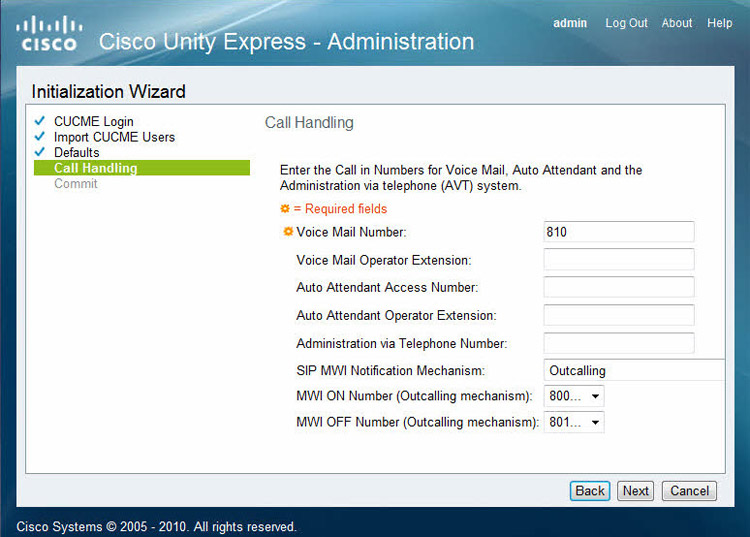
Next page coves the handling of calls to Unity Express. Here you set the Voice Mail Number. This same number should be configured under Telephony-Service in CallManager Express (covered earlier in this article). MWI ON/OFF should be automatically configured, if not, select the correct extensions configured. SIP MWI should be left as default unless there is a reason to change it:
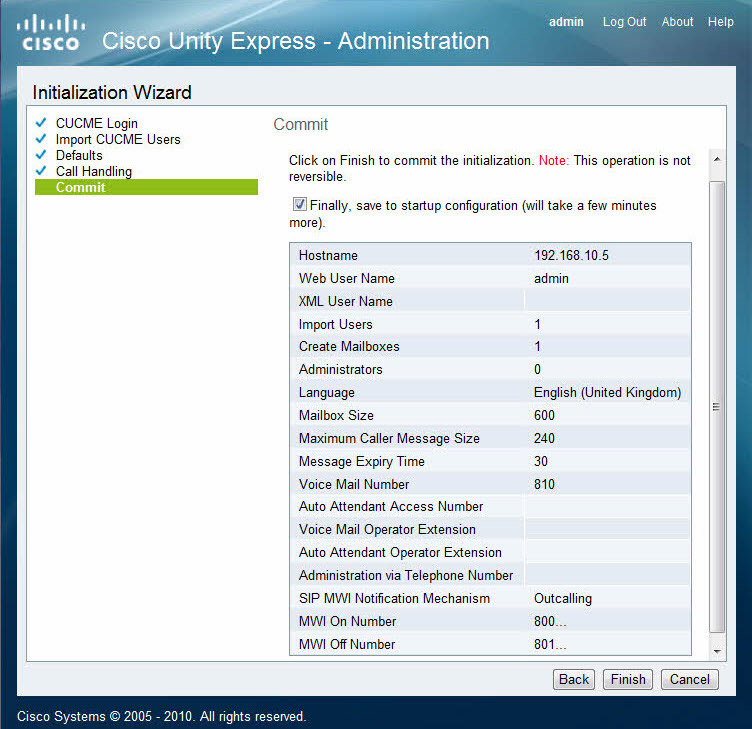
A final screen is presented where there is an option to finalize the configuration and save it to the Unity Express startup-config. Review as necessary and click on Finish to begin the process:
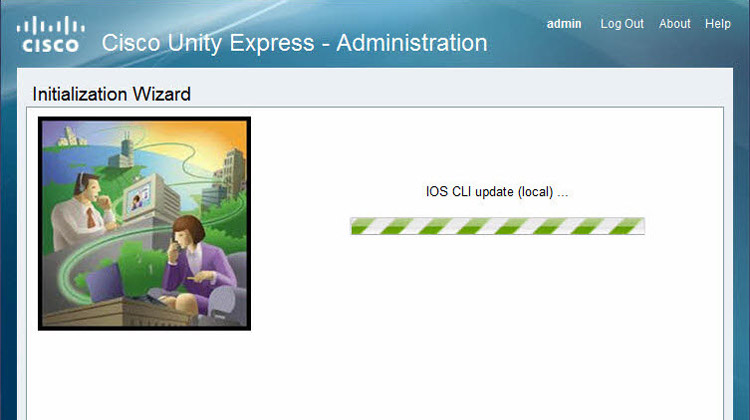
As the saving of the configuration is in progress, Unity Express executes a number of scripts in the background and makes the necessary modifications. An update of this progress is shown on the web browser screen:
Finally, Unity Express will present a summary of the setup and inform the administrator of all successes and failures:

In our example, Unity Express failed to create and allocate a voice mailbox to our user due to the absence of an active mailbox license.
Unity Express licensing will be covered in a separate article, along with more details and information.
This completes a two-part article covering the physical installation of ISM300 and SME700 Service Engine Ready modules with Unity Express 8.0.
Your IP address:
216.73.216.176
All-in-one protection for Microsoft 365

FREE Hyper-V & VMware Backup

Wi-Fi Key Generator
Network and Server Monitoring

Follow Firewall.cx
Recommended Downloads
Enterprise Class Cloud & Network Monitoring

Cisco Password Crack
Decrypt Cisco Type-7 Passwords on the fly!
Bandwidth Monitor

Free PatchManager

Security Podcast

Firewall Analyzer
