Cisco VPN Client Configuration - Setup for IOS Router
Remote VPN access is an extremely popular service amongst Cisco routers and ASA Firewalls. The flexibility of having remote access to our corporate network and its resources literally from anywhere in the world, has proven extremely useful and in many cases irreplaceable. All that is required is fast Internet connection and your user credentials to log in – all the rest are taken care by your Cisco router or firewall appliance.
To initiate the connection, we use the Cisco VPN client, available for Windows operating systems (XP, Vista, Windows 7 - 32 & 64bit), Linux, Mac OS X10.4 & 10.5 and Solaris UltraSPARC (32 & 64bit), making it widely available for most users around the globe. Cisco VPN Clients are available for download from our Cisco Downloads section.
The Cisco VPN also introduces the concept of ‘Split Tunneling'. Split tunneling is a feature that allows a remote VPN client access the company's LAN, but at the same time surf the Internet. In this setup, only traffic destined to the company's LAN is sent through the VPN tunnel (encrypted) while all other traffic (Internet) is routed normally as it would if the user was not connected to the company VPN.
Some companies have a strict policy that does not allow the remote VPN client access the Internet while connected to the company network (split tunneling disabled) while others allow restricted access to the Internet via the VPN tunnel (rare)! In this case, all traffic is tunnelled through the VPN and there's usually a web proxy that will provide the remote client restricted Internet access.
From all the above, split tunneling is the most common configuration of Cisco VPN configuration today, however for educational purposes, we will be covering all methods.
Setting up a Cisco router to accept remote Cisco VPN clients is not an extremely difficult task. Following each step shown in this article will guarantee it will work flawlessly.
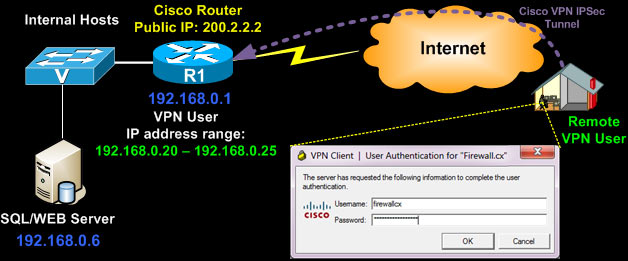
Below is a typical diagram of a company network providing VPN access to remote users in order to access the company's network resources.
The VPN established is an IPSec secure tunnel and all traffic is encrypted using the configured encryption algorithm:

Engineers and administrators who need to restrict VPN user access to Layer-4 services e.g www, smtp, pop on a specific internal host (e.g web/email server) should read our How to Restrict Cisco IOS Router VPN Client to Layer-4 (TCP, UDP) Services - Applying IP, TCP & UDP Access Lists article.
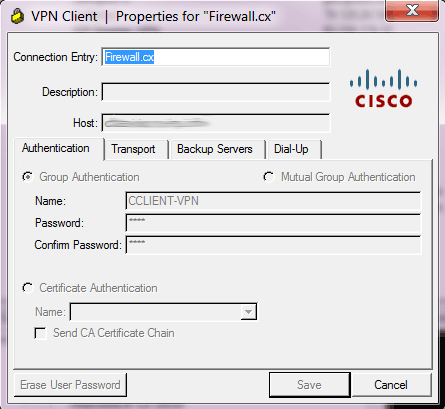
The Cisco IPSec VPN has two levels of protection as far as credentials concern. The remote client must have valid group authentication credential, followed by valid user credential.
The group credentials are entered once and stored in the VPN connection entry, however the user credentials are not stored and requested every time a connection is established:

We should note that configuring your router to support Point-to-Point Tunnel Protocol VPN (PPTP) is an alternative method and covered on our Cisco PPTP Router Configuration article, however PPTP VPN is an older, less secure and less flexible solution. We highly recommend using Cisco IPSec VPN only.
In order to configure Cisco IPSec VPN client support, the router must be running at least the 'Advanced Security' IOS otherwise most of the commands that follow will not be available at the CLI prompt!
To begin, we need to enable the router's 'aaa model' which stands for 'Authentication, Authorisation and Accounting'. AAA provides a method for identifying users who are logged in to a router and have access to servers or other resources.
AAA also identifies the level of access that has been granted to each user and monitors user activity to produce accounting information.
We enable the 'aaa new-model' service followed by X-Auth for user authentication and then group authentication (network vpn_group_ml_1):
R1(config)# aaa new-model
R1(config)# aaa authentication login default local
R1(config)# aaa authentication login vpn_xauth_ml_1 local
R1(config)# aaa authentication login sslvpn local
R1(config)# aaa authorization network vpn_group_ml_1 local
R1(config)# aaa session-id common
When trying to establish an IPSec tunnel, there are two main phase negotiations where the remote client negotiates the security policies and encryption method with the Cisco VPN router.
Now we create the user accounts that will be provided to our remote users. Each time they try to connect to our VPN, they will be required to enter this information:
R1(config)# username firewallcx secret $fir3w@ll!
We next create an Internet Security Association and Key Management Protocol (ISAKMP) policy for Phase 1 negotiations. In this example, we've create two ISAKMP policies, and configure the encryption (encr), authentication method, hash algorithm and set the Diffie-Hellman group:
R1(config-isakmp)# encr 3des
R1(config-isakmp)# authentication pre-share
R1(config-isakmp)# group 2
R1(config-isakmp)#
R1(config-isakmp)#crypto isakmp policy 2
R1(config-isakmp)# encr 3des
R1(config-isakmp)# hash md5
R1(config-isakmp)# authentication pre-share
R1(config-isakmp)# group 2
R1(config-isakmp)# exit
We now create a group and configure the DNS server and other parameters as required. These parameters are passed down to the client as soon as it successfully authenticates to the group:
R1(config-isakmp-group)# key firewall.cx
R1(config-isakmp-group)# dns 10.0.0.10
R1(config-isakmp-group)# pool VPN-Pool
R1(config-isakmp-group)# acl 120
R1(config-isakmp-group)# max-users 5
R1(config-isakmp-group)# exit
R1(config)# ip local pool VPN-Pool 192.168.0.20 192.168.0.25
The above configuration is for the 'CCLIENT-VPN' group with a pre-share key (authentication method configured previously) of 'firewall.cx'. Users authenticating to this group will have their DNS set to 10.0.0.10. A maximum of 5 users are allowed to connect simultaneously to this group and will have access to the resources governed by access-list 120.
Lastly, users authenticating to this group will obtain their IP address from the pool named 'VPN-Pool' that provides the range of IP address: 192.168.0.20 up to 192.168.0.25.
Creation of the Phase 2 Policy is next. This is for actual data encryption & IPSec phase 2 authentication:
R1(cfg-crypto-trans)#
The transformation named 'encrypto-method-1' is then applied to an IPSec profile named 'VPN-Profile-1':
R1(ipsec-profile)# set transform-set encrypt-method-1
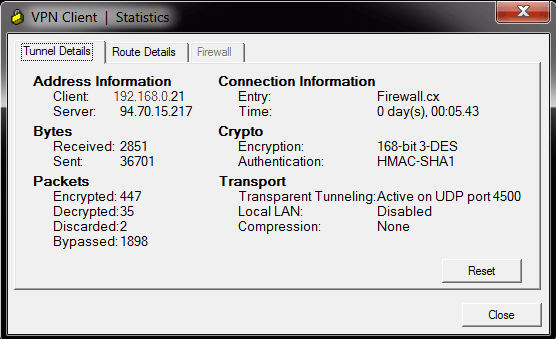
Note the encryption and authentication method of our IPSec crypto tunnel as shown by a connected VPN client to the router with the above configuration:

Now its time to start binding all the above together by creating a virtual-template interface that will act as a 'virtual interface' for our incoming VPN clients. Remote VPN clients will obtain an IP address that is part of our internal network (see diagram above - 192.168.0.x/24) so we therefore do not require this virtual interface to have an ip address and configure it as an 'ip unnumbered' interface on our router's LAN interface.
Setting an interface as an ip unnumbered enables IP processing through it without assigning an explicit IP address, however you must bind it to a physical interface that does have an IP address configured, usually your LAN interface:
R1(config-if)# ip unnumbered FastEthernet0/0
R1(config-if)# tunnel mode ipsec ipv4
R1(config-if)# tunnel protection ipsec profile VPN-Profile-1
Above, our virtual template also inherits our configured encryption method via the 'ipsec profile VPN-Profile-1' command which sets the transform method to 'encrypt-method-1' (check previous configuration block) which in turn equals to 'esp-3des esp-sha-hmac'.
Notice how Cisco's CLI configuration follows a logical structure. You configure specific parameters which are then used in other sections of the configuration. If this logic is understood by the engineer, then decoding any given Cisco configuration becomes an easy task.
So far we've enabled the authentication mechanisms (aaa), created an ISAKMP policy, created the VPN group and set its parameters, configured the encryption method (transform-set) and binded it to the virtual template the remote VPN user will connect to.
Second-last step is to create one last ISAKMP profile to connect the VPN group with the virtual template:
R1(conf-isa-prof)# match identity group CCLIENT-VPN
R1(conf-isa-prof)# client authentication list vpn_xauth_ml_1
R1(conf-isa-prof)# isakmp authorization list vpn_group_ml_1
R1(conf-isa-prof)# client configuration address respond
R1(conf-isa-prof)# virtual-template 2
Last step is the creation of our access lists that will control the VPN traffic to be tunnelled, effectively controlling what our VPN users are able to access remotely.
Once that's done, we need to add a 'no NAT' statement so that traffic exiting the router and heading toward the VPN user is preserved with its private IP address, otherwise packets sent through the tunnel by the router, will be NAT'ed and therefore rejected by the remote VPN Client.
When NAT is enabled through a VPN tunnel, the remote user sees the tunnelled traffic coming from the router's public IP address, when in fact it should be from the router's private IP address.
We assume the following standard NAT configuration to provide Internet access to the company's LAN network:
<output omitted>
ip nat inside source list 100 interface Dialer1 overload
access-list 100 remark -=[Internet NAT Service]=-
access-list 100 permit ip 192.168.0.0 0.0.0.255 any
access-list 100 remark
Based on the above, we proceed with our configuration. First, we need to restrict access to our remote VPN users, so that they only access our SQL server with IP address 192.168.0.6 (access-list 120), then we deny NAT (access-list 100) to our remote VPN Pool IP range:
R1(config)# access-list 120 remark ==[Cisco VPN Users]==
R1(config)# access-list 120 permit ip host 192.168.0.6 host 192.168.0.20
R1(config)# access-list 120 permit ip host 192.168.0.6 host 192.168.0.21
R1(config)# access-list 120 permit ip host 192.168.0.6 host 192.168.0.22
R1(config)# access-list 120 permit ip host 192.168.0.6 host 192.168.0.23
R1(config)# access-list 120 permit ip host 192.168.0.6 host 192.168.0.24
R1(config)# access-list 120 permit ip host 192.168.0.6 host 192.168.0.25
R1(config)# no access-list 100
R1(config)# access-list 100 remark [Deny NAT for VPN Clients]=-
R1(config)# access-list 100 deny ip 192.168.0.0 0.0.0.255 host 192.168.0.20
R1(config)# access-list 100 deny ip 192.168.0.0 0.0.0.255 host 192.168.0.21
R1(config)# access-list 100 deny ip 192.168.0.0 0.0.0.255 host 192.168.0.22
R1(config)# access-list 100 deny ip 192.168.0.0 0.0.0.255 host 192.168.0.23
R1(config)# access-list 100 deny ip 192.168.0.0 0.0.0.255 host 192.168.0.24
R1(config)# access-list 100 deny ip 192.168.0.0 0.0.0.255 host 192.168.0.25
R1(config)# access-list 100 remark
R1(config)# access-list 100 remark -=[Internet NAT Service]=-
R1(config)# access-list 100 permit ip 192.168.0.0 0.0.0.255 any
Note that for access-list 100, we could either 'deny ip host 192.168.0.6' to our remote clients, or as shown, deny the 192.168.0.0/24 network. What's the difference? Practically none. Denying your whole network the NAT service toward your remote clients, will make it easier for any future additions.
If for example there was a need to deny NAT for another 5 servers so they can reach remote VPN clients, then the access-list 100 would need to be edited to include these new hosts, where as now it's already taken care of. Remember, with access-list 100 we are simply controlling the NAT function , not the access the remote clients have (done with access-list 120 in our example.
At this point, the Cisco VPN configuration is complete and fully functional.
VPN - Split Tunneling
We mentioned in the beginning of this article that we would cover split tunneling and full tunneling methods for our VPN clients. You'll be pleased to know that this functionality is solely determined by the group's access-lists, which our case is access-list 120.
If we wanted to tunnel all traffic from the VPN client to our network, we would use the following access-list 120 configuration:
R1(config)# access-list 120 remark ==[Cisco VPN Users]==
R1(config)# access-list 120 permit ip any host 192.168.0.20
R1(config)# access-list 120 permit ip any host 192.168.0.21
R1(config)# access-list 120 permit ip any host 192.168.0.22
R1(config)# access-list 120 permit ip any host 192.168.0.23
R1(config)# access-list 120 permit ip any host 192.168.0.24
R1(config)# access-list 120 permit ip any host 192.168.0.25
In another example, if we wanted to provide our VPN clients access to networks 10.0.0.0/24, 10.10.10.0/24 & 192.168.0.0/24, here's what the access-list 120 would look like (this scenario requires modification of NAT access-list 100 as well):
R1(config)# access-list 120 remark ==[Cisco VPN Users]==
R1(config)# access-list 120 permit ip 10.0.0.0 0.0.0.255 host 192.168.0.20
R1(config)# access-list 120 permit ip 10.0.0.0 0.0.0.255 host 192.168.0.21
R1(config)# access-list 120 permit ip 10.0.0.0 0.0.0.255 host 192.168.0.22
R1(config)# access-list 120 permit ip 10.0.0.0 0.0.0.255 host 192.168.0.23
R1(config)# access-list 120 permit ip 10.0.0.0 0.0.0.255 host 192.168.0.24
R1(config)# access-list 120 permit ip 10.0.0.0 0.0.0.255 host 192.168.0.25
R1(config)#
R1(config)# access-list 120 permit ip 10.10.10.0 0.0.0.255 host 192.168.0.20
R1(config)# access-list 120 permit ip 10.10.10.0 0.0.0.255 host 192.168.0.21
R1(config)# access-list 120 permit ip 10.10.10.0 0.0.0.255 host 192.168.0.22
R1(config)# access-list 120 permit ip 10.10.10.0 0.0.0.255 host 192.168.0.23
R1(config)# access-list 120 permit ip 10.10.10.0 0.0.0.255 host 192.168.0.24
R1(config)# access-list 120 permit ip 10.10.10.0 0.0.0.255 host 192.168.0.25
R1(config)#
R1(config)#
R1(config)# access-list 120 permit ip 192.168.0.0 0.0.0.255 host 192.168.0.20
R1(config)# access-list 120 permit ip 192.168.0.0 0.0.0.255 host 192.168.0.21
R1(config)# access-list 120 permit ip 192.168.0.0 0.0.0.255 host 192.168.0.22
R1(config)# access-list 120 permit ip 192.168.0.0 0.0.0.255 host 192.168.0.23
R1(config)# access-list 120 permit ip 192.168.0.0 0.0.0.255 host 192.168.0.24
R1(config)# access-list 120 permit ip 192.168.0.0 0.0.0.255 host 192.168.0.25
R1(config)#
R1(config)#
R1(config)# no access-list 100
R1(config)# access-list 100 remark [Deny NAT for VPN Clients]=-
R1(config)# access-list 100 deny ip 10.0.0.0 0.0.0.255 host 192.168.0.20
R1(config)# access-list 100 deny ip 10.0.0.0 0.0.0.255 host 192.168.0.21
R1(config)# access-list 100 deny ip 10.0.0.0 0.0.0.255 host 192.168.0.22
R1(config)# access-list 100 deny ip 10.0.0.0 0.0.0.255 host 192.168.0.23
R1(config)# access-list 100 deny ip 10.0.0.0 0.0.0.255 host 192.168.0.24
R1(config)# access-list 100 deny ip 10.0.0.0 0.0.0.255 host 192.168.0.25
R1(config)#
R1(config)#
R1(config)# access-list 100 deny ip 10.10.10.0 0.0.0.255 host 192.168.0.20
R1(config)# access-list 100 deny ip 10.10.10.0 0.0.0.255 host 192.168.0.21
R1(config)# access-list 100 deny ip 10.10.10.0 0.0.0.255 host 192.168.0.22
R1(config)# access-list 100 deny ip 10.10.10.0 0.0.0.255 host 192.168.0.23
R1(config)# access-list 100 deny ip 10.10.10.0 0.0.0.255 host 192.168.0.24
R1(config)# access-list 100 deny ip 10.10.10.0 0.0.0.255 host 192.168.0.25
R1(config)#
R1(config)#
R1(config)# access-list 100 deny ip 192.168.0.0 0.0.0.255 host 192.168.0.20
R1(config)# access-list 100 deny ip 192.168.0.0 0.0.0.255 host 192.168.0.21
R1(config)# access-list 100 deny ip 192.168.0.0 0.0.0.255 host 192.168.0.22
R1(config)# access-list 100 deny ip 192.168.0.0 0.0.0.255 host 192.168.0.23
R1(config)# access-list 100 deny ip 192.168.0.0 0.0.0.255 host 192.168.0.24
R1(config)# access-list 100 deny ip 192.168.0.0 0.0.0.255 host 192.168.0.25
R1(config)# access-list 100 remark
R1(config)# access-list 100 remark -=[Internet NAT Service]=-
R1(config)# access-list 100 permit ip 10.0.0.0 0.0.0.255 any
R1(config)# access-list 100 permit ip 10.10.10.0 0.0.0.255 any
R1(config)# access-list 100 permit ip 192.168.0.0 0.0.0.255 any
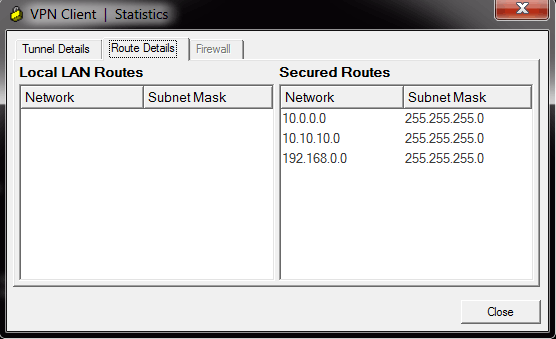
When the VPN client connects, should we go to the connection's statistics, we would see the 3 networks under the secure routes, indicating all traffic toward these networks is tunnelled through the VPN:

Cisco VPN Configuration Tips
Engineers and administrators who need to restrict VPN user access to Layer-4 services e.g www, smtp, pop on a specific internal host (e.g web/email server) should read our How to Restrict Cisco IOS Router VPN Client to Layer-4 (TCP, UDP) Services - Applying IP, TCP & UDP Access Lists article.
It is evident from our last example with the tunneling of our 3 networks, that should our VPN IP address pool be larger, for example 50 IP addresses, then we would have to enter 50 IPs x 3 Networks = 150 lines of code just for the access-list 120, plus another 150 lines for access-list 100 (no NAT)! That is quite a task indeed!
To help cut down the configuration to just a couple of lines, this is the alternative code that would be used and have the same effect:
Mark VPN Traffic to be tunnelled:
R1(config)# access-list 120 remark ==[Cisco VPN Users]==
R1(config)# access-list 120 permit ip 10.0.0.0 0.0.0.255 192.168.0.0 0.0.0.255
R1(config)# access-list 120 permit ip 10.10.10.0 0.0.0.255 192.168.0.0 0.0.0.255
R1(config)# access-list 120 permit ip 192.168.0.0 0.0.0.255 192.168.0.0 0.0.0.255
Do not NAT any traffic from our LANs toward VPN clients, but NAT everything else destined to the Internet:
R1(config)# access-list 100 remark [Deny NAT for VPN Clients]=-
R1(config)# access-list 100 deny ip 10.0.0.0 0.0.0.255 192.168.0.0 0.0.0.255
R1(config)# access-list 100 deny ip 10.10.10.0 0.0.0.255 192.168.0.0 0.0.0.255
R1(config)# access-list 100 deny ip 192.168.0.0 0.0.0.255 192.168.0.0 0.0.0.255
R1(config)# access-list 100 remark
R1(config)# access-list 100 remark -=[Internet NAT Service]=-
R1(config)# access-list 100 permit ip 10.0.0.0 0.0.0.255 any
R1(config)# access-list 100 permit ip 10.10.10.0 0.0.0.255 any
R1(config)# access-list 100 permit ip 192.168.0.0 0.0.0.255 any
The access-list 120 instructs the router to tunnel all traffic from the three networks to our VPN clients who's IP address will be in the 192.168.0.0/24 range!
So, if the VPN client received from the VPN Pool, IP address 192.168.0.23 or 192.168.0.49, it really wouldn't matter as the '192.168.0.0 0.0.0.255' statement at the end of each access-list 120 covers both 192.168.0.23 & 192.168.0.49. Even replacing the '192.168.0.0 0.0.0.255' with the 'any' statement would have the same effect.
For 'access-list 100' that controls the NAT service, we cannot use the 'any' statement at the end of the DENY portion of the ACLs, because it would exclude NAT for all networks (public and private) therefore completely disabling NAT and as a result, Internet access.
As a last note, if it was required the VPN clients to be provided with an IP address range different from that of the internal network (e.g 192.168.50.0/24), then the following minor changes to the configuration would have to be made:
R1(config-isakmp-group)# key firewall.cx
R1(config-isakmp-group)# dns 10.0.0.10
R1(config-isakmp-group)# pool VPN-Pool
R1(config-isakmp-group)# acl 120
R1(config-isakmp-group)# max-users 5
R1(config-isakmp-group)# exit
R1(config)#
R1(config)# ip local pool VPN-Pool 192.168.50.10 192.168.50.25
R1(config)#
R1(config)# interface Virtual-Template2 type tunnel
R1(config-if)# ip address 192.168.50.1 255.255.255.0
R1(config-if)# tunnel mode ipsec ipv4
R1(config-if)# tunnel protection ipsec profile VPN-Profile-1
Assuming 3 internal networks Mark VPN Traffic to be tunnelled:
R1(config)# access-list 120 remark ==[Cisco VPN Users]==
R1(config)# access-list 120 permit ip 10.0.0.0 0.0.0.255 192.168.50.0 0.0.0.255
R1(config)# access-list 120 permit ip 10.10.10.0 0.0.0.255 192.168.50.0 0.0.0.255
R1(config)# access-list 120 permit ip 192.168.0.0 0.0.0.255 192.168.50.0 0.0.0.255
Do not NAT any traffic from our LANs toward VPN clients, but NAT everything else destined to the Internet:
R1(config)# access-list 100 remark [Deny NAT for VPN Clients]=-
R1(config)# access-list 100 deny ip 10.0.0.0 0.0.0.255 192.168.50.0 0.0.0.255
R1(config)# access-list 100 deny ip 10.10.10.0 0.0.0.255 192.168.50.0 0.0.0.255
R1(config)# access-list 100 deny ip 192.168.0.0 0.0.0.255 192.168.50.0 0.0.0.255
R1(config)# access-list 100 remark
R1(config)# access-list 100 remark -=[Internet NAT Service]=-
R1(config)# access-list 100 permit ip 10.0.0.0 0.0.0.255 any
R1(config)# access-list 100 permit ip 10.10.10.0 0.0.0.255 any
R1(config)# access-list 100 permit ip 192.168.0.0 0.0.0.255 any
Summary
This article explained the fundamentals of Cisco's VPN client and features it offers to allow the remote and secure connection of users to their corporate networks from anywhere in the world.
We examined the necessary steps and commands required on a Cisco router to setup and configure it to accept Cisco VPN client connections. Detailed explanation was provided for every configuration step, along with the necessary diagrams and screenshots.
Split tunneling was explained and covered, showing how to configure the Cisco VPN clients access only to the required internal networks while maintaining access to the Internet.
Lastly, a few tips were presented to help make the Cisco VPN configuration a lot easier for large and more complex networks.
Wi-Fi Key Generator
Follow Firewall.cx
Cisco Password Crack
Decrypt Cisco Type-7 Passwords on the fly!


