


The DNS protocol is used to resolve FQDN (Fully Qualified Domain Names) to IP addresses around the world. This allows us to successfully find and connect to Internet websites and services no matter where they are. Its usefulness, however, doesn't stop there: local company and private networks also rely on DNS to operate efficiently and correctly.
In many cases, where a local DNS server is not available, we are forced to either use our ISP's DNS servers or some public DNS server, however, this can sometimes prove troublesome. Today, small low-end routers have the ability to integrate DNS functionality, making life easier, but so do Cisco routers - they simply have to be setup and you're done.
This article will show you how to configure your Cisco router to provide DNS services to your network, and make all clients use it as a DNS server. Our easy to follow step-by-step process ensures you'll understand the process and have it running within minutes.
Example Scenario
Consider the following network diagram. This is our example network, we'd like to enable the DNS Service so our workstations can properly resolve Internet domains but also local network names.

First step is to enable the DNS service and domain lookup on the router:
R1(config)# ip dns server
R1(config)# ip domain-lookup
Next, we need to configure the router with a public name-server, this will force the router to perform recursive DNS lookups, in other words, for every request it receives from our workstations the router will try to find the answer by asking as many DNS servers it needs, and finally return with an answer:
R1(config)# ip name-server 4.2.2.6
The Cisco IOS will allow you to enter up to 6 different name servers (essentially DNS servers). Usually you would use your ISP's DNS server to ensure you have quick responses, then place a few free public DNS servers such as the ones above. This will ensure that you'll get a DNS response from either your ISP or public DNS servers.
Next step is to configure your DNS server with the host names of your local network, this way when Alan's PC trys to ping or connect to Wayne, the router will successfully resolve its netbios name to the appropriate IP address:
R1(config)# ip host john 192.168.1.11
R1(config)# ip host wayne 192.168.1.12
If you now try to ping 'wayne' directly from your router's CLI prompt, you should receive an answer:
Type escape sequence to abort.
Sending 5, 100-byte ICMP Echos to 192.168.1.12, timeout is 2 seconds:
!!!!!
Success rate is 100 percent (5/5), round-trip min/avg/max = 1/1/4 ms
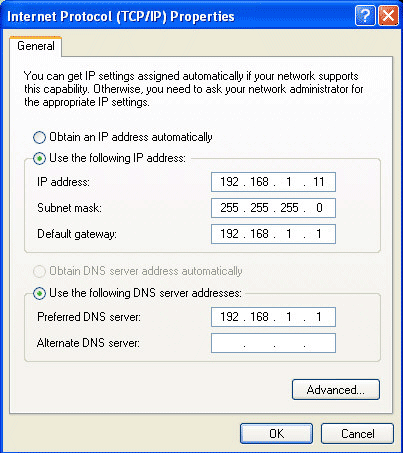
At this point, you can configure your workstations to use your router's IP address as the primary DNS server:
Summary
We've covered how a Cisco router can be used as a basic DNS server to enable network clients to perform DNS queries for the local network and Internet.
Future articles in DNS will cover more advanced configurations, including full domain resource records, DNS load balancing and more.
If you have found the article useful, we would really appreciate you sharing it with others by using the provided services on the top left corner of this article. Sharing our articles takes only a minute of your time and helps Firewall.cx reach more people through such services.
Free eBook - Endpoint Security

Enterprise-Class Cloud & Network Monitoring

Bandwidth Monitor

Wi-Fi Key Generator
Network and Server Monitoring

Follow Firewall.cx
Recommended Downloads
Cisco Password Crack
Decrypt Cisco Type-7 Passwords on the fly!
Automated Patching Solution

Firewall Analyzer
