How to Enable & Configure Shadow Copy for Shared Folders on Windows Server 2012 R2
When you shadow copy a disk volume, you are actually generating a snapshot of the changes made to the folders and files within the disk volume at a certain point in time. Windows 2012 R2 shadow copy feature allows taking snapshots at set intervals, so that users can revert and restore their folders and files to a previous version.
The shadow copy feature for backups is a much faster solution compared to the traditional backup solution. We should keep in mind that shadow copy is not meant as a replacement for the traditional backup process. The shadow copy process never copies all the files and folders, but only keeps track of the changes made to them. This is the reason shadow copy cannot replace the traditional backup process. Typically, shadow copies are useful in scenarios where one needs to restore an earlier version of files or folders.
To configure shadow copy of a shared folder in Windows Server 2012, at first, you have to enable the shadow copy feature on the disk volume containing the shared folder. The shadow copy process works only at volume level and not on individual files or directories. Additionally, it works only on NTFS volumes and not on FAT volumes. After generating a snapshot of the data, the server keeps track of changes occurring to the data.
Typically, the server stores the changes on the same volume as the original, but you can change the destination. Additionally, you can define the disk space allocated to shadow copies. As the allocated disk space fills up, the server deletes the oldest shadow copy snapshot, thereby making room for newer shadow copies. Once the server has deleted a shadow copy snapshot, you cannot retrieve it. Windows Server 2012 R2 can keep a maximum of 64 shadow copies per volume.
Running a Windows Hyper-V or VMware Server? Hyper-V & VMware Backup made easy with Altaro’s Free VM Backup Solution. Download Now!
Install File & Storage Services
The shadow copy feature requires prior installation of all the File and Storage Services. For installing or verifying the installation of all the File and Storage Services, logon to the server as a local administrator, go to the Server Manager Dashboard and click on Add Roles and Features.
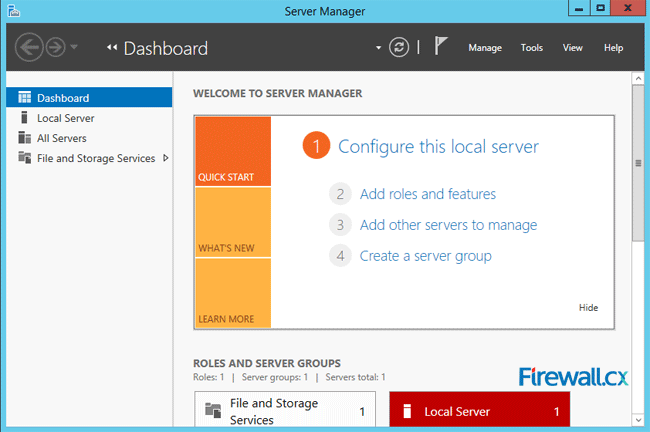
Figure 1. Server Manager Dashboard
This opens the Add Roles and Features Wizard, wherein go to Server Selection to select the server on which you want to install the File and Storage Services:
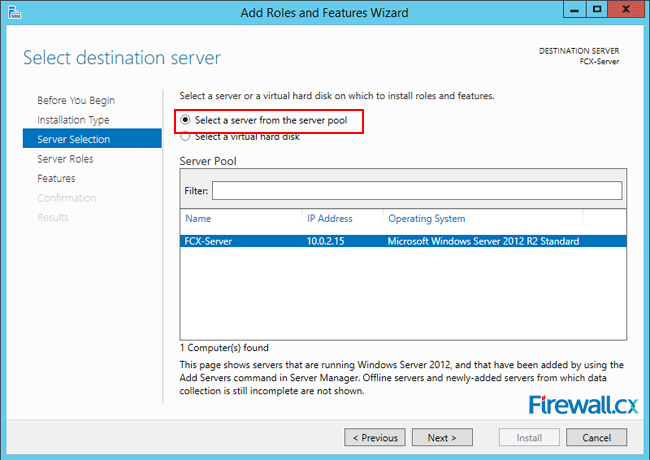
Figure 2. Selecting our Windows 2012 R2 Server from the server pool
Click on Next and select Server Roles. Expand the File and Storage Services and the File and iSCSI Services. Check that tick marks are visible against all the services. Click on those missing the tick marks:
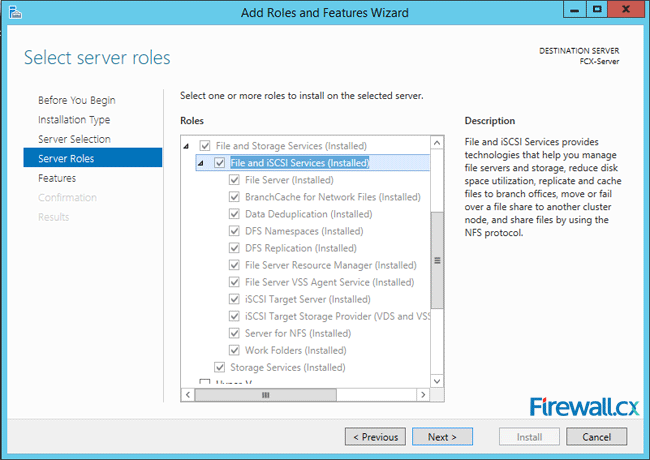
Figure 3. Selecting File & Storage Services, plus iSCSI Services for installation
Click Next four times until you arrive at Confirmation:
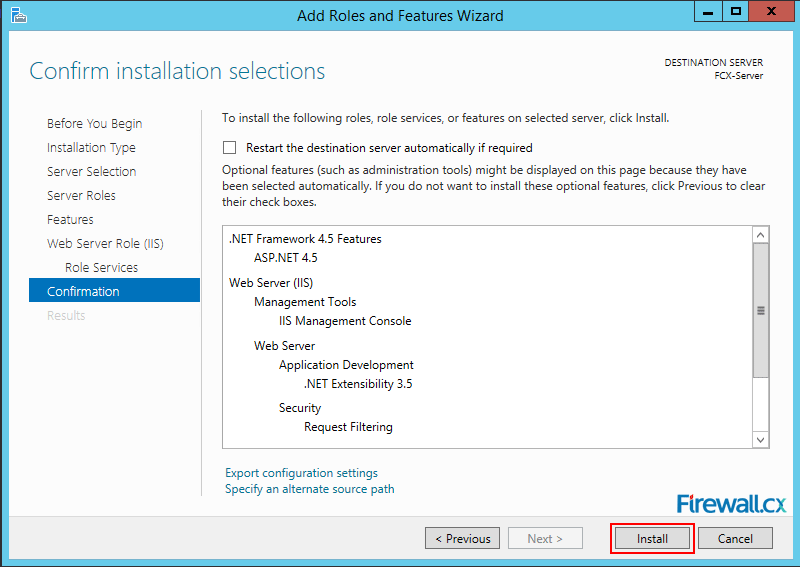
Figure 4. Add roles and Features – Final confirmation Window
Click on Install to enable all the File and Storage Services. Once the server has completed the installation, click on Close.
Enabling The Shadow Copy Feature
After having confirmed that the server has enabled all File and Storage Services, go to the server desktop and open the File Explorer. You can do this by pressing the WINDOWS+E keys together on your keyboard or by clicking on the fourth icon from left on the bottom toolbar on the Windows Server 2012 R2 desktop:

Figure 5. Opening Windows File Explorer
We will enable shadow copy for the volume C:\. Within this volume, we have our folder C:\Users\Chris_Partsenidis_Share for which we would like to ensure shadow copy is enabled:
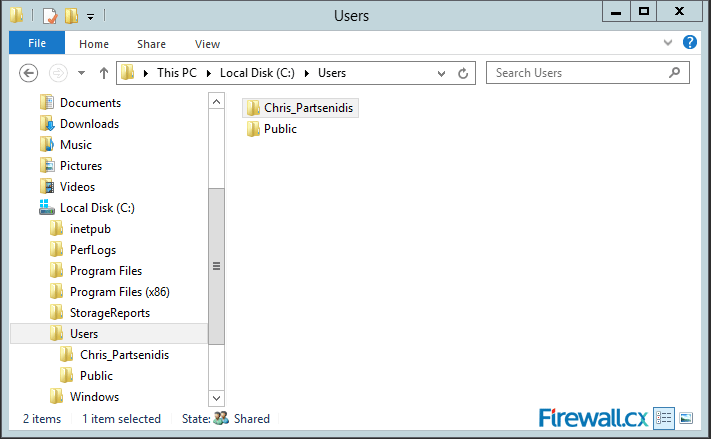
Figure 6. Location of the folder we will be using as a Shadow-Copy example
Right-click on the Local Disk or volume C:\ (Or any other volume depending on your requirements) and select Configure shadow copies from the drop-down menu:
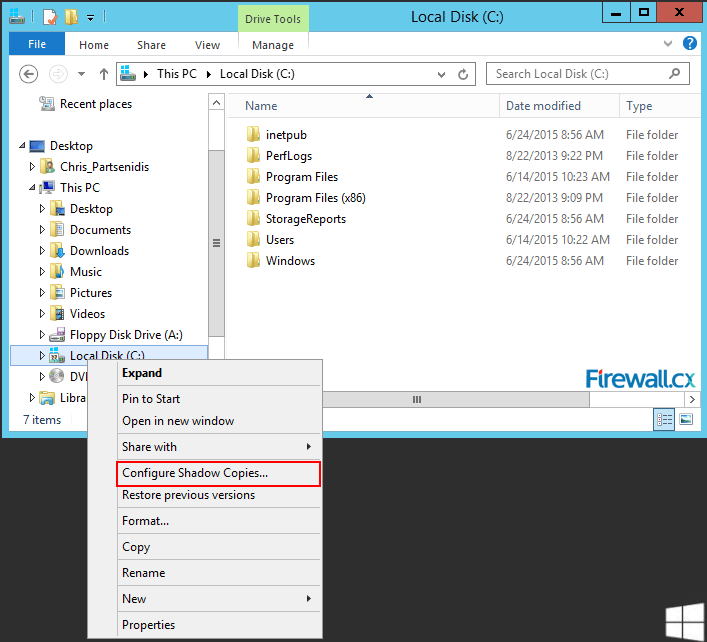
Figure 7. How to enable Shadow Copy for a Windows Volume
When the UAC confirmation dialog box opens, confirm with Yes. This opens the screen for Shadow Copies. Under Select a volume, click to select the volume C:\ from the list or any other volume for which you want to turn on shadow copies. Now, click on Enable.
A confirmation dialog will appear to Enable Shadow Copies along with a warning about file servers with high I/O loads:
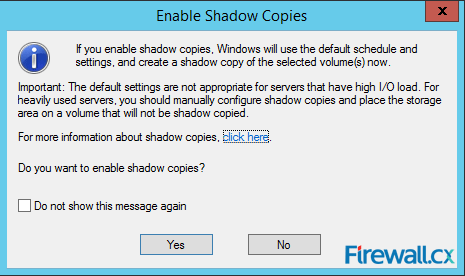
Figure 8. Enable Shadow Copy confirmation window
Click on Yes to complete the process. You will be returned to the Shadow Copies screen and under Shadow copies of the selected volume, you can see the newly created Shadow Copy for volume C:\:
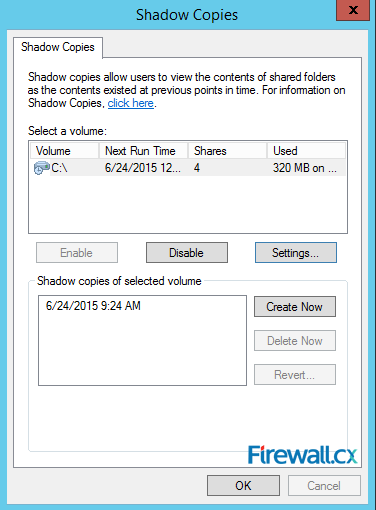
Figure 9. Viewing the status of Shadow Copy for our Volume
Click on Settings to open the Settings dialog. In the Settings dialog, under Maximum size, you can select either No limit for the space reserved or set a limit for it by selecting Use limit. Note that as stated in the dialog box, a minimum limit of 300MB is necessary for the space reserved for shadow copies:
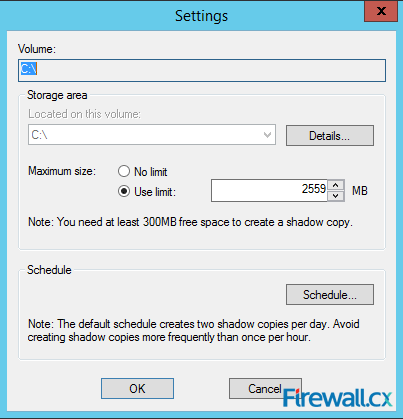
Figure 10. Setting the maximum size to be used by Shadow Copy for our volume
Next, you can either go with the default schedule of two snapshots of shadow copies every day, or define your own by clicking on Schedule to open the Schedule dialog:
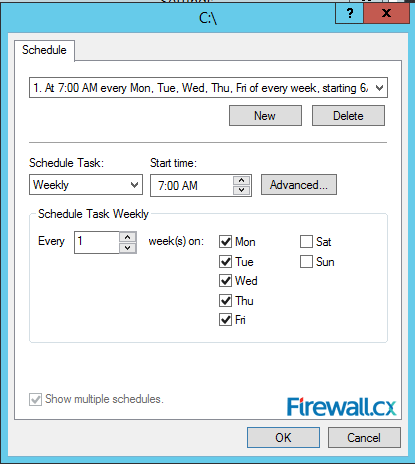
Figure 11. Configuring the Shadow Copy Schedule
In the Schedule dialog, tweak the settings to fit your environment in the best possible way and click on Ok to return to the Shadow Copies dialog.
To create a current snapshot, click on Create Now and under Shadow Copies of Selected Volume, a date and time entry will appear, signifying that the server has created a shadow copy snapshot. Click on Ok to close the dialog.
Accessing Shadow Copies
Users can access the shared volume/folders from either their local server or from a client PC over the network. They can see the previous versions (shadow copies) of their folders and files from the Properties of the shared folder or file.
Go to File explorer and click on a shared volume - volume C:\ in our case. Select the shared folder within the shared volume – which, in our example, is C:\Users\Chris_Partsenidis. Right-click on the shared folder and go to Restore previous versions:
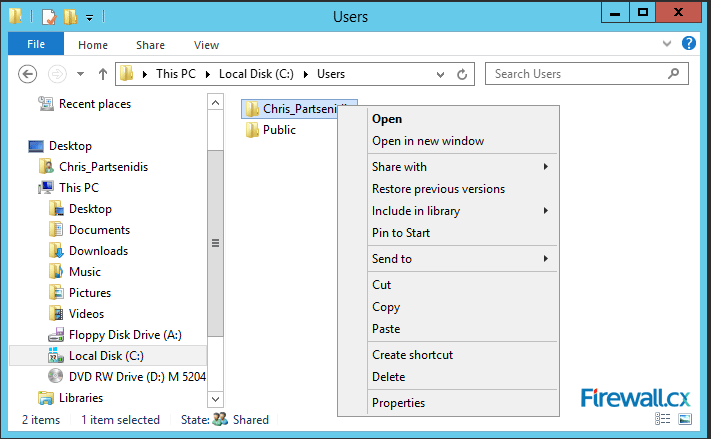
Figure 12. Viewing the Shadow Copy status of our shared folder
This opens the Properties dialog for the share folder - C:\Users\Chris_Partsenidis. The list under Folder versions has all the shadow copies created for the share folder – C:\Users\Chris_Partsenidis. From this list, you can select a specific previous version (shadow copy) and choose to Open, Copy or Restore it.
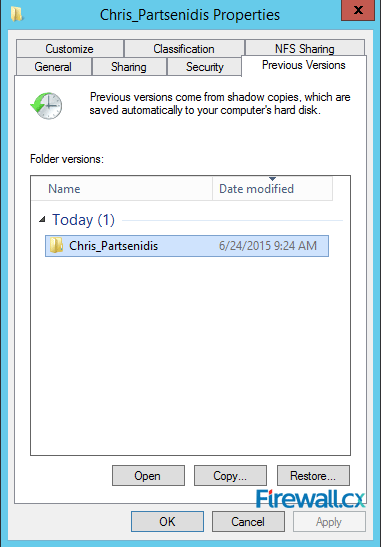
Figure 13. Accessing previous versions of our shared folder
After you have completed your work, click on Ok or Cancel to exit the dialog box.
This article explained the purpose Windows Shadow Copy services, how to enable and configure Shadow Copy for a Windows Volume. We also saw how administrators and users can access previous versions of folders/files that are located in a shadow-copy enabled volume.
Wi-Fi Key Generator
Follow Firewall.cx
Cisco Password Crack
Decrypt Cisco Type-7 Passwords on the fly!


