


DNS is used for translating host names to IP addresses and the reverse, for both private and public networks (i.e.: the Internet). DNS does this by using records stored in its database. On the Internet DNS mainly stores records for public domain names and servers whereas in private networks it may store records for client computers, network servers and data pertaining to Active Directory.
In this article, we will install and configure DNS on a standalone Windows Server 2003. We will begin by setting up a cache-only DNS server and progress to creating a primary forward lookup zone, a reverse lookup zone, and finally some resource records. At the end of this article we will have set up a DNS server capable of resolving internal and external host names to IP addresses and the reverse.
Install DNS on Windows Server 2003
Before installing and configuring DNS on our server we have to perform some preliminary tasks. Specifically, we have to configure the server with a static IP address and a DNS suffix. The suffix will be used to fully-qualify the server name. To begin:
1. Go to Start > Control Panel > Network Connections , right-click Local Area Connection and choose Properties .
2. When the Local Area Connection Properties window comes up, select Internet Protocol (TCP/IP) and click Properties . When the Internet Protocol (TCP/IP) window comes up, enter an IP address , subnet mask and default gateway IP addresses that are all compatible with your LAN.
Our LAN is on a 192.168.1.0/24 network, so our settings are as follows:
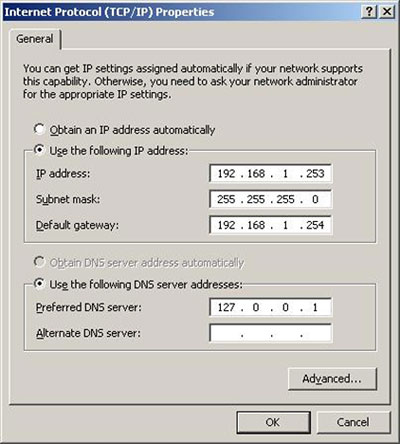
3. For the Preferred DNS Server , enter the loopback address 127.0.0.1 . This tells the server to use its own DNS server service for name resolution, rather than using a separate server. After filling out those fields , click the Advanced button.
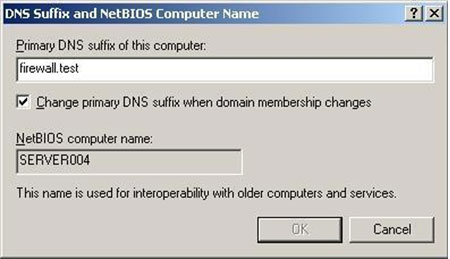
4. When the Advanced TCP/IP Settings window comes up, click the DNS tab, enter firewall.test on the DNS suffix for this connection text field, check Register this connection's address in DNS , check Use this connection's DNS suffix in DNS registration , and click OK , OK , and then Close:
Now that we have configured our server with a static IP address and a DNS suffix, we are ready to install our DNS Server. To do this:
1. Go to Start > Control Panel > Add or Remove Programs .
2. When the Add or Remove Program window launches, click Add/Remove Windows Components on the left pane.
3. When the Windows Components Wizard comes up, scroll down and highlight Networking Services and then click the Details button.
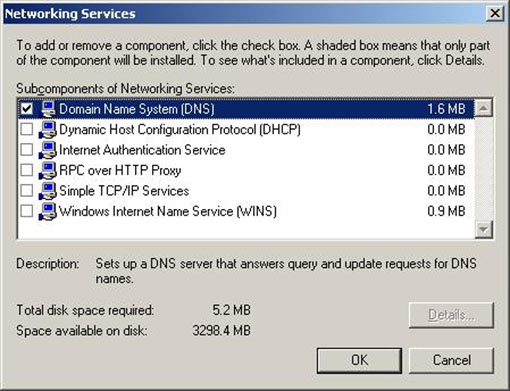
4. When the Networking Services window appears, place a check mark next to Domain Name System (DNS) and click OK and OK again.
Note that, during the install, Windows may generate an error claiming that it could not find a file needed for DNS installation. If this happens, insert your Windows Server 2003 CD into the server's CD-ROM drive and browse to the i386 directory. The wizard should automatically find the file and allow you to select it. After that, the wizard should resume the install.
After this, DNS should be successfully installed. To launch the DNS MMC, go to Start > Administrative Tools > DNS
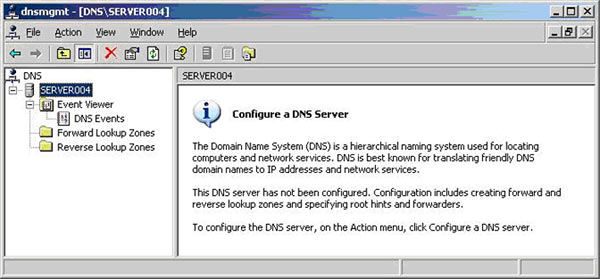
As our DNS server was just installed it is not populated with anything. On the left pane of the DNS MMC, there is a server node with three nodes below it, titled Forward Lookup Zones, Reverse Lookup Zones and Event Viewer.
The Forward Lookup Zones node stores zones that are used to map host names to IP addresses, whereas the Reverse Lookup Zones node stores zones that are used to map IP addresses to host names.
Setting Up a Cache-Only DNS Server
A cache-only DNS server contains no zones or resource records. Its only function is to cache answers to queries that it processes, that way if the server receives the same query again later, rather than go through the recursion process again to answer the query, the cache-only DNS server would just return the cached response, thereby saving time. With that said, our newly installed DNS server is already a cache-only DNS server!
Creating a Primary Forward Lookup Zone
With its limited functionality, a cache-only DNS server is best suited for a small office environment or a small remote branch office. However, in a large enterprise where Active Directory is typically deployed, more features would be needed from a DNS server, such as the ability to store records for computers, servers and Active Directory. The DNS server stores those records in a database, or a zone .
DNS has a few different types of zones, and each has a different function. We will first create a primary forward lookup zone titled firewall.test . We do not want to name it firewall.cx , or any variation that uses a valid top-level domain name, as this would potentially disrupt the clients' abilities to access the real websites for those domains.
1. On the DNS MMC, right-click the Forward Lookup Zones node and choose New Zone .
2. When the New Zone Wizard comes up, click Next .
3. On the Zone Type screen, make sure that Primary zone is selected and click Next .
4. On the Zone Name screen, type firewall.test .
5. On the Zone File screen, click Next .
6. On the Dynamic Update screen, make sure that “ Do not allow dynamic updates ” is selected and click Next .
7. On the next screen, click Finish .
We now have a foundation that we can place resource records in for name resolution by internal clients.
Creating a Primary Reverse Lookup Zone
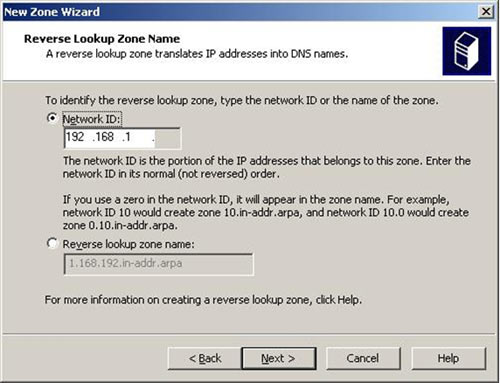
Contrary to the forward lookup zone, a reverse lookup zone is used by the DNS server to resolve IP addresses to host names. Not as frequently used as forward lookup zones, reverse lookup zones are often used by anti-spam systems in countering spam and by monitoring systems when logging events or issues. To create a reverse lookup zone:
1. On the DNS MMC, right-click the Reverse Lookup Zones node and choose New Zone .
2. When the New Zone Wizard comes up, click Next .
3. On the Zone Type screen, make sure that Primary zone is selected and click Next .
4. On the Reverse Lookup Zone Name screen, enter 192.168.1 and click Next .
5. On the Zone File screen, click Next .
6. On the Dynamic Update screen, make sure that “Do not allow dynamic updates” is selected and click Next .
7. On the next screen, click Finish .
There is now a reverse lookup zone titled 192.168.1.x Subnet on the left pane of the DNS MMC. This will be used to store PTR records for computers and servers in those subnets.
Using the instructions above, go ahead and create two additional reverse lookup zones, one for a 192.168.2.x subnet and for a 192.168.3.x subnet.
Creating Resource Records
DNS uses resource records (RRs) to tie host names to IP addresses and the reverse. There are different types of resource records, and the DNS server will respond with the record that is requested in a query.
The most common resource records are: Host (A); Mail Exchanger (MX); Alias (CNAME); and Service Location (SRV) for Active Directory zones. As such, we will create all but SRV records because Active Directory will create those automatically:
1. On the DNS MMC, expand the Forward Lookup Zones node followed by the firewall.test zone.
2. Right-click firewall.test zone and choose Other New Records .
3. On the Resource Record Type window, select Host (A) and click Create Record
4. On the New Resource Record window, type “ webserver001 ” on the Host text field, type “ 192.168.2.200” in the IP address text field, check the box next to “Create associated pointer (PTR) record” and click OK .
This tells DNS to create a PTR record in the appropriate reverse lookup zone. And, for demonstration purposes, it does not matter whether this server actually exists or not.
5. Back at the Resource Record Type window, select Host (A) again and click Create Record .
6. On the New Resource Record window, type “ mailserver001 ” on the Host text field and type “ 192.168.3.200” in the IP address text field. Make sure that the check box next to “Create associated pointer (PTR) record” is checked and click OK . A corresponding PTR record will be created in the appropriate reverse lookup zone.
7. Back at the Resource Record Type window, select Alias (CNAME) and click Create Record .
8. On the New Resource Record window, type “ www ” on the Alias name text field, then click Browse .
9. On the Browse window, double-click the server name, then double-click Forward Lookup Zones, then double-click firewall.test , and finally double-click webserver001 . This should populate the webserver001's fully qualified domain name in the Fully qualified domain name (FQDN) for target host text field. Click OK afterwards.
10. Back at the Resource Record Type window, select Mail Exchanger (MX) and click Create Record .
11. On the New Resource Record window, click Browse , double-click the server name, then double-click Forward Lookup Zones, then double-click firewall.test, and finally double-click mailserver001 . This should populate the mailserver001's fully qualified domain name in the Fully qualified domain name (FQDN) of mail server text field. Click OK afterwards.
12. Back at the Resource Record Type window, click Done .
Summary
Our standalone Windows Server 2003 DNS server now has a primary forward lookup zone, a primary reverse lookup zone, and multiple resource records. As a standard function, it will also cache the answers to queries that it has already resolved.
Cybersecurity Framework Update

Enterprise-Class Cloud & Network Monitoring

Bandwidth Monitor

Wi-Fi Key Generator
Network and Server Monitoring

Follow Firewall.cx
Recommended Downloads
Cisco Password Crack
Decrypt Cisco Type-7 Passwords on the fly!
Free PatchManager

Firewall Analyzer
