


In this article, we will cover more advanced DHCP features and topics such as server options, superscopes, multicast scopes, dynamic DNS, DHCP database backup and restoration, DHCP migration, and DHCP troubleshooting. We will cover these topics in two ways: by building out from our earlier implementation and by using our imagination!
Ok, using our imagination for this purpose may seem silly but doing so will give us the opportunity to indirectly learn how, why, and where these advanced DHCP features and topics come into play in a real-world network and how other networking technologies are involved in a DHCP implementation.
We will imagine that we are building our DHCP server for a company that has two buildings, Building A and Building B, each with a single floor (for now). Building A is on a 192.168.0.0/24 network and Building B is on a 192.168.1.0/24 network.
Although each building has its own DNS server (192.168.0.252 and 192.168.1.252), WINS server (192.168.0.251 and 192.168.1.251) and Cisco Catalyst 4507R-E switch (192.168.0.254 and 192.168.1.254), only a single DHCP server exists – it is the one that we have been building and it resides in Building A.
The clients and servers in each building connect to their respective Cisco Catalyst switches and the switches are uplinked to a Cisco router for Internet connectivity. The only notable configuration is with the Building B switch: It is configured with the ip helper-address 192.168.0.253 command.
The ip helper-address command tells the switch to forward DHCP requests in the local subnet to the DHCP server, since the clients in Building B cannot initially communicate with the DHCP server directly. We are not concerned with any other configuration or networking technologies for now.
Server Options
The specifications of our imaginary company state that the company has two buildings – Building A and Building B. In our first article, we created a scope called “Building A, Floor 1” so a scope for our first building is already made. In this article, we will create a scope for Building B, Floor 1, using the instructions from our Basic DHCP Configuration article and the following specifications for the scope:
After creating the scope, we want to activate it as well.
Notice that, in creating this scope, we had to input a lot of the same information from our “Building A, Floor 1” scope. In the event that we had several other scopes to create, we would surely not want to be inputting the same information each time for each scope.
That is where server options are useful. Server options allow you to specify options that all the scopes have in common. In creating two scopes, we noticed that our scopes had the following in common:
- DNS servers
- WINS servers
- Domain name
To avoid having to enter this information again, we will create these options as server options. To do this:
1. On the DHCP MMC, right-click Server Options and choose Configure Options
When the Server Options window comes up, take a moment to scroll down through the long list of available options. Not all options are needed or used in every environment. In some cases, however, a needed option is not available. For example, Cisco IP phones require Option 150 but because that option is not available it would have to be defined manually. Other than that, options 006 DNS Servers, 015 DNS Domain, and 003 Router are generally sufficient.
2. Scroll down to option 006 DNS Servers and place a checkmark in its box. This will activate the Data Entry section. In that section, type 192.168.0.252 for the IP Address and click Add. Then enter 192.168.1.252 as another IP Address and click Add again. This will add those two servers as DNS servers.
3. Scroll down to option 015 DNS Domain Name and place a checkmark in its box. This will activate the Data Entry section. In that section, enter firewall.cx in the String Value text field.
4. Scroll down to option 044 WINS/NBNS Servers and place a checkmark in its box. This will activate the Data Entry section. In that section, enter 192.168.0.251 for the IP Address and click Add. Then enter 192.168.1.251 as another IP Address and click Add again. This will add those two servers as WINS servers.
5. Scroll down to option 046 WINS/NBT Node Type and place a checkmark in its box to activate the Data Entry section. In that section, enter “0x8” for the Byte text field and click OK . This will set the workstation node type to 'Hybrid' which is preffered.
Back on the DHCP MMC, if you click on the Server Options node you will see the following:
Subsequent scopes will inherit these options if no scope options are specified. However, if scope options are specified then the scope options would override the server options in assignment.
If we did have Cisco IP phones in our environment we would define Option 150 as follows:
1. Right-click the server node on the DHCP MMC and choose Set Predefined Options
2. When the Predefined Options and Values window comes up, click Add
3. When the Options Type window comes up, type a name for the option such as “TFTP Server for Cisco IP Phones”.
4. On the Data Type drop-down menu, select IP Address.
5. On the Code text field, enter 150.
6. On the Description text field, type a description for the scope, such as “Used by Cisco IP Phones”.
7. Check the box next to Array
8. Click OK twice.
If you go back to the Scope/Server Options window again, you will see Option 150 available.

Dynamic DNS
At this point, our imaginary network can service a significant number of clients, but those clients can only be referenced by IP address. Sometimes it is necessary or helpful to reference clients by their host names rather than IP addresses.
DNS resolves client host names to IP addresses. But for DNS to be able to do that, client host names and IP addresses must already be registered in DNS. Servers are typically registered manually in DNS by the administrator, but workstations are not. So how do client workstations get registered in DNS? The answer is to use dynamic DNS (DDNS), a feature that will allow clients, or the DHCP server itself, to register clients in DNS automatically upon the client's assignment of an IP address. Fortunately, DDNS is setup to automatically work in a domain environment, granted that DNS is also setup correctly in the network.
To view the options available for DDNS:
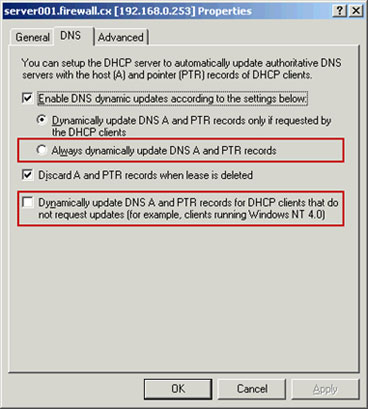
- On the DHCP MMC, right-click the server node and choose Properties
- When the Properties window comes up, click the DNS tab.
If the network has some clients that are not in the domain, have legacy Windows operating systems, or are not capable of registering their host names and IP addresses in DNS, the two options marked below would need to be selected:
But if that were the case, you would also have to specify credentials that the DHCP server would use for DDNS on behalf of the clients. To do this, you would:
- Click the Advanced tab on the Properties window.
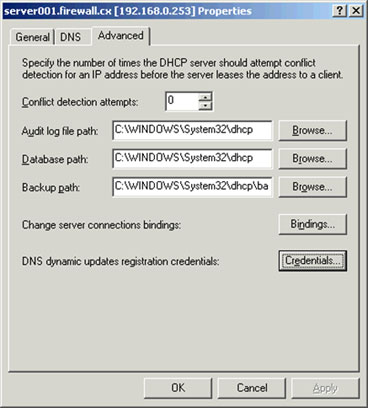
1.Click the Credentials button.
2. When the DNS Dynamic Update Credentials window comes up, enter an administrator username and password and firewall for the domain. In a real-world environment, you would create a separate username and password that would be used solely for DDNS and enter it here instead.
3. Click OK twice to exit the Properties window.
Superscopes
Let us imagine that the number of client workstations in Floor 1 of Building A was expanded beyond the number of available IP addresses that our “Building A, Floor 1” scope could offer. What would we do to provide IP addresses to those additional clients?
The following options may appear to be solutions, but they are not always feasible:
- Extend the scope to include more IP addresses.
- Create an additional scope for that network segment.
- Delete and recreate the scope with a different subnetmask that allows for more hosts.
The problem with the first option is that you may not always be able to extend the scope, depending on the scope's subnetmask and whether consecutive scopes were created based on that subnetting. The problem with the second option is that even if you create an additional scope, the DHCP server would not automatically lease out those IP addresses to clients of that physical network segment. Although the third option could work, this option may not always be optimal depending on how much additional network-based changes would also be needed to reach the solution.
There are a few options to solve this issue:
- Place the additional clients in a separate VLAN and create a scope for that VLAN that is in a completely different network
- Create a superscope that includes the exhausted scope and a new scope with available IP addresses
The first option could solve the problem but, since this is a DHCP article, we will address the problem by using DHCP features, so the second option will be our choice!
Superscopes allow you to join scopes from separate networks into one scope. Then, when one of the scopes runs out of IP addresses, the DHCP server would automatically start leasing out IP addresses from the other scopes in that superscope. However, solely creating a superscope is not the complete solution. As some clients in that network segment would have IP addresses from a different network, the segment's router interface would also have to be assigned an additional IP address that is in the same network as the additional scope.
To use this solution, we first have to create the additional scope. Here are the scope specifications:
The scope will inherit the server options for DNS domain name, DNS server and WINS server. Activate the scope when done.
Now we will create a superscope and place the two Building A scopes in it:
- On the DHCP MMC, right-click the server node and choose New Superscope
- When the New Superscope Wizard comes up, click Next
- On the next screen, you are prompted to enter a name for the scope. Enter “All of Building A, Floor 1” and click Next
- On the next screen, you are asked to select the scopes that will be part of the superscope. Select the scopes shown below and then click Next
5. On the next screen, click Finish to complete the wizard.
Back on the DHCP MCC, you will see that the two scopes selected earlier have been placed under a new scope – “Superscope All of Building A, Floor 1”.

Now when the scope titled “Building A, Floor 1” runs out of IP addresses, the server will start issuing IP addresses in “Building A, Floor 1 – Extended”.
Multicast Scopes
The most common systems and applications that use multicasting have multicast IP addresses statically configured or hard-coded in some way. However, for systems and applications that need multicast IP addresses dynamically assigned, they lease them from a MADCAP (Multicast Address Dynamic Client Allocation Protocol) server, such as Windows Server 2003.
One example of such an application that leased a multicast IP address from a MADCAP server is an old application from Windows 2000 called Phone Dialer. This application allowed the creation of video conferences that people could attend. When creating a conference, the application would lease a multicast IP address from the MADCAP server and stream to that IP address. Clients wishing to join the conference would “join” that established multicast group.
Setting up a multicast scope is similar to setting up a standard scope:
- On the DHCP MMC, right-click the server node and choose New Multicast Scope
- When the New Multicast Scope Wizard comes up, click Next
- On the next screen, specify a Scope Name of “Video Conferencing” and a Scope Description of “Multicast scope for conference presenters.” Afterwards, click Next
4. On the next screen, enter 239.192.1.0 in the Start IP Address field and 239.192.1.255 in the End IP Address field. Since this scope will only service video conferences within the company, we define an IP address range in the multicast organization local scope range. Leave the TTL at 32. Click Next when done.
- On the next screen, click Next again. No exclusions need to be defined.
- On the next screen, set the Days to 1 and click Next
- On the next screen, click Next to activate the scope.
- On the next screen, click Finish
- Back on the DHCP MMC, expand the multicast scope that we just created and select Address Pool . Notice that an exclusion range encompassing the entire pool is also created. Select it and delete it.
The DHCP server can now provide multicast IP addresses. For the most part, the multicast scope functions the same as a standard scope. One different feature is that you can set a multicast scope to automatically expire and delete itself at a certain time.
To configure this:
- Right-click the multicast scope and choose Properties
- When the Properties window comes up, click the Lifetime tab.
- On the Lifetime tab, select “Multicast scope expires on” and select when you would like it to expire. When this date and time is reached, the server automatically deletes the scope.
Conclusion
The Advanced DHCP configuration article continues with part 2, covering the DHCP database backup and restoration, troubleshooting the DHCP service using audit logs and finally DHCP Migration.
To continue with our article, please click here: Windows 2003 Advanced DHCP Server Configuration - Part 2.
Free eBook - Endpoint Security

Enterprise-Class Cloud & Network Monitoring

Bandwidth Monitor

Wi-Fi Key Generator
Network and Server Monitoring

Follow Firewall.cx
Recommended Downloads
Cisco Password Crack
Decrypt Cisco Type-7 Passwords on the fly!
Automated Patching Solution

Firewall Analyzer
