


In a Windows server environment, it is very important that only authenticated users are allowed to log in for security reasons. To fulfill this requirement the creation of User accounts and Groups is essential.
User Accounts
In Windows Server 2003 computers there are two types of user accounts. These types are local and domain user accounts. The local user accounts are the single user accounts that are locally created on a Windows Server 2003 computer to allow a user to log on to a local computer. The local user accounts are stored in Security Accounts Manager (SAM) database locally on the hard disk. The local user accounts allow you to access local resources on a computer
On the other hand the domain user accounts are created on domain controllers and are saved in Active Directory. These accounts allow to you access resources anywhere on the network. On a Windows Server 2003 computer, which is a member of a domain, you need a local user account to log in locally on the computer and a domain user account to log in to the domain. Although you can have a same login and password for both the accounts, they are still entirely different account types.
You become a local administrator on your computer automatically because local computer account is created when a server is created. A domain administrator can be local administrator on all the member computers of the domain because by default the domain administrators are added to the local administrators group of the computers that belong to the domain.
This article discusses about creating local as well as domain user accounts, creating groups and then adding members to groups.
Creating a Local User Account
To create a local user account, you need to:
1. Log on as Administrator, or as a user of local administrator group or Account Operators local group in the domain.
2. Open Administrative Tools in the Control Panel and then click Computer Management, as shown in Figure 1.
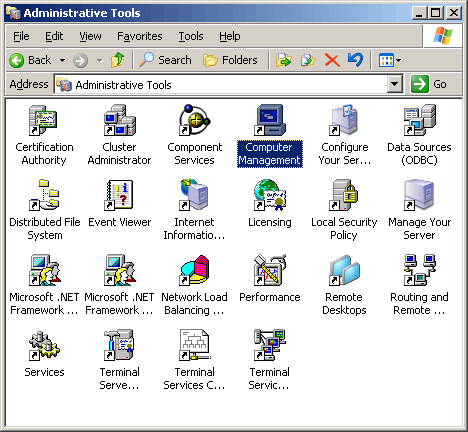
Figure 1
3. Click Users folder under Local Users and Groups node, as shown in Figure 2.
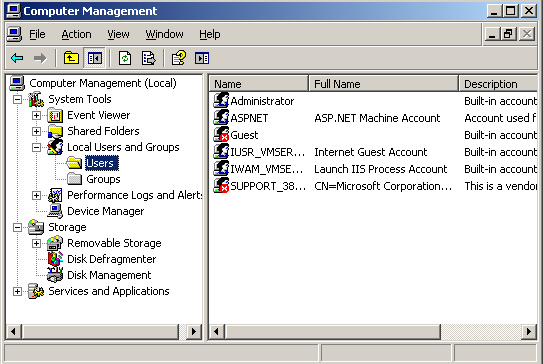
Figure 2
4. Right-click Users and then click New User in the menu that appears, as shown in Figure 3:
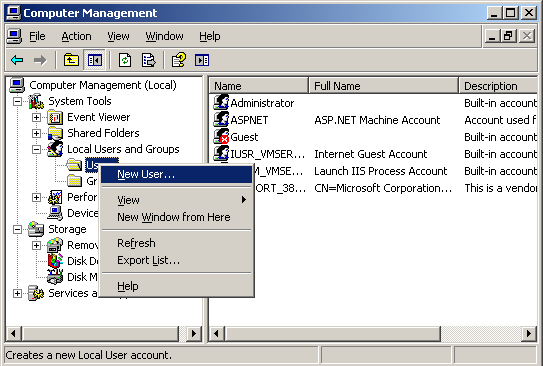
Figure 3
The New User dialog box appears as shown below in Figure 4.
5. Provide the User name and the Password for the user in their respective fields.
6. Select the desired password settings requirement.
Select User must change password at next logon option if you want the user to change the password when the user first logs into computer. Select User cannot change password option if you do not want the user to change the password. Select Password never expires option if you do not want the password to become obsolete after a number of days. Select Account is disabled to disable this user account.
7. Click Create , and then click Close:
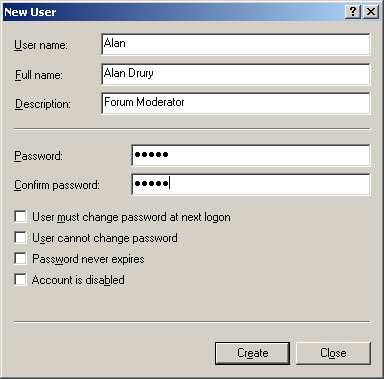
Figure 4
The user account will appear on clicking Users node under Local Users and Groups on the right panel of the window.
You can now associate the user to a group. To associate the user to a group, you need to:
8. Click Users folder under Local Users and Groups node.
9. Right-click the user and then select Properties from the menu that appears, as shown in Figure 5:
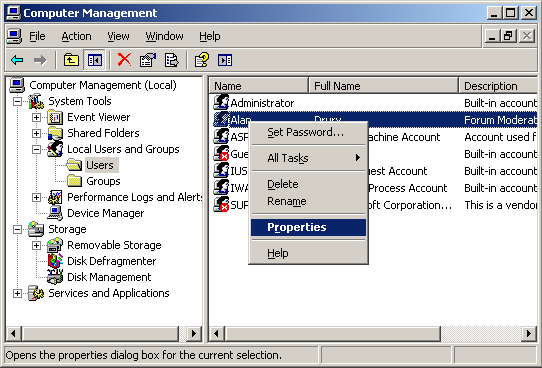
Figure 5
The Properties dialog box of the user account appears, as shown in Figure 6:
10. Click Member of tab.
The group(s) with which the user is currently associated appears.
11. Click Add.
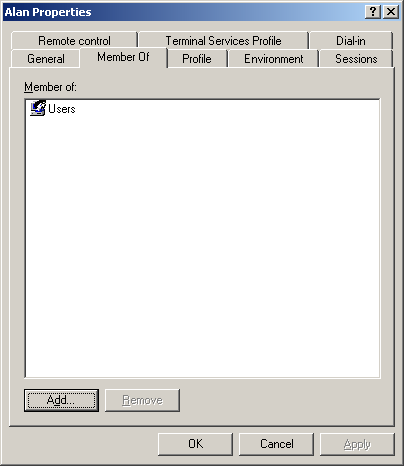
Figure 6
The Select Groups dialog box appears, as shown in Figure 7.
12. Select the name of the group/object that you want the user to associate with from the Enter the object names to select field.
If the group/object names do not appear, you can click Advanced button to find them. Also if you want to choose different locations from the network or choose check the users available, then click Locations or Check Names buttons.
13. Click OK .
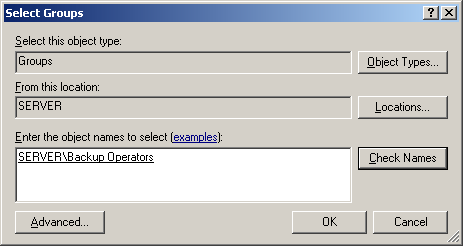
Figure 7
The selected group will be associated with the user and will appear in the Properties window of the user, as shown in Figure 8:
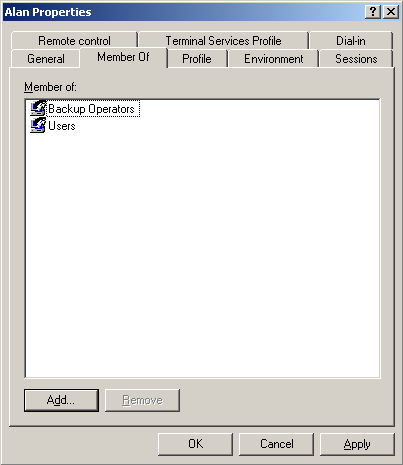
Figure 8
Creating a Domain User Account
The process of creating a domain user account is more or less similar to the process of creating a local user account. The only difference is a few different options in the same type of screens and a few steps more in between.
For example you need Active Directory Users and Computers MMC (Microsoft Management Console) to create domain account users instead of Local Users and Computers MMC. Also when you create a user in domain then a domain is associated with the user by default. However, you can change the domain if you want.
Besides all this, although, a domain user account can be created in the Users container, it is always better to create it in the desired Organization Unit (OU).
To create a domain user account follow the steps given below:
1. Log on as Administrator and open Active Directory Users and Computers MMC from the Administrative Tools in Control Panel, as shown in Figure 9.
2. Expand the OU in which you want to create a user, right-click the OU and select New->User from the menu that appears.
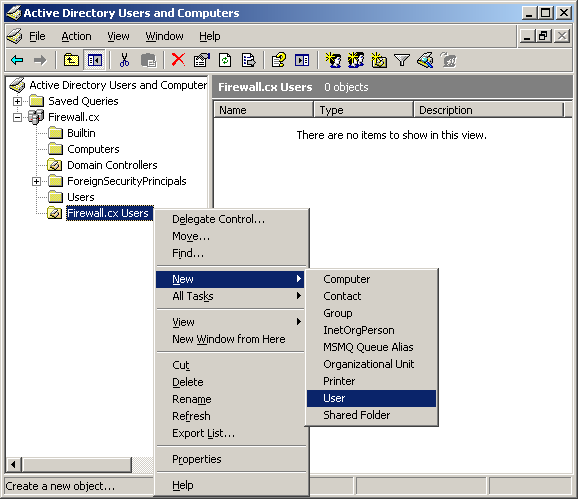
Figure 9
3. Alternatively, you can click on Action menu and select New->User from the menu that appears.
The New Object –User dialog box appears, as shown in Figure 10.
4. Provide the First name, Last name, and Full name in their respective fields.
5. Provide a unique logon name in User logon name field and then select a domain from the dropdown next to User logon name field if you want to change the domain name.
The domain and the user name that you have provided will appear in the User logon name (pre-Windows 2000) fields to ensure that user is allowed to log on to domain computers that are using earlier versions of Windows such as Windows NT.
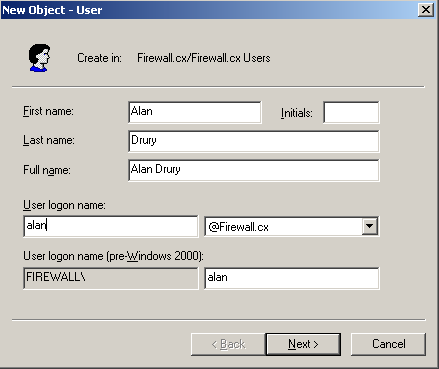
Figure 10
6. Click Next.
The second screen of New Object –User dialog box appears similar to Figure 4.
7. Provide the User name and the Password in their respective fields.
8. Select the desired password settings requirement:
Select User must change password at next logon option if you want the user to change the password when the user first logs into computer. Select User cannot change password option if you do not want the user to change the password. Select Password never expires option if you do not want the password to become obsolete after a number of days. Select Account is disabled to disable this user account.
9. Click Next.
10. Verify the user details that you had provided and click Finish on the third screen of New Object –User dialog box.
11. Follow the steps 9-13 mentioned in Creating a Local User Account section to associate a user to a group.
Creating Groups
Just like user accounts, the groups on a Windows Server 2003 are also of two types, the built in local groups and built in domain groups. The example of certain built in domain groups are: Account Operators, Administrators, Backup Operators, Network Configuration Operators, Performance Monitor Users, and Users. Similarly certain built in local groups are: Administrators, Users, Guests, and Backup operators.
The built-in groups are created automatically when the operating system is installed and become a part of a domain. However, sometimes you need to create your own groups to meet your business requirements. The custom groups allow you limit the access of resources on a network to users as per your business requirements. To create custom groups in domain, you need to:
1. Log on as Administrator and open Active Directory Users and Computers MMC from the Administrative Tools in Control Panel, as shown in Figure 9.
2. Right-click the OU and select New->Group from the menu that appears.
The New Object –Group dialog box appears, as shown in Figure 10.
3. Provide the name of the group in the Group name field.
The group name that you have provided will appear in the Group name (pre-Windows 2000) field to ensure that group is functional on domain computers that are using earlier versions of Windows such as Windows NT.
4. Select the desired group scope of the group from the Group scope options.
If the Domain Local Scope is selected the members can come from any domain but the members can access resources only from the local domain.
If Global scope is selected then members can come only from local domain but can access resources in any domain.
If Universal scope is selected then members can come from any domain and members can access resources from any domain.
5. Select the group type from the Group Type options.
The group type can be Security or Distribution . The Security groups are only used to assign and gain permissions to access resources and Distribution groups are used for no-security related tasks such as sending emails to all the group members.
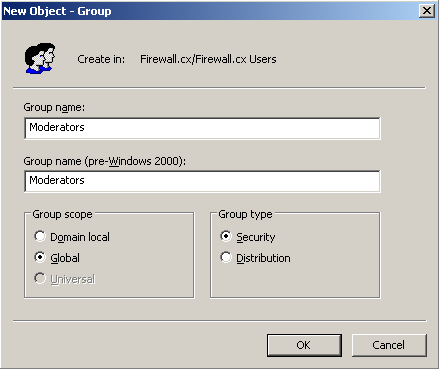
Figure 11
6. Click OK.
You can add members to group just as you add groups to members. Just right-click the group in Active Directory Users and Computers node in the Active Directory Users and Computers snap-in, select Properties, click Members tab from the Properties window of the group and then follow the steps from 11-13 from Creating Local User Accounts section.
Article Summary
Dealing with User & Group accounts in a Windows Server environment is a very important everyday task for any Administrator. This article covered basic administration of user and group accounts at both local and domain environments.
Free eBook - Endpoint Security

Enterprise-Class Cloud & Network Monitoring

Bandwidth Monitor

Wi-Fi Key Generator
Network and Server Monitoring

Follow Firewall.cx
Recommended Downloads
Cisco Password Crack
Decrypt Cisco Type-7 Passwords on the fly!
Automated Patching Solution

Firewall Analyzer
