How To Configure Windows VPDN (PPTP) Dialup Connection
Setting up a Windows VPDN connection is a required task in order to connect to a remote network. In previous articles we covered the set up of a VPDN - PPTP server on a Cisco router. Click here to find out how to setup a PPTP (VPDN) server on a Cisco router. This service can be offered by a Windows 2000/2003/2008 server as well.
Configuring Windows XP Client for VPDN
The great thing about VPDN/PPTP is that it is natively supported by most Windows operating systems. This means you're not required to install additional drivers or programs to get it working.
In order to connect to the VPDN, we need to create a VPDN dialup and modify a few parameters. So, without further delay, here are the steps required:
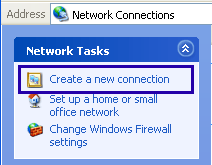
Firstly go to Control Panel --> Network Connections. From there, select Create a new connection:
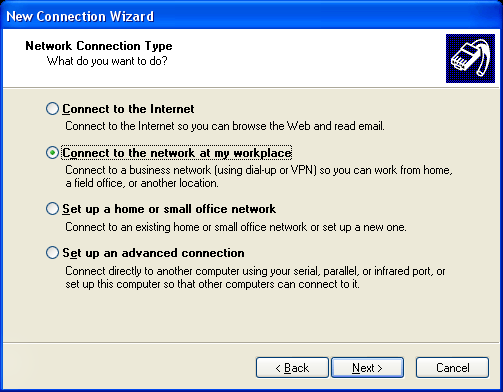
Next, select the Connect to the network at my workplace to create the VPDN connection:
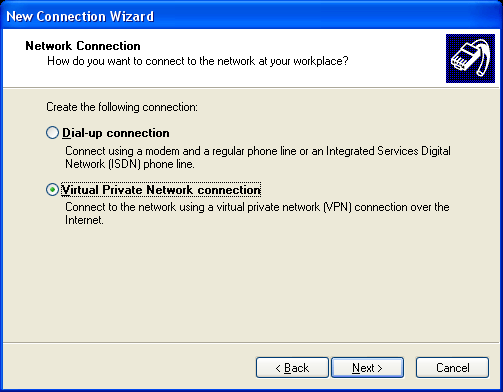
Next step, select the Virtual Private Network connection:
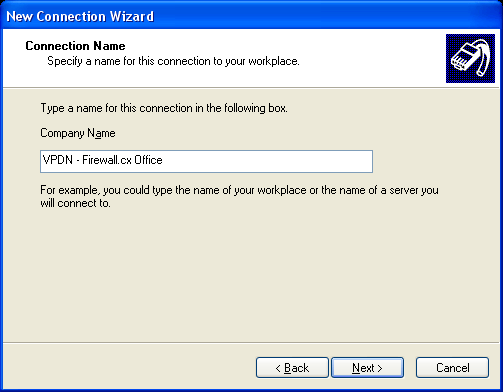
On the next step, you'll need to provide a description for the new VPDN connection:
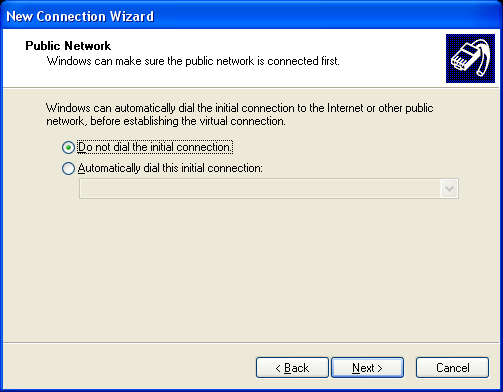
Assuming you're directly connected to the Internet via LAN or wireless, you won't need to initiate a dialup:
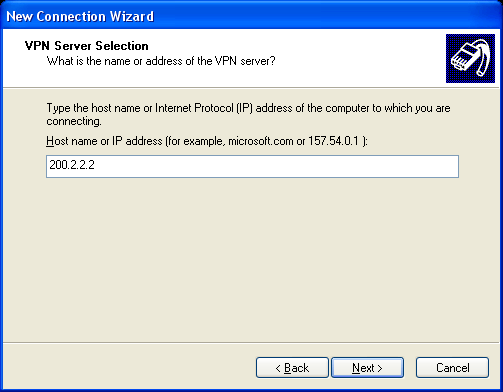
Next, we insert the router's public IP address to which the VPDN will terminate:
Last step, simply click on finish to save the new connection:

Double-clicking on the connection will open up the connection dialogue, here you'll need to enter the credentials of the username/password you previously created on the router. However you need to be aware that once connected, all traffic, including Internet traffic, will be directed through the VPDN connection. This effectively means that it's most likely you won't be able to browse the Internet because all traffic will be sent to the router on the other end, which will most probably drop the traffic.

In order to overcome this problem, you'll need to 'un-check' a specific option under the VPDN's TCP/IP settings. From the connection dialogue, click on Properties, go to the Networking tab and from there double-click on the TCP/IP protocol. Next, click on the Advanced button on the lower right corner and you'll be presented with the window below:
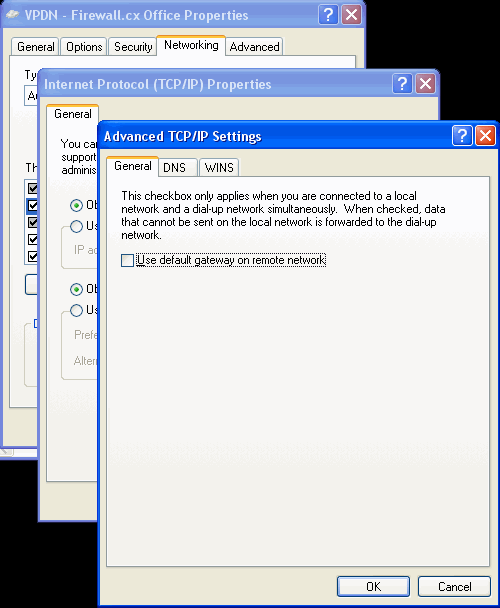
All you need to do here is 'un-check' the Use default Gateway on remote network and click OK on every window to ensure the setting is saved.
What this option does is ensure that only traffic destined to the remote network (192.168.0.0 /24 in our example) traverses the VPN tunnel. All other traffic will be sent through the workstation's default gateway.
This concludes the setup of a VPDN on a Windows based workstation.
Summary
This article showed how to create a VPDN connection to a PPTP server, including how to configure the VPN tunnel to ensure only necessary traffic passes through it. Its application is similar to all Windows-based operating systems.
If you have found the article useful, we would really appreciate you sharing it with others by using the provided services on the top left corner of this article. Sharing our articles takes only a minute of your time and helps Firewall.cx reach more people through such services.
Wi-Fi Key Generator
Follow Firewall.cx
Cisco Password Crack
Decrypt Cisco Type-7 Passwords on the fly!


